Install WordPress on Synology NAS part 3 focuses on the WordPress.org solution. Its use is unlimited, but it is more complex to install. First, we install all packages and files on your NAS. Next, we configure the components to work together and achieve the desired goal.
Update 3 December 2023: this post is based on DSM 7.2 with Web Station 4.2.
Install WordPress on Synology NAS (part 3)
This is part 3 of a four-part series about hosting WordPress on Synology NAS. The four parts each cover a different aspect of the topic.
- Part 1 – introduction to WordPress on your NAS
highlight the different scenarios and necessary preparations - Part 2 – install WordPress from Synology
highlights the installation steps of this setup - Part 3 – install WordPress from WordPress.org (this post)
highlights the installation steps of this setup - Part 4 – WordPress maintenance
backup, second instance, suspend, reset and uninstall, internal DNS setup
Overview
The installation and configuration include several steps that I briefly highlight below. I discuss them in more detail later in this post. This post was made with a Synology NAS running DSM 7.2.
Installation
Instead of using WordPress from Synology, you can install WordPress from a download at WordPress.org. The advantage is that you have complete control over the version of WordPress you use, both from the start and during the lifetime of your website.
Because you do not install the WordPress package from Synology, you manually install the dependencies that WordPress relies on, download and install WordPress, and configure all components. You install most dependencies by using the packages from Package Center.
Note that with Web Station 4.2, which comes with DSM 7.2 and later, you can use Docker packages instead of packages from Package Center. However, this is not in the scope of this post.
These packages will be – as of DSM 7.2 – installed in the order listed:
- Web Station
- MariaDB 10
- PHP 8.0
- Apache HTTP Server 2.4
- phpMyAdmin
- Text Editor
- WordPress (download to a computer and copy files to the NAS)
The phpMyAdmin package relies on PHP 8.0. In this setup, I use the same PHP version for WordPress. However, if you prefer PHP 8.1 or 8.2 for WordPress, please install that package in addition to PHP 8.0.
These version numbers may change later as Synology frequently updates the software.
Configuration
After the initial installation of packages, the configuration is more complex than the WordPress from Synology route. The following list briefly outlines the steps in the configuration process:
- configure Web Station
- change WordPress sample configuration
- create a WordPress database and user
- redirect traffic for a domain name
- install SSL certificate and configure for web portal
- set web folder permissions
- set WordPress folder permissions
- WordPress 5-minutes installation
During the MariaDB 10 installation, you create a password for the database root account in MariaDB. You need the root account to create a WordPress database user later on.
Last, you run the WordPress 5-minute installer. In this step, you provide the site name and create an administrative user account.
Okay, let’s get started.
Install Applications And Files
You will see all the steps involved in this custom setup. It is similar to what Synology envisioned, with several extra steps. The result is a WordPress website with your domain that you access externally from the internet.
If you have reserved a specific volume for WordPress on your NAS, you can install the packages on that volume.
Install Web Station
From the Package Center, install the Web Station package. This package installs the Web Station application in the main menu and creates the shared folders /web and /web_packages and the index.html file.

After the installation, you find the Web Station application in the main menu. We will come back later to configure the website.
The Web Station package turns your NAS into a web server. To check if Web Station works, open a separate window in your browser. In the address bar, type the IP address of your NAS, like 192.168.10.100, or “server_name.local,” like mynas.local.
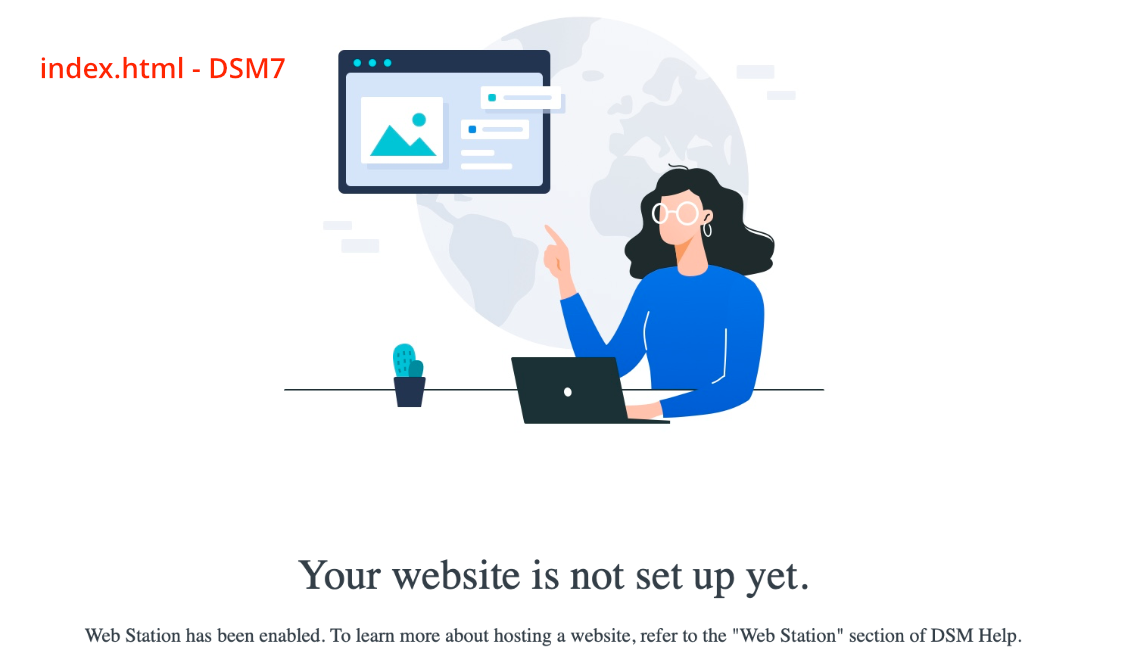
You should see the screen above. This is the index.html file. Now you know that Web Station works. For reference, please look up my Web Station datasheet.
Note
Before you installed Web Station, entering the IP address or server_name.local of your NAS in your browser gave the DSM login screen. The port number (default 5000 or 5001) was added automatically.
You must add it yourself to get the DSM login screen. If you omit the port number, you get the index.html screen from Web Station. As a result, enter IP address:5000 or server_name.local:5000 of your NAS in your browser.
Note that your port number can differ if custom port numbers are configured in Control Panel > Login Portal > DSM tab > Web Services.
For your convenience, I suggest you update the bookmark in your browser to include the correct port number to access the DSM login screen.
Install MariaDB 10
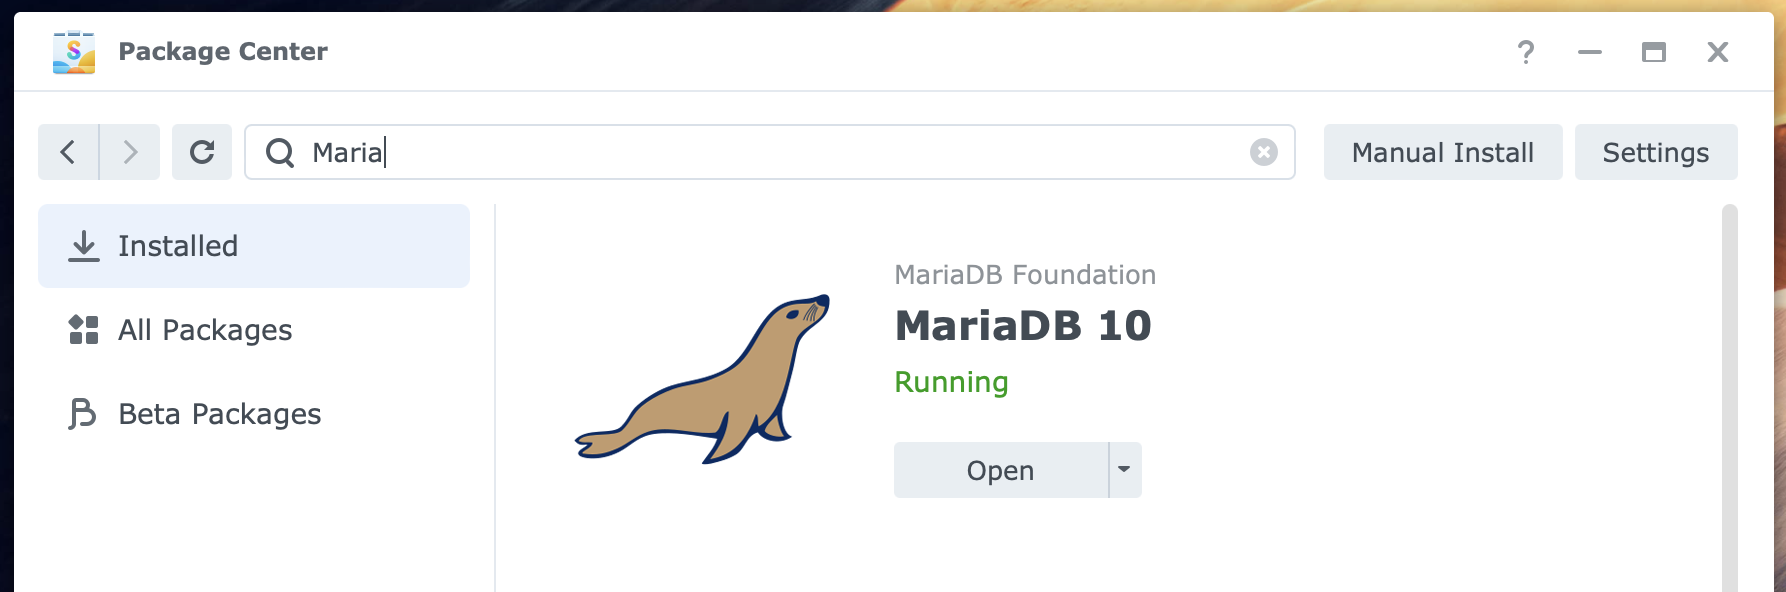
WordPress needs an SQL-type database, and MariaDB is the tool for this. In Package Center, look up MariaDB 10 and install it.
During the MariaDB 10 installation, you create a password for the database root account. You will later use this password when WordPress makes a dedicated database and database user.
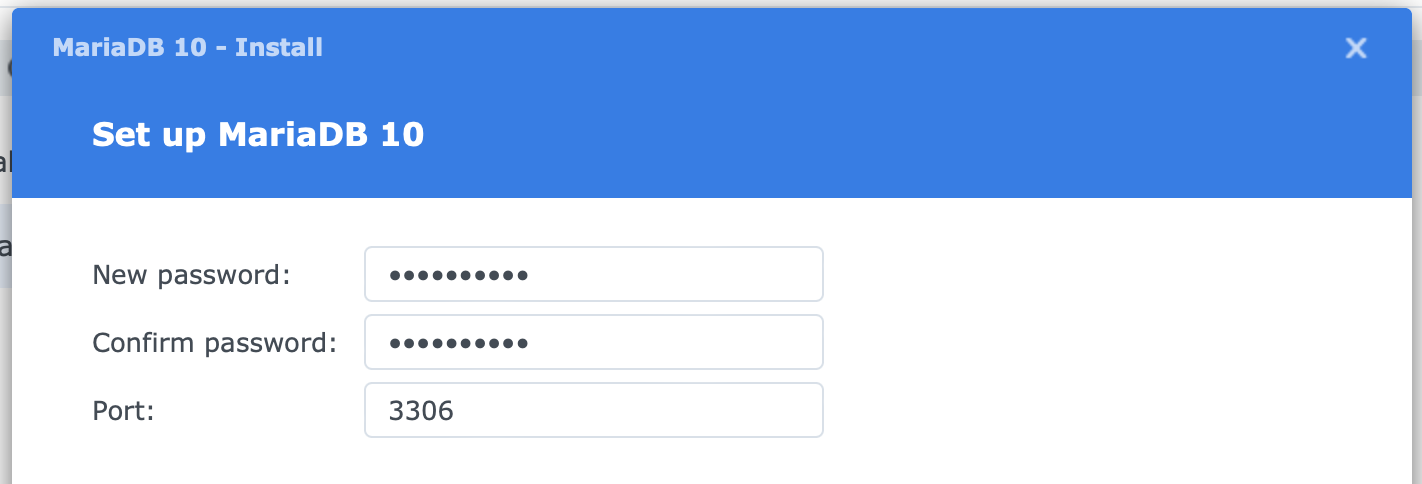
Create a strong password and unique password and store it in a safe location. Please copy and paste it into the screen twice. This avoids typos. Leave the port number at 3306. Click Next, and finish the installation.
Note that you will need the password again in a minute.
After the installation, the MariaDB 10 application is found in the main menu. It allows you to reset the root password and the database, but you do not usually need to use it.
For reference, please look up my MariaDB 10 datasheet.
Install PHP
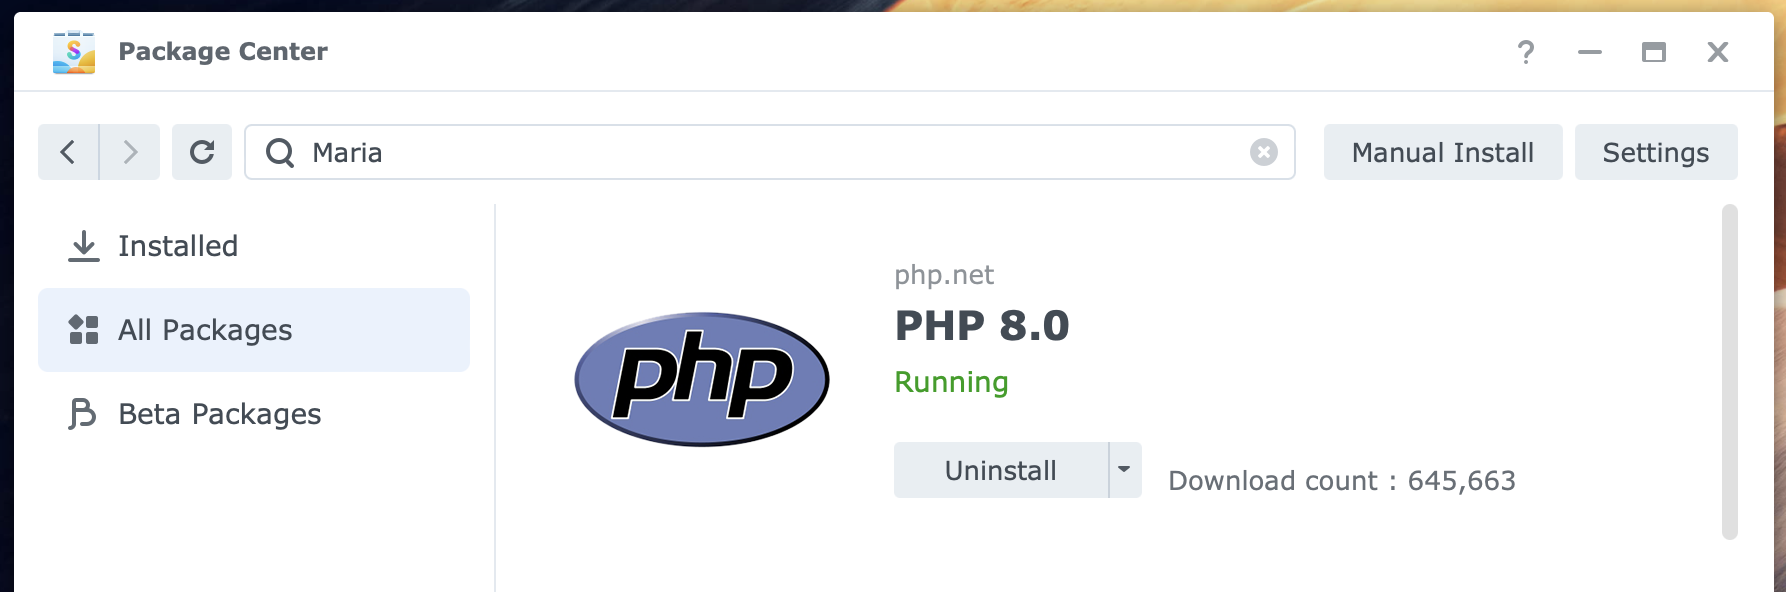
WordPress and phpMyAdmin depend on PHP, so you need to install a version of PHP. Install the PHP 8.0 package from Package Center.
If you prefer to use a later version of PHP, like 8.1 or 8.2, please install that package in addition to PHP 8.0.
After installation, you won’t find any traces of it in DSM, and there is no application in the main menu or a folder. Also, after installation, there is nothing to configure.
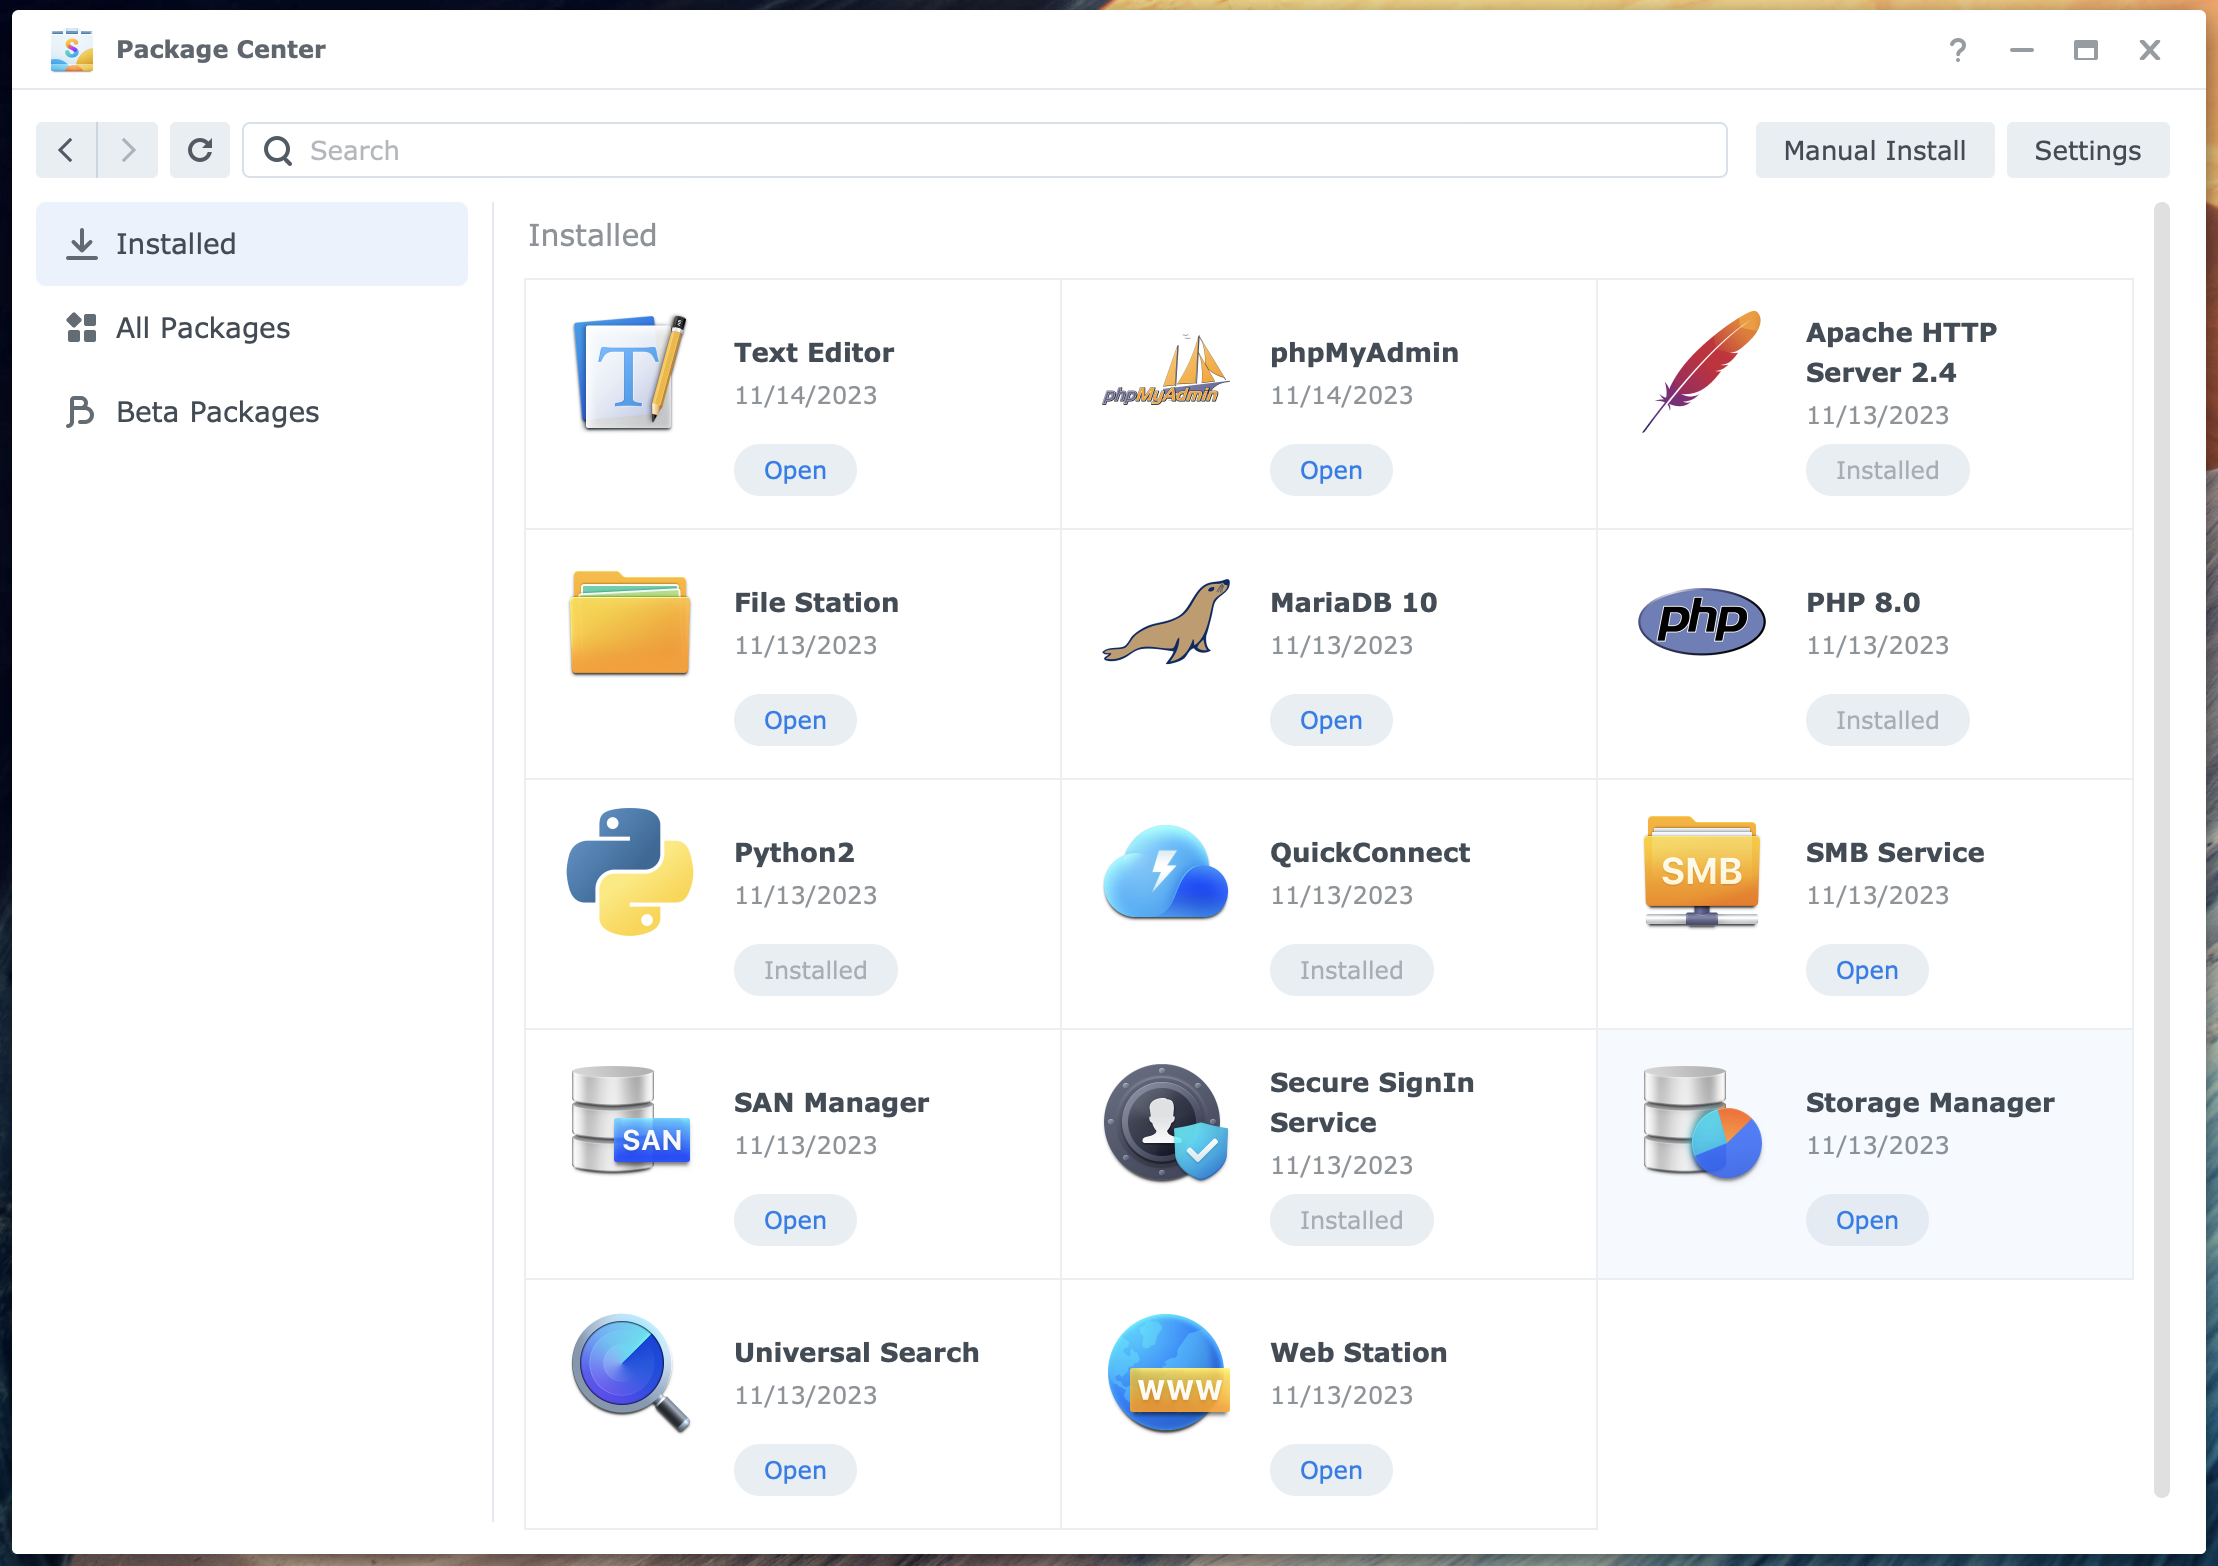
Summary: nothing fancy here. Check under Installed in Package Center. For reference, please look up my PHP 8 datasheet.
For reference, please look up my phpMyAdmin datasheet.
Install Apache HTTP Server 2.4
WordPress needs an HTTP server; we use Apache HTTP Server 2.4 for that purpose. Install the package from Package Center. This package depends on Web Station, but you already installed that package.
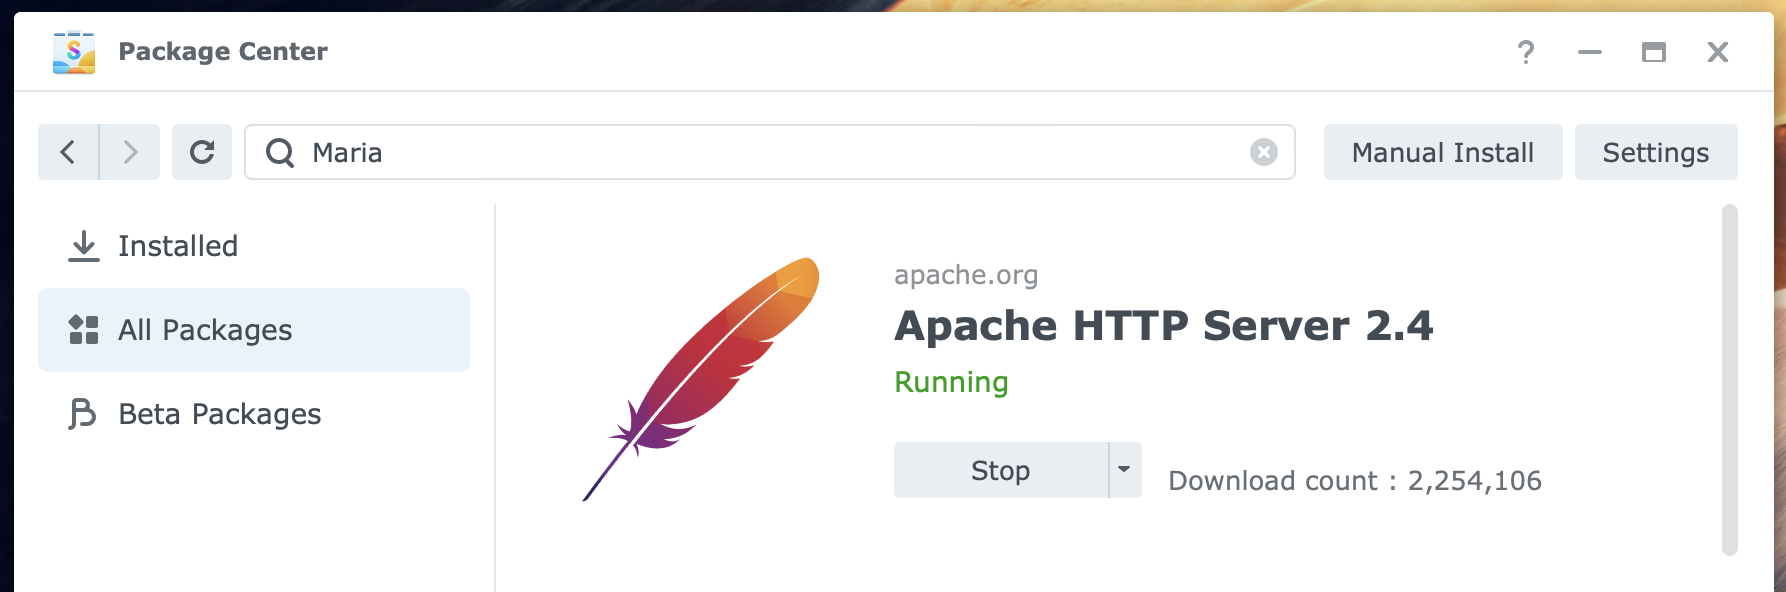
As with the PHP package, there are no configurations to make. Again, there is nothing fancy here. Check under Installed in Package Center.
For reference, please look up my Apache HTTP Server 2 datasheet.
Install phpMyAdmin
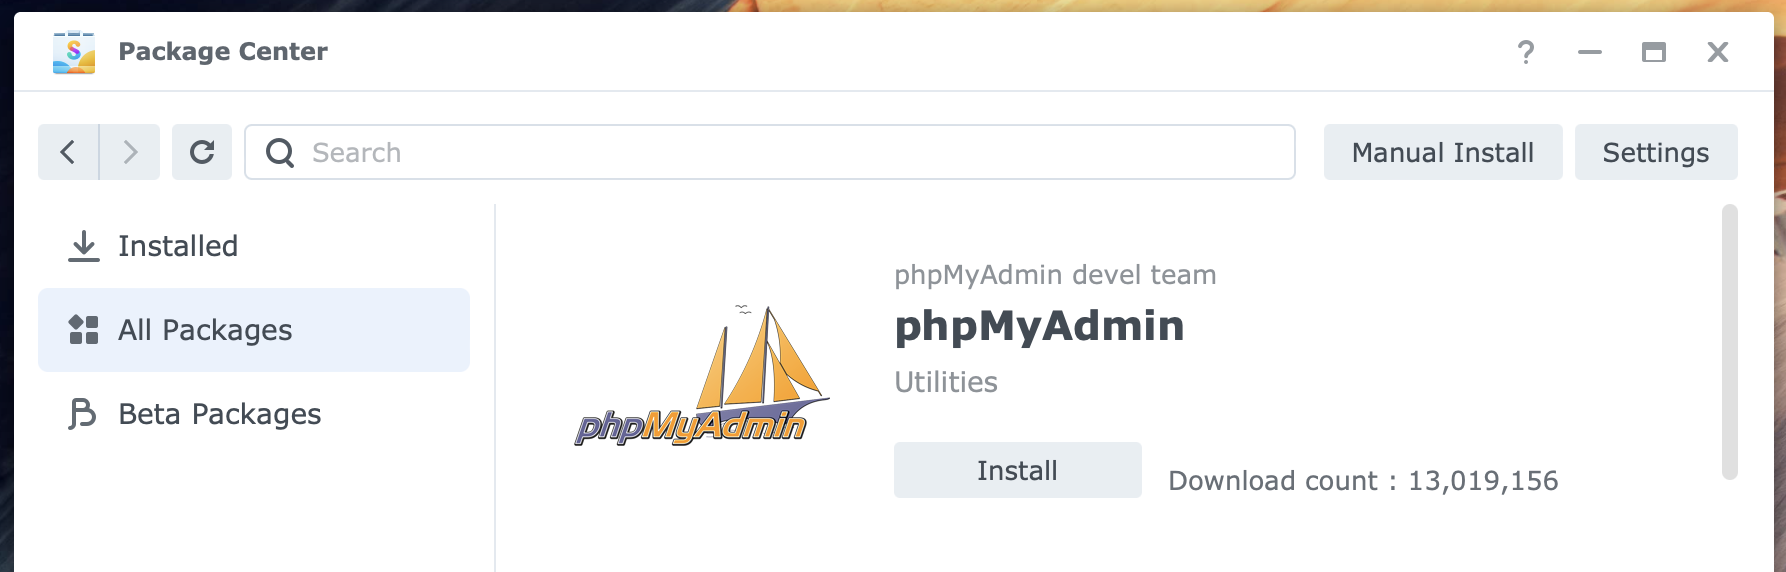
In this scenario, installing phpMyAdmin is mandatory because you will use it to create the database and database user for WordPress. This PHP-based web tool lets you manage the database in MariaDB 10.
Open Package Center and install the phpMyAdmin package. This package depends on Web Station and PHP 8.0; both are installed if you follow this guide. Otherwise, Package Center installs them together with the phpMyAdmin package.
After installation, you will find the application in the main menu and files in the /web_packages/phpMyAdmin folder. Click on the phpMyAdmin application in the main menu to open it in a separate browser window.
To test the installation, log in with the username root and the password you created during the MariaDB 10 installation.
Install Text Editor
This is an optional step but one I recommend. The Text Editor is a plain text editor that allows you to edit WordPress configuration files on your NAS. If you have another editor on your computer that you prefer, skip this step.
Install the Text Editor package in Package Center. After installation, you will find the Text Editor in the main menu.
For reference, look up my Text Editor datasheet.
Tip
The easiest way to use this editor is by right-clicking on a file in File Station and choosing Open with Text Editor.
Download WordPress
You download the software from the internet because you choose to go all-in with WordPress on your NAS with the WordPress.org setup.

Download a recent version from the WordPress.org website to your computer. Why do I say recent and not the latest version? I have two reasons.
First, the plugins or theme you plan to use might need an update to be compatible with the latest WordPress release. Second, I would prefer to update it later after I build a new WordPress site. This is a good test for whether the permissions are set correctly.
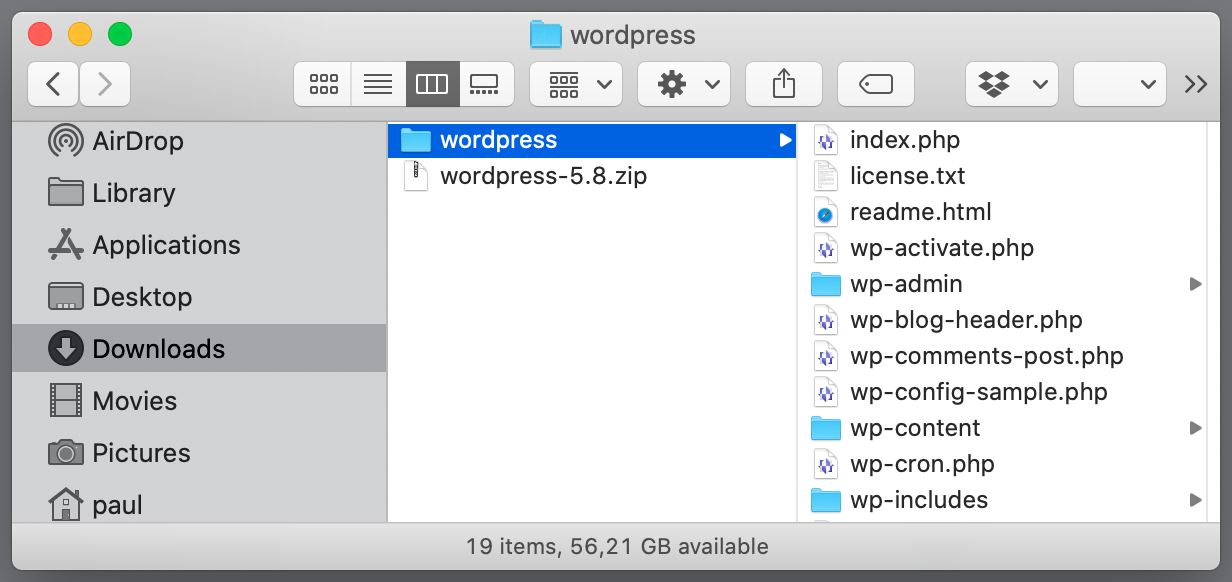
Note that the download is a ZIP file, for example, wordpress-5.8.zip. Expand the ZIP file on your computer. You get a wordpress folder with approximately 19 items, including three folders.
By the way, WordPress.org has its counterpart, WordPress.com. The latter is a hosting service based on WordPress and run by Automattic. WordPress.org, on the other hand, is an open-source sibling for self-hosted installations.
Create a folder for WordPress files
But first, let us create a folder for the WordPress files. I will show you how to do this with File Station.
In File Station, select the folder /web. Click on the Create button > Create folder. In the pop-up dialog, enter the folder name.
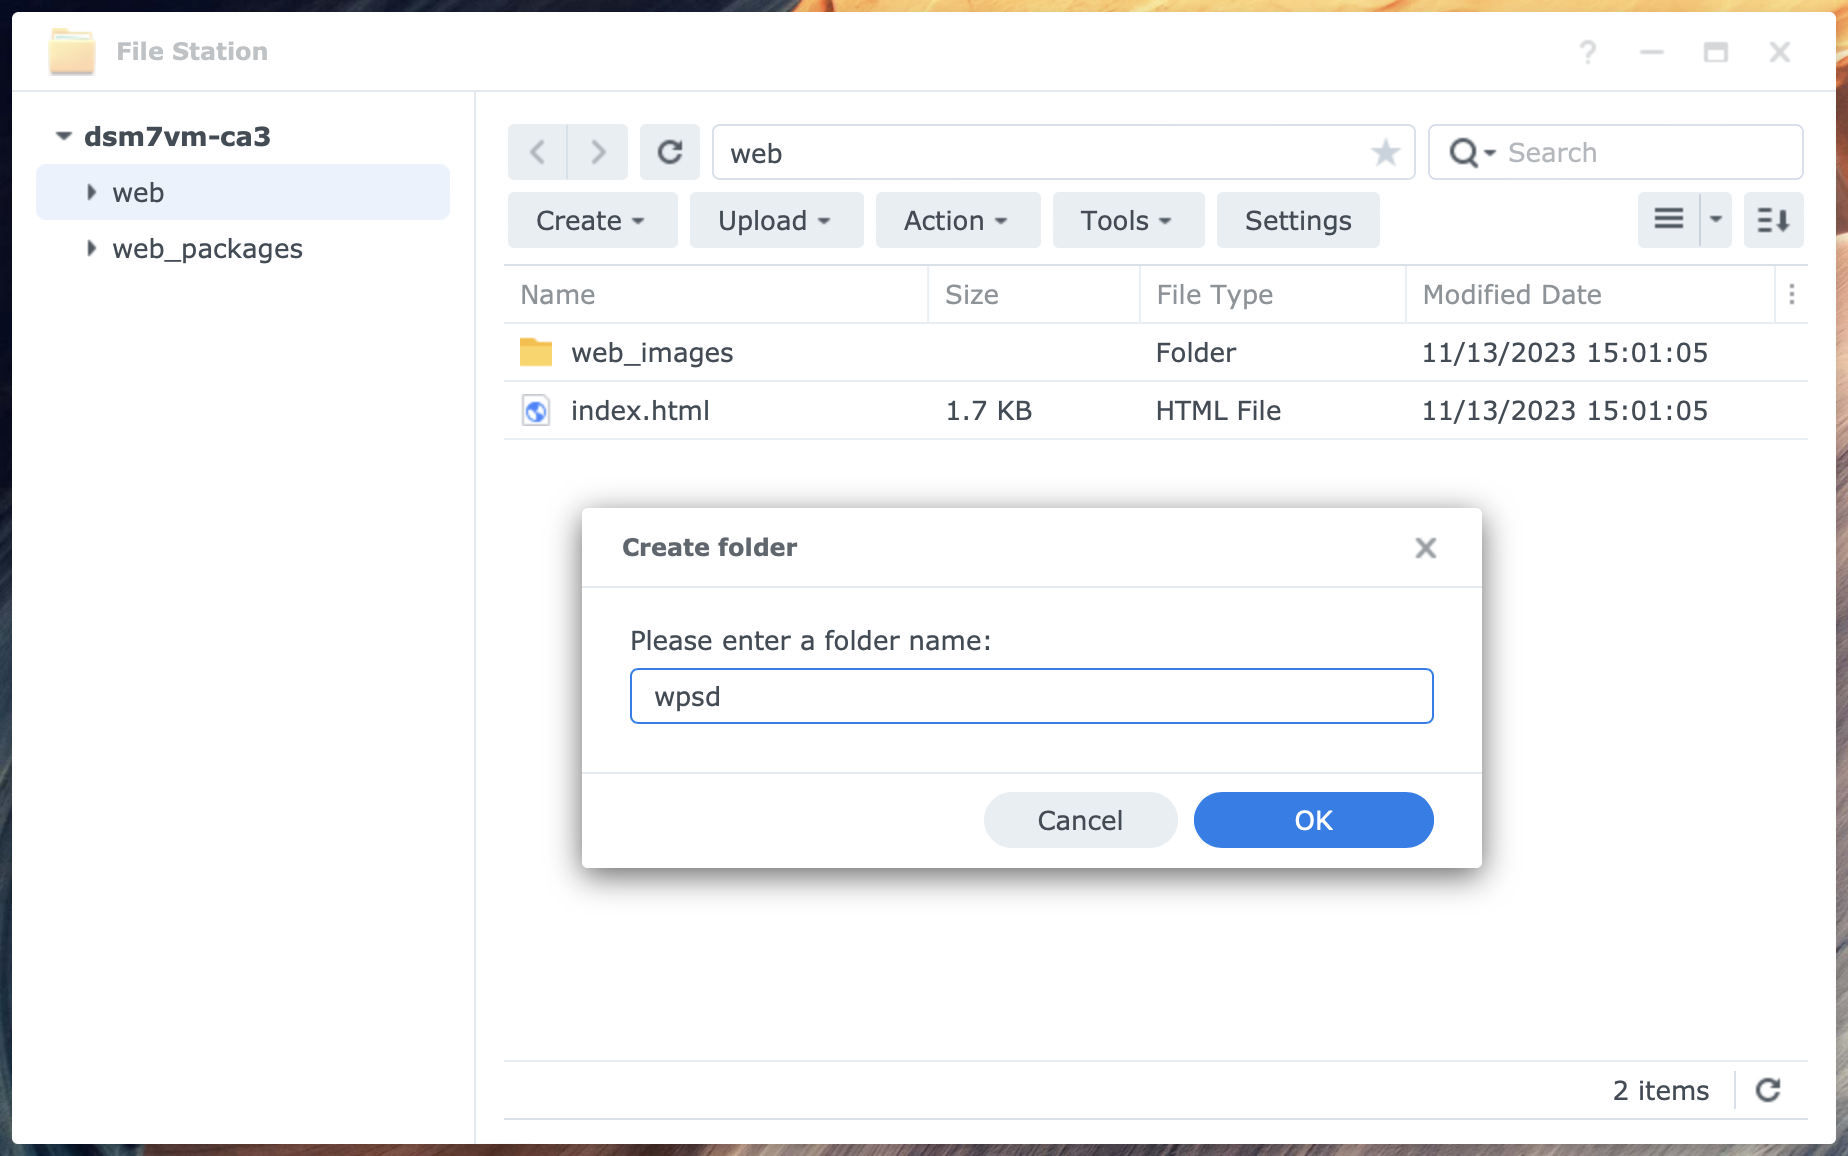
Give the folder a name that is unique to the website you create. Please do not call it /web/wordpress, as this is reserved for the Synology WordPress package and is non-descriptive.
Name your WordPress folder /web/wpaa for a website about All Animals or /web/wphc for a site about Home Cooking. Use your imagination as long as it makes sense to you. In this example, I use /web/wpsd, which stands for WordPress Synology Demonstration. As you will soon know, I use synodemo.com as my domain name.
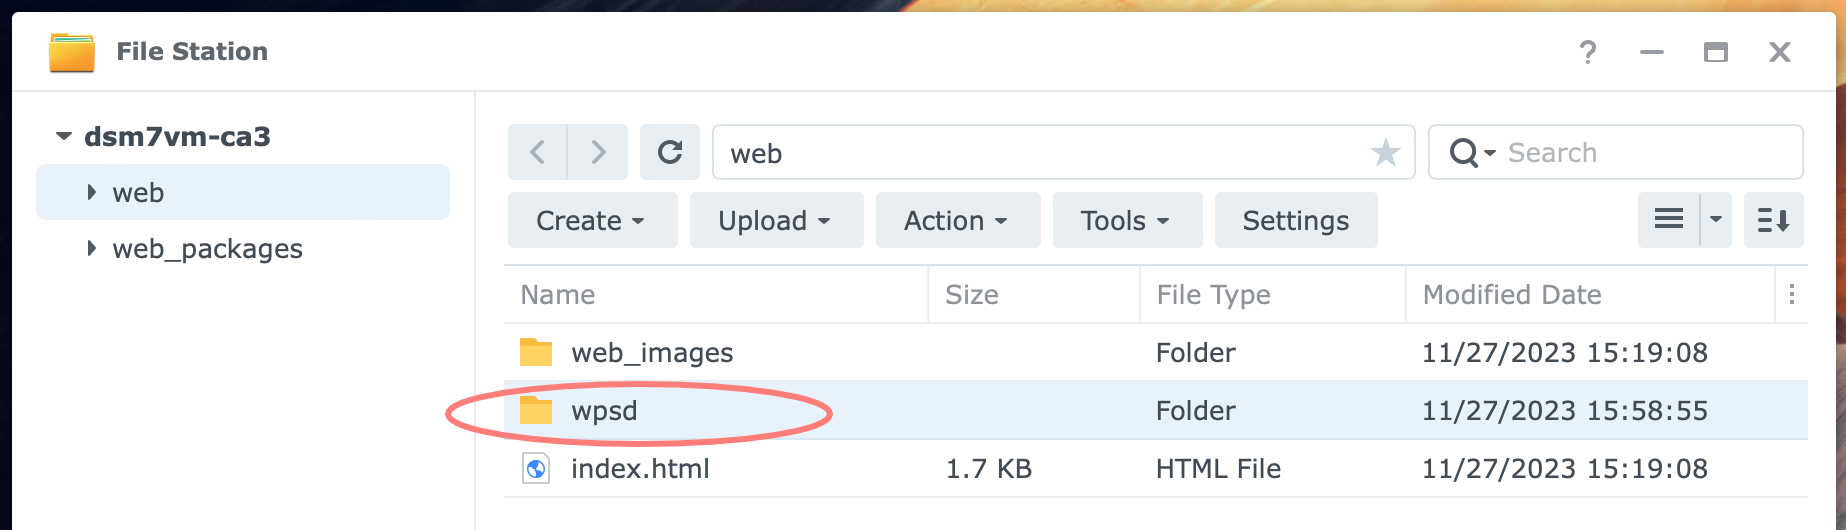
Throughout this tutorial you will repeatedly come across the wpsd acronym. Please substitute your value in the screen when requested.
Also, note that lowercase characters must be used in the folder name. Please don’t make it too fancy. Keep it basic, with alphanumerical characters only and without spaces. The folder name does not affect your website in any way.
Note: a unique folder name allows you to create another (WordPress) website on your NAS in its folder.
Copy WordPress files
Copy your computer’s WordPress files and folders to the WordPress folder on your NAS. Ensure that all 19 files and folders inside the wordpress folder on your computer are copied to the /web/wpsd folder. Again, substitute your name for wpsd.
Note that uploading via File Station is relatively slow, but it is fine if you need a coffee break. The transfer is much faster if you connect your computer to the /web shared folder over SMB. Connect with an administrative user account from your NAS.
Configure Applications
After installation, it is time for configuration. In the previous steps, you installed all necessary applications and files on your NAS. Now, it is time to connect the dots and make it work.
Configure Web Station
Open Web Station from the main menu of your DSM 7.2 desktop. In version 4.2.x of Web Station, you see five items on the left. I will cover four of them, leaving the Error Page Settings as is.
The process of Web Station configuration includes the following steps (to get you prepared):
- Create a custom PHP profile for the website on the Script Language Settings page
- Create a web service with the PHP profile, document root folder, and HTTP server on the Web Service page
- Create a web service portal based on the web service created, including ports, protocol, and access options
Overview page
In the sidebar, select Overview. On the Overview page, under General, your status should look like this:
- Default server status: Normal
- Personal website status: Disabled
- Web service portal status: Normal
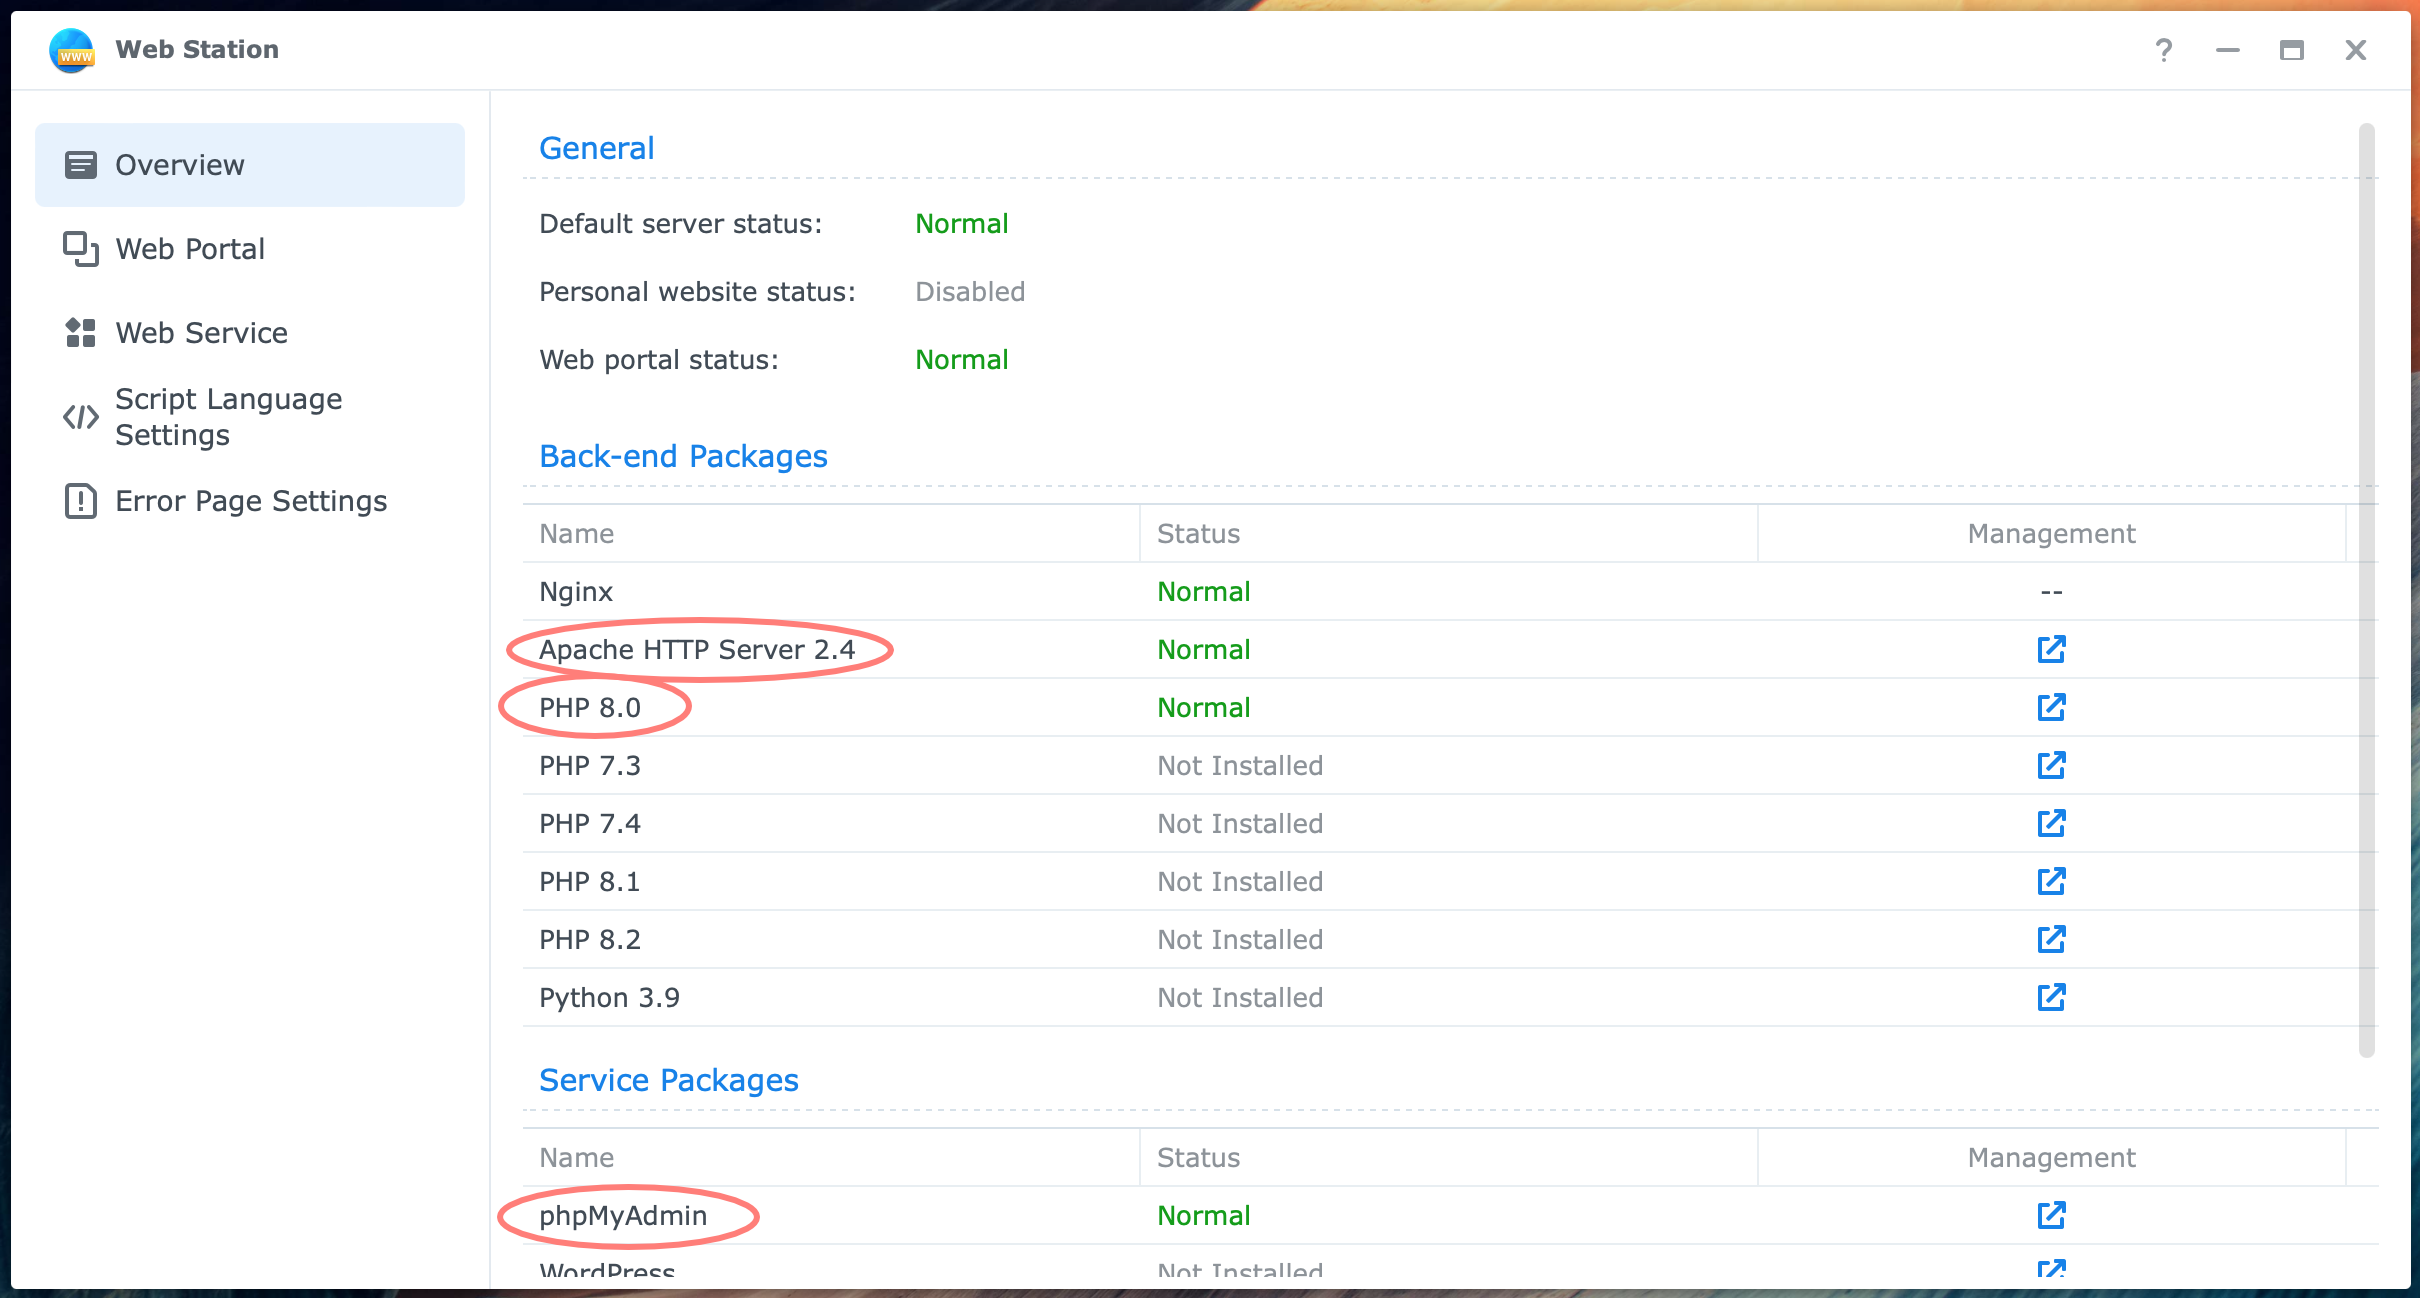
Under Back-end Packages, your status is:
- Ngnix – Normal
- Apache HTTP Server 2.4 – Normal
- PHP 8.0 – Normal
If you installed additional components like PHP 8.1 or 8.2, they will appear here too.
And the Service Packages should list the following:
- phpMyadmin – Normal
If you see WordPress – Normal listed here, you installed the WordPress from Synology package from Package Center, as explained in part 2 of this series.
Script Language Settings page
You create and define a customized PHP profile on the Script Language Settings page. Make sure that you select the PHP tab. Notice the Customized Profile with the default profile and the Package-Based Profile with the phpMyAdmin profile.
The screenshot below displays our starting point.
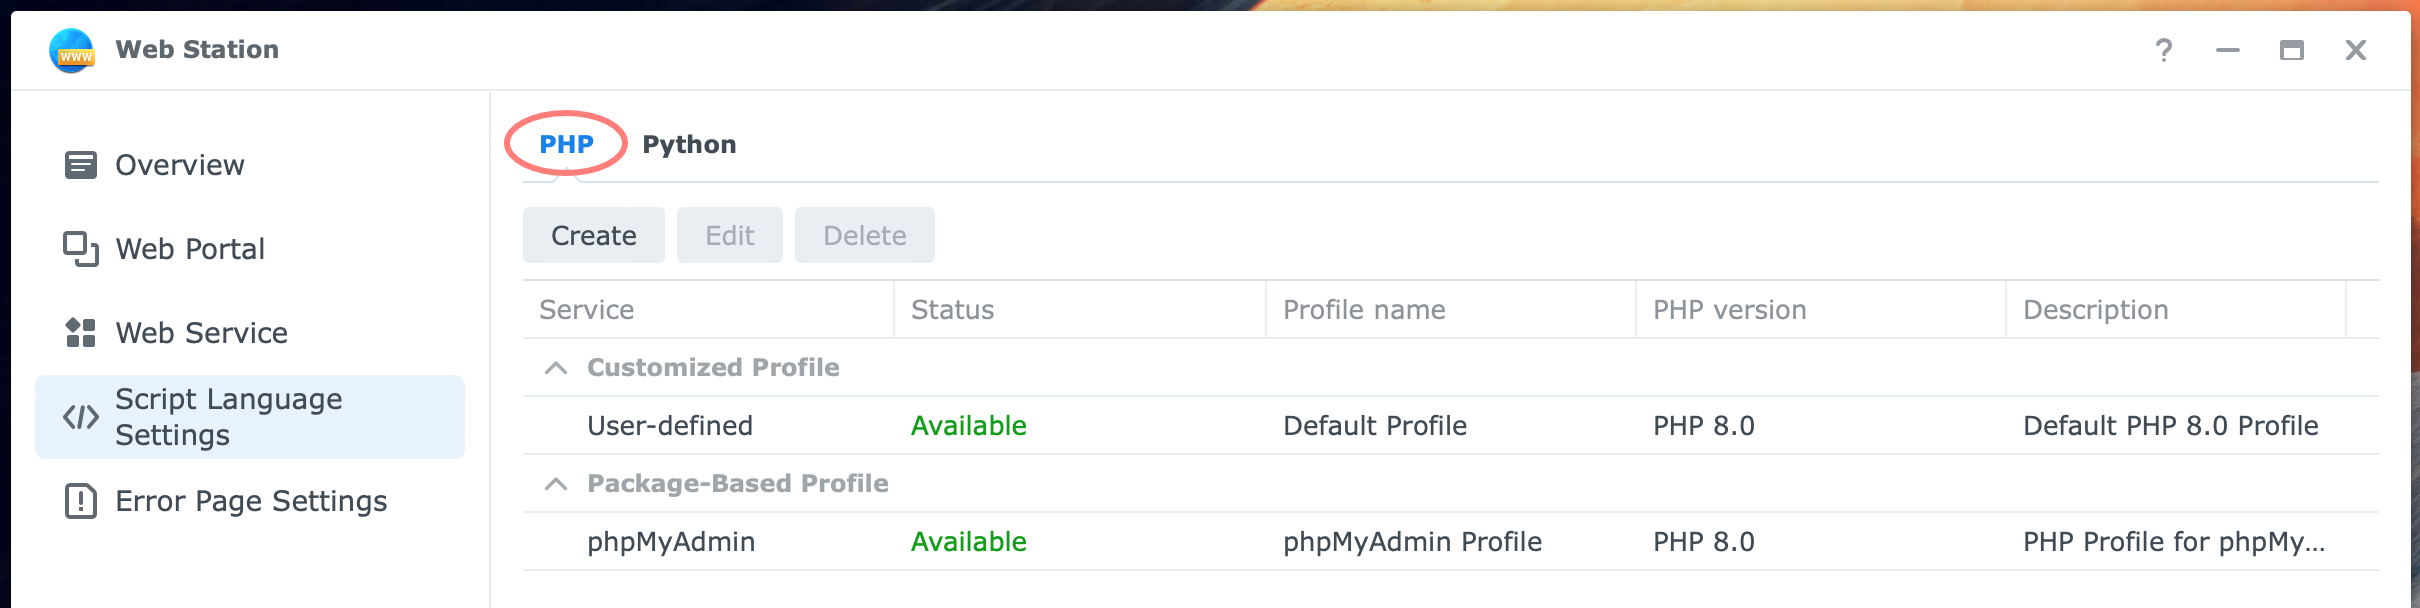
Note: The PHP configuration settings I offer you come from the WordPress for Synology configuration.
Click on the Create button. The Create Profile wizard opens. On the Configure general settings page, fill in the following information:
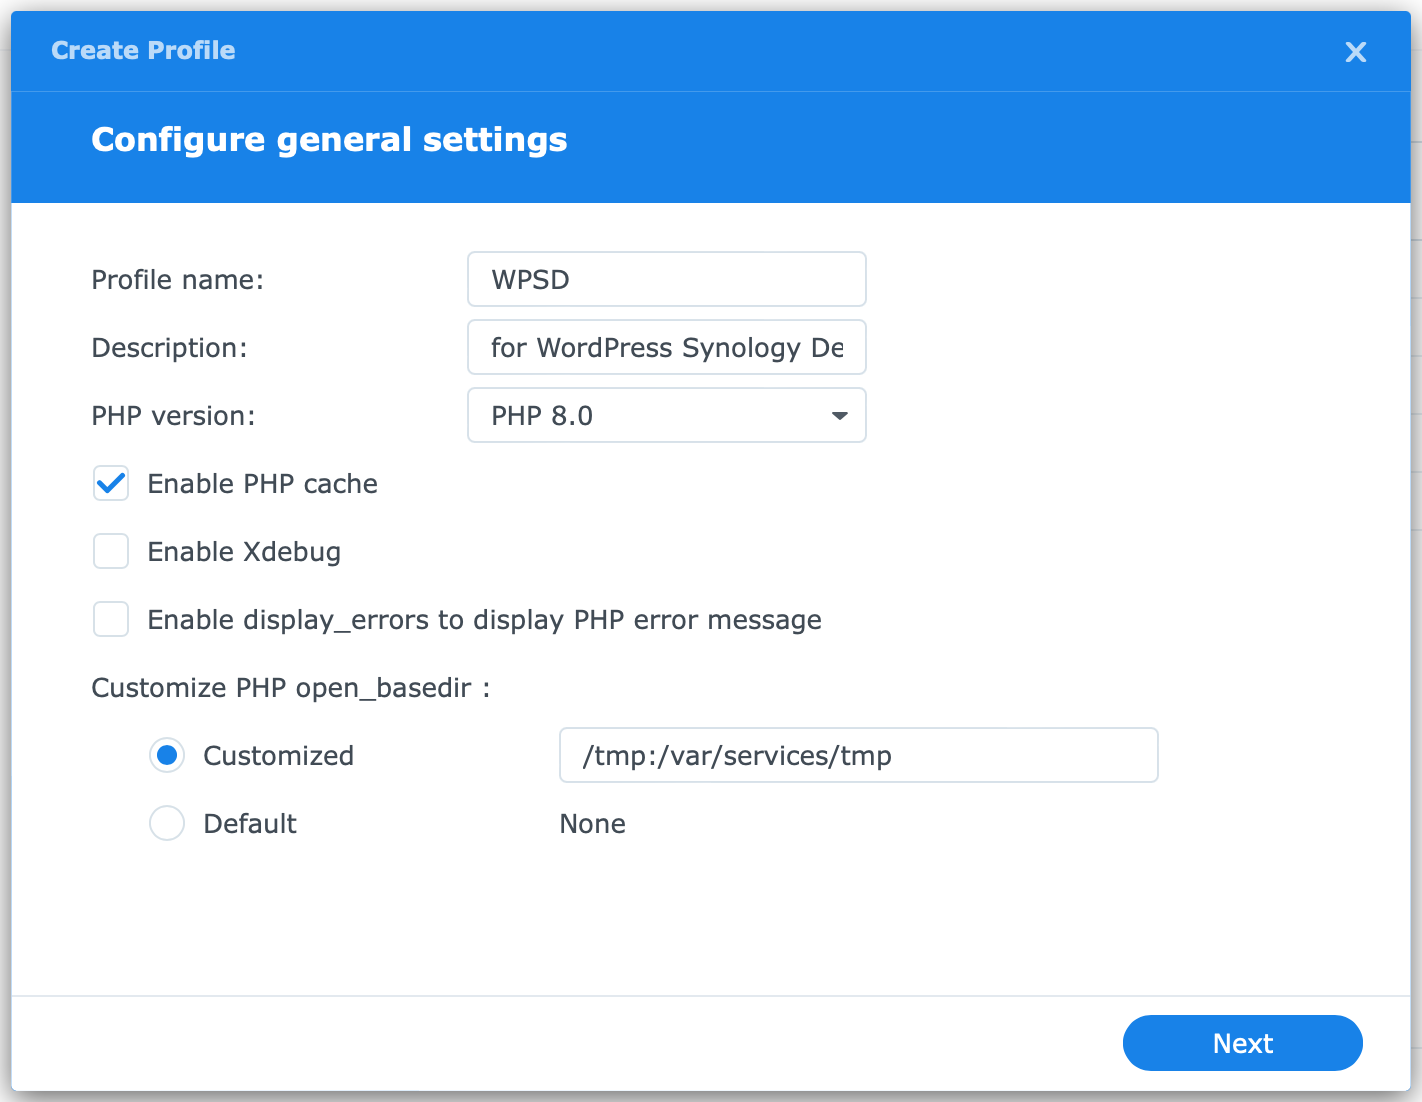
- Profile name
- for example, the folder name for the WordPress files, WPSD in my case
- Description
- for example, for WordPress Synology Demo; note that this field is required
- PHP version
- PHP 8.0, unless you installed a later version for WordPress
- Enable PHP cache
- checked
- Customized PHP open_basedir
- /tmp:/var/services/tmp
Leave other settings as is and click Next. On the Configure extensions page, enable the following extensions:
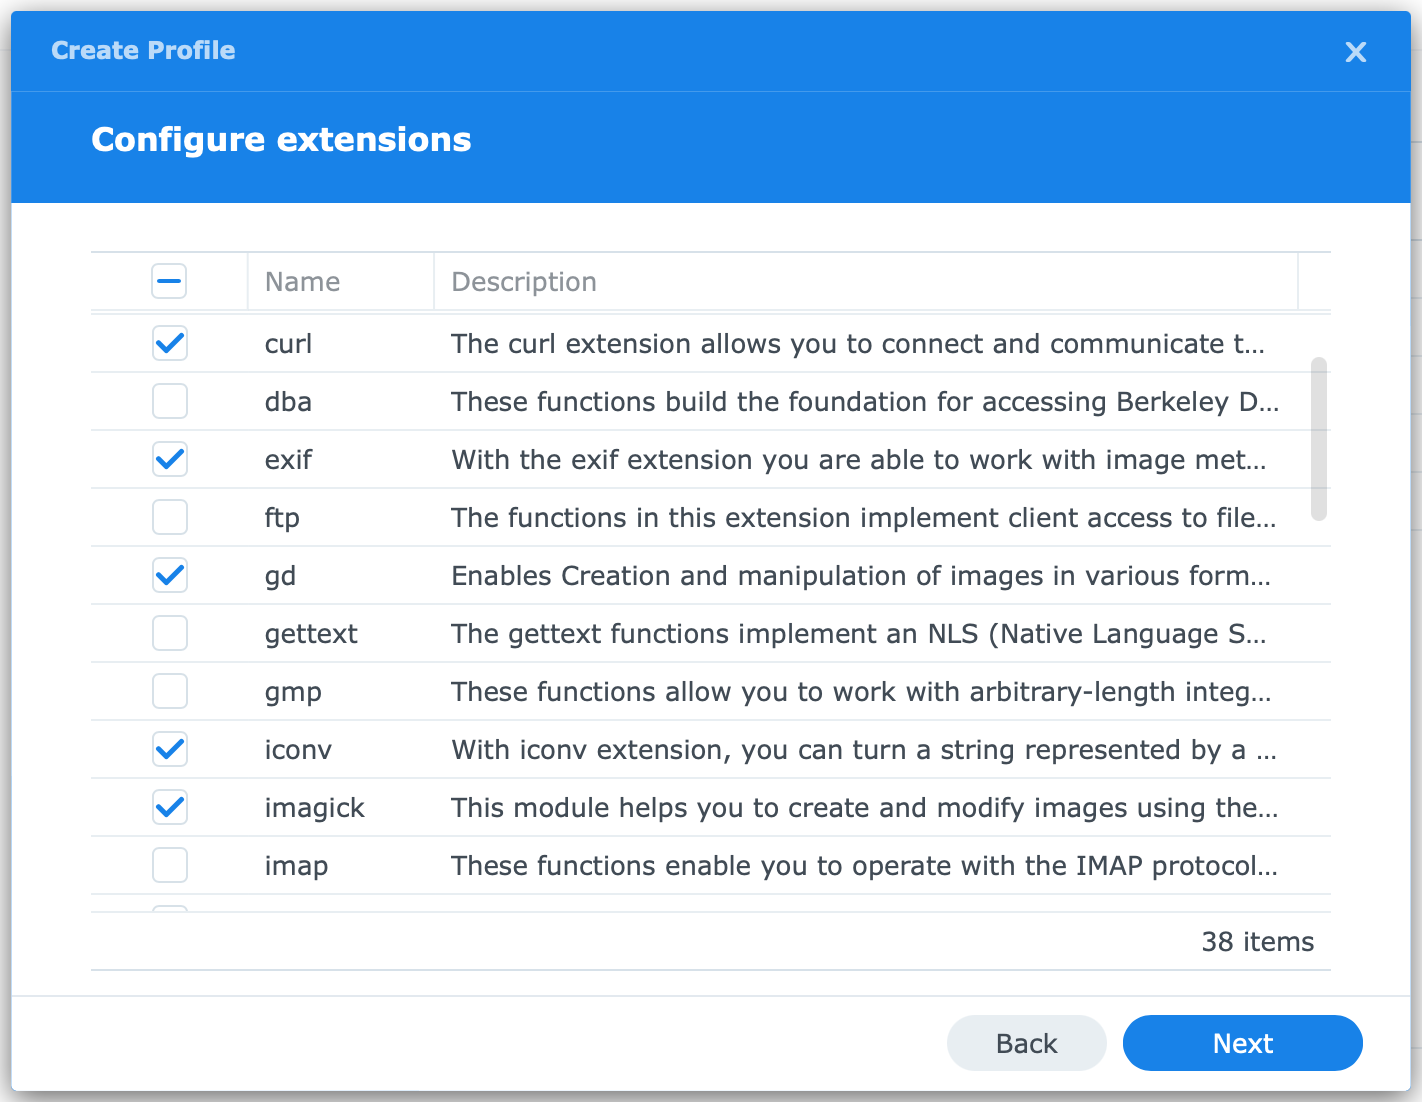
- curl, exif, gd, iconv, imagick, mysqli, openssl, pdo_mysql, zip, zlib
Click Next. On the Configure FPM settings page, fill in the following and leave the remaining settings at their default.
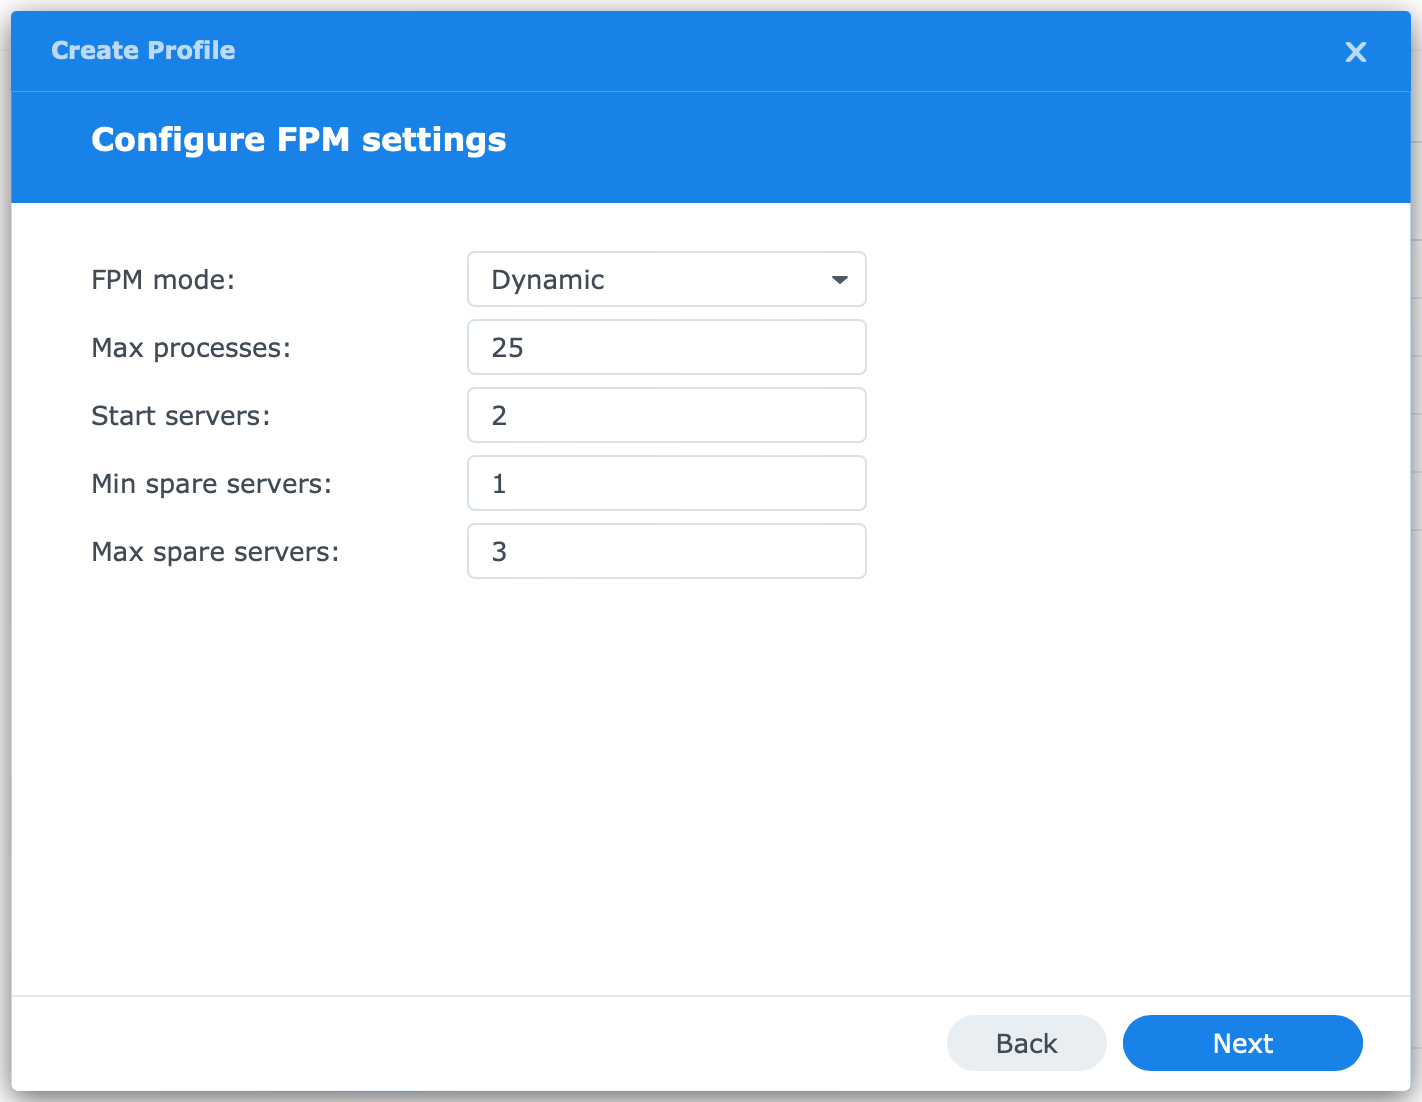
- Start servers – 2
- Min spare servers – 1
- Max spare servers – 3
Click Next. On the Configure core settings page, leave all settings at their defaults and click Next. At the Confirm settings page, click Create.
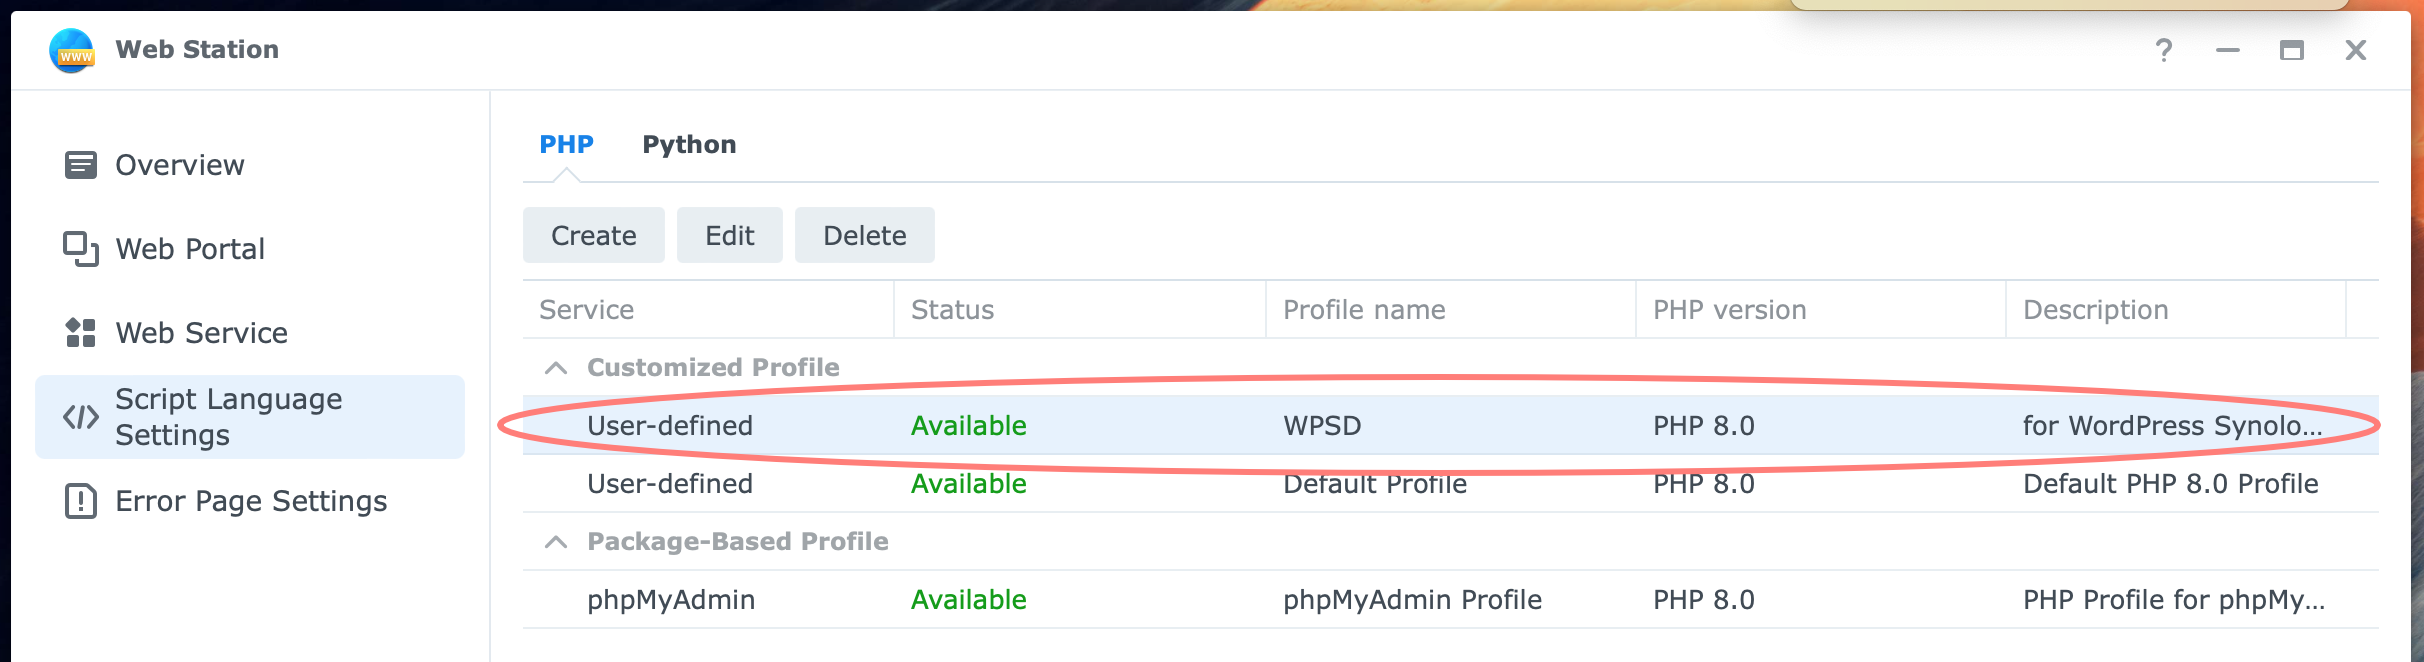
Notice the profile you created in the Customized Profile section on the PHP tab.
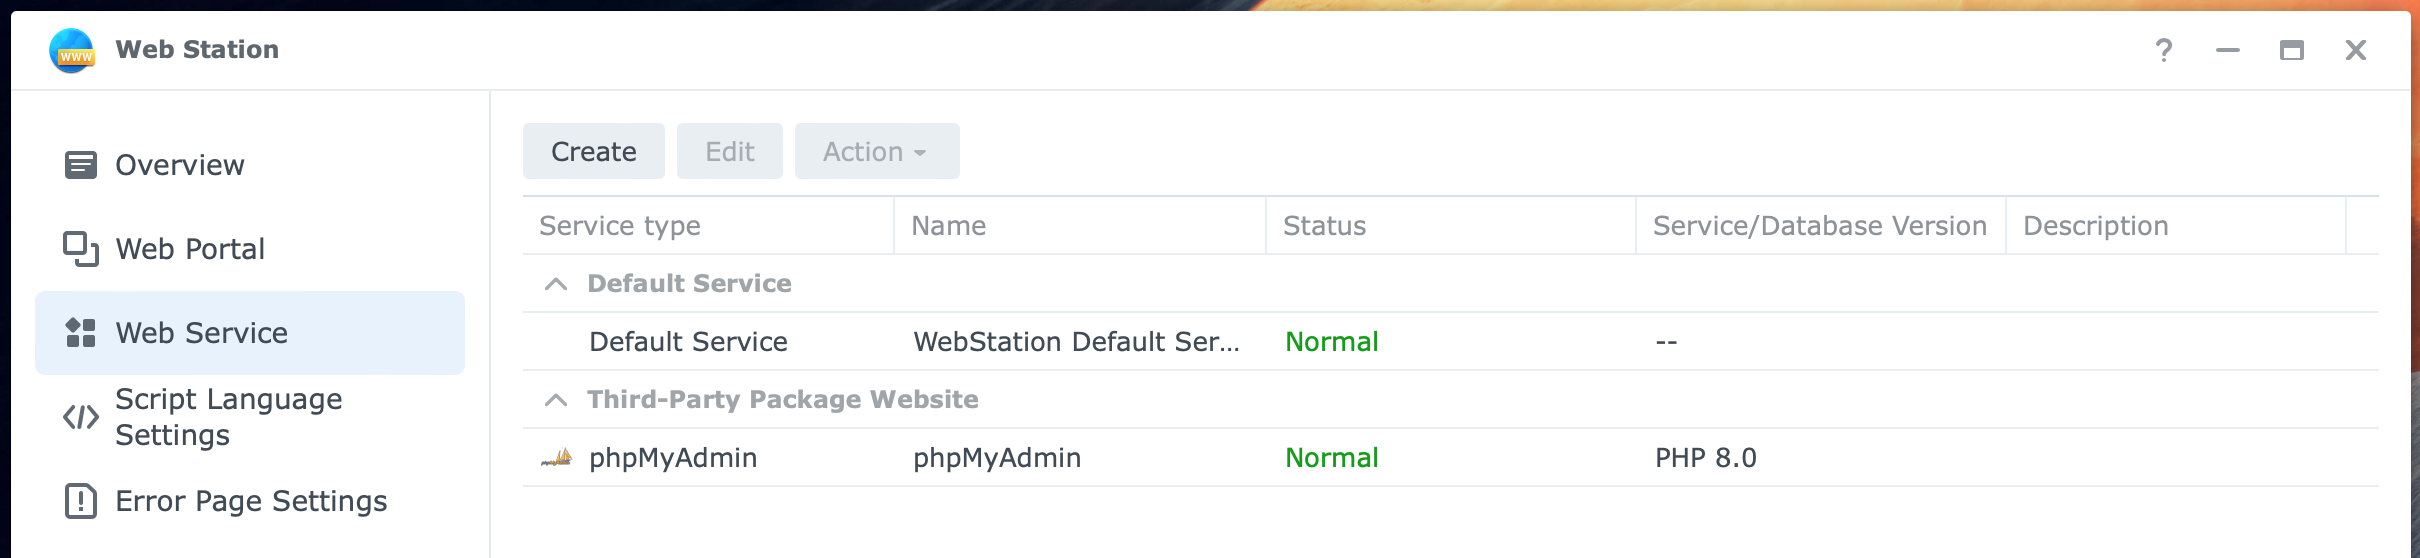
Web Service page
On this page, you make a so-called web service. You combine the PHP profile, Apache web server, and the web root folder into a service. You use this service in the next step on the Web Portal page.
The screenshot below displays our starting point.
Click on the Create button. The Create Web Service wizard opens. On the Select a service type page, fill in the following information:
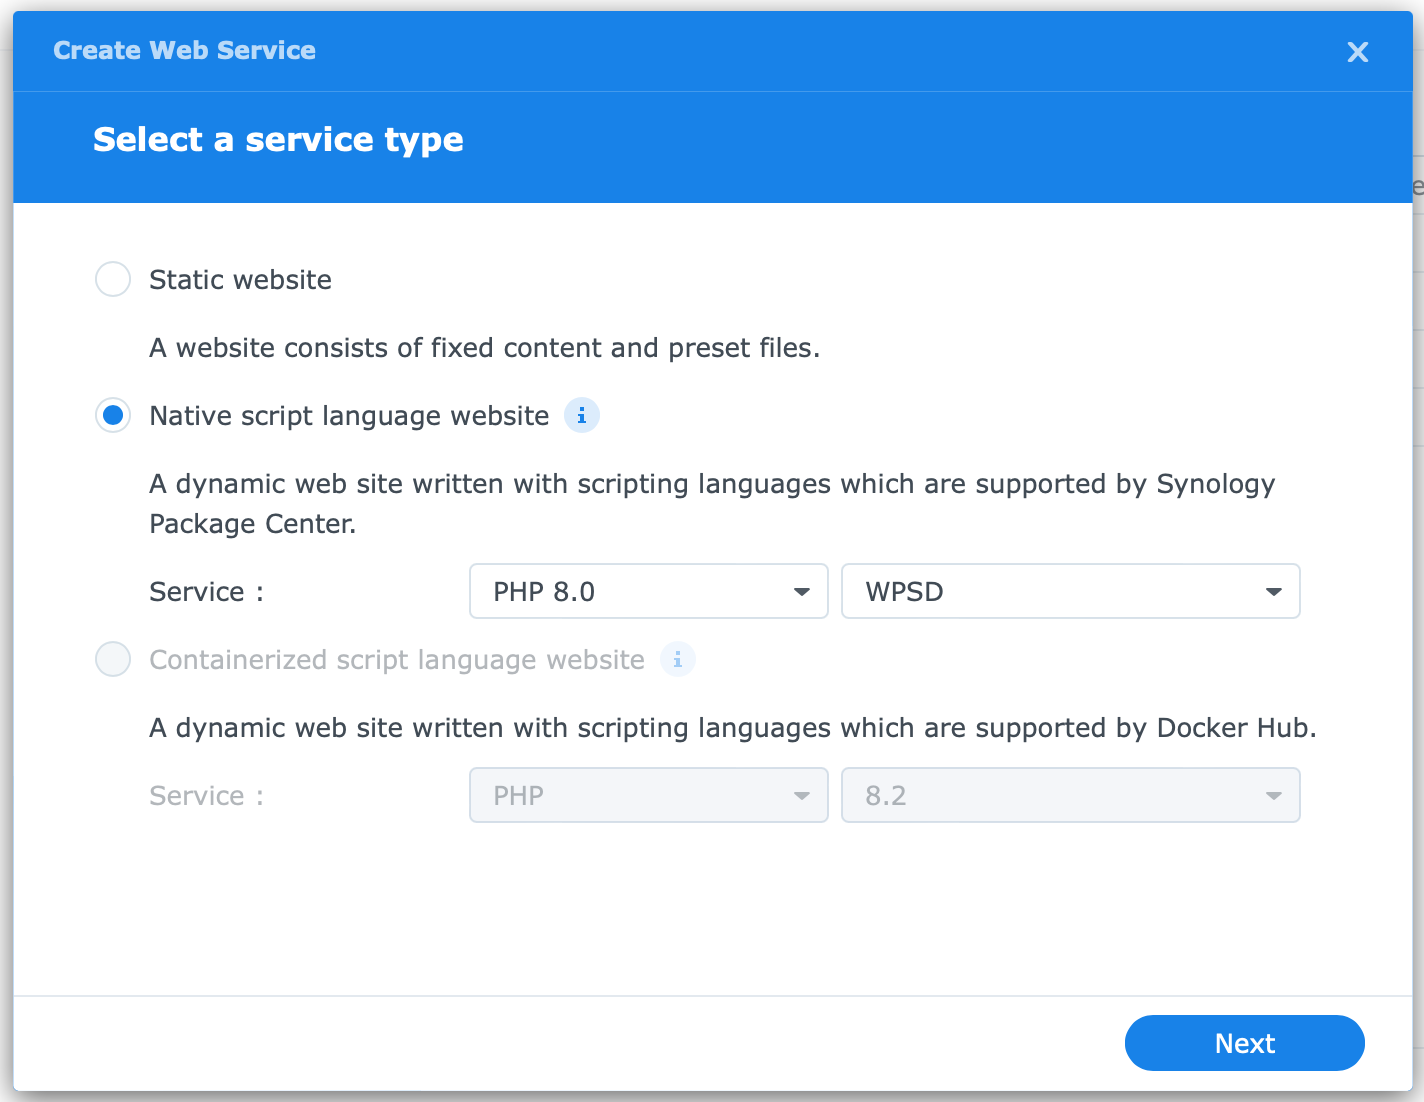
- Native script language site
- Service – select the PHP version, like 8.0; select the name of the PHP profile, like WPSD in my example
Click Next. On the Configure general settings page, fill in the following information:
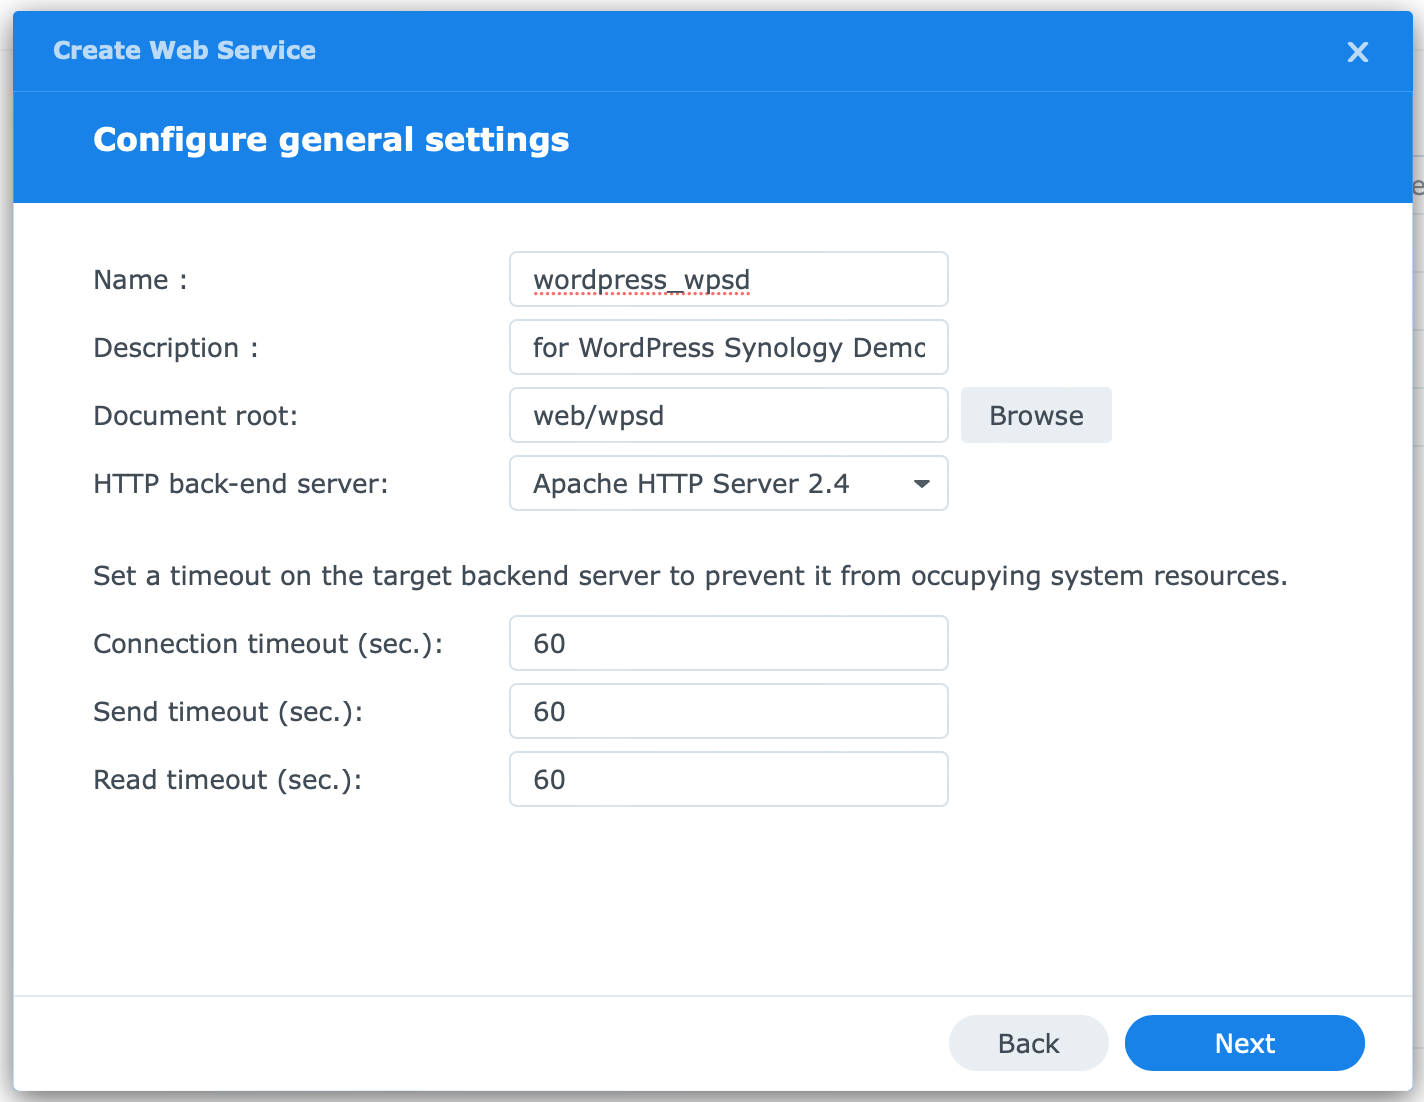
- Name
- for example, wordpress_wpsd; note that only lowercase letters, numbers, hyphens, and underscores are allowed
- Description
- for example, for WordPress Synology Demo
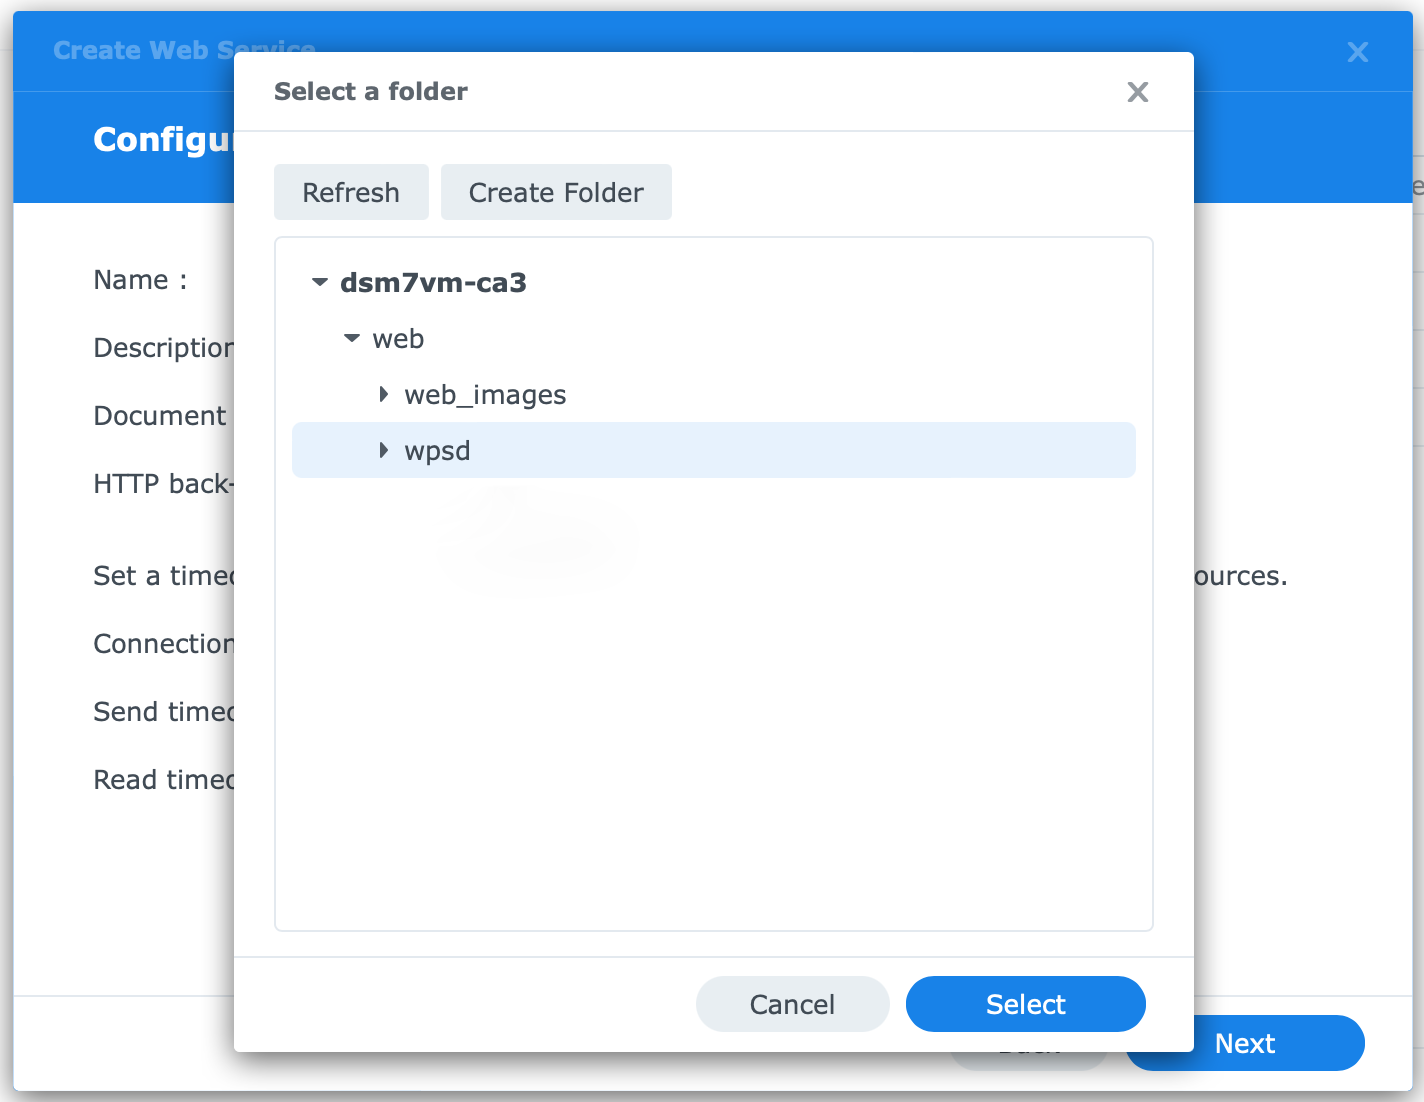
- Document root
- the folder that contains the WordPress file, in my example /web/wpsd; use the Browse button
- HTTP back-end server
- Apache HTTP Server 2.4
Leave the time-out values at their defaults. Click Next. On the Confirm settings page, click Create.
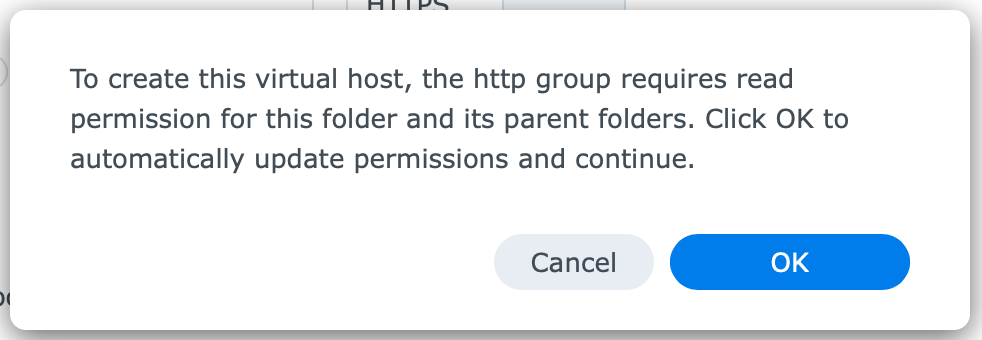
Notice the message about permissions for the HTTP group. Click OK to accept the message.
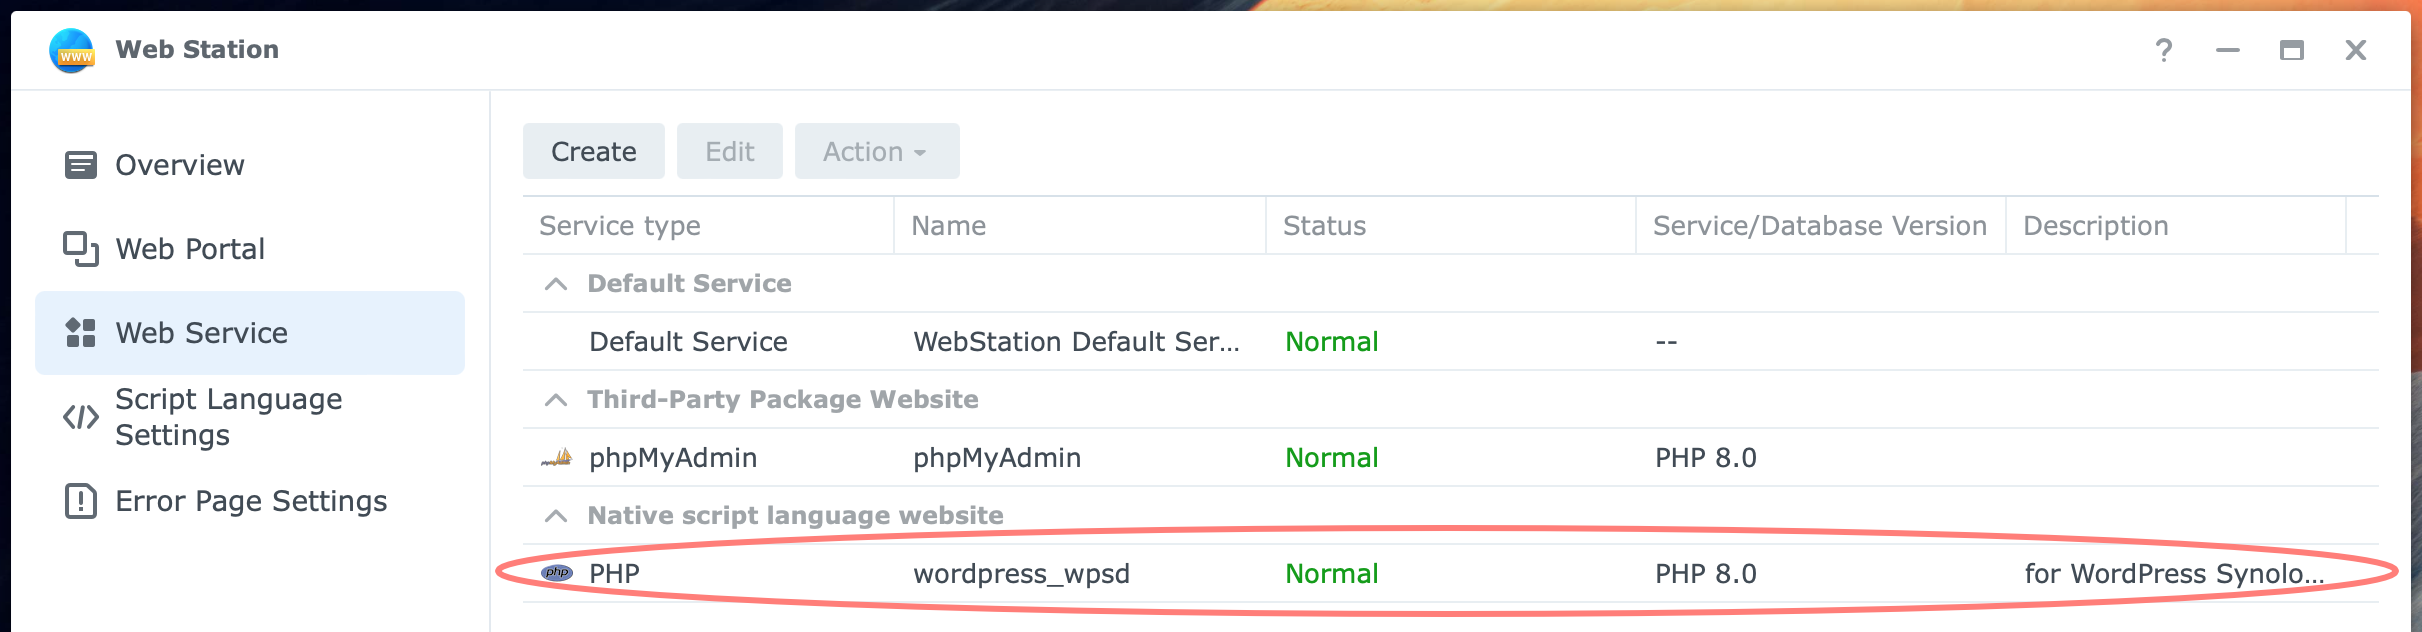
Review the result in the web service you created under Native script language website.
Web Portal page
A web portal is a customization of the web service you made in the previous step. The screenshot below displays our starting point.
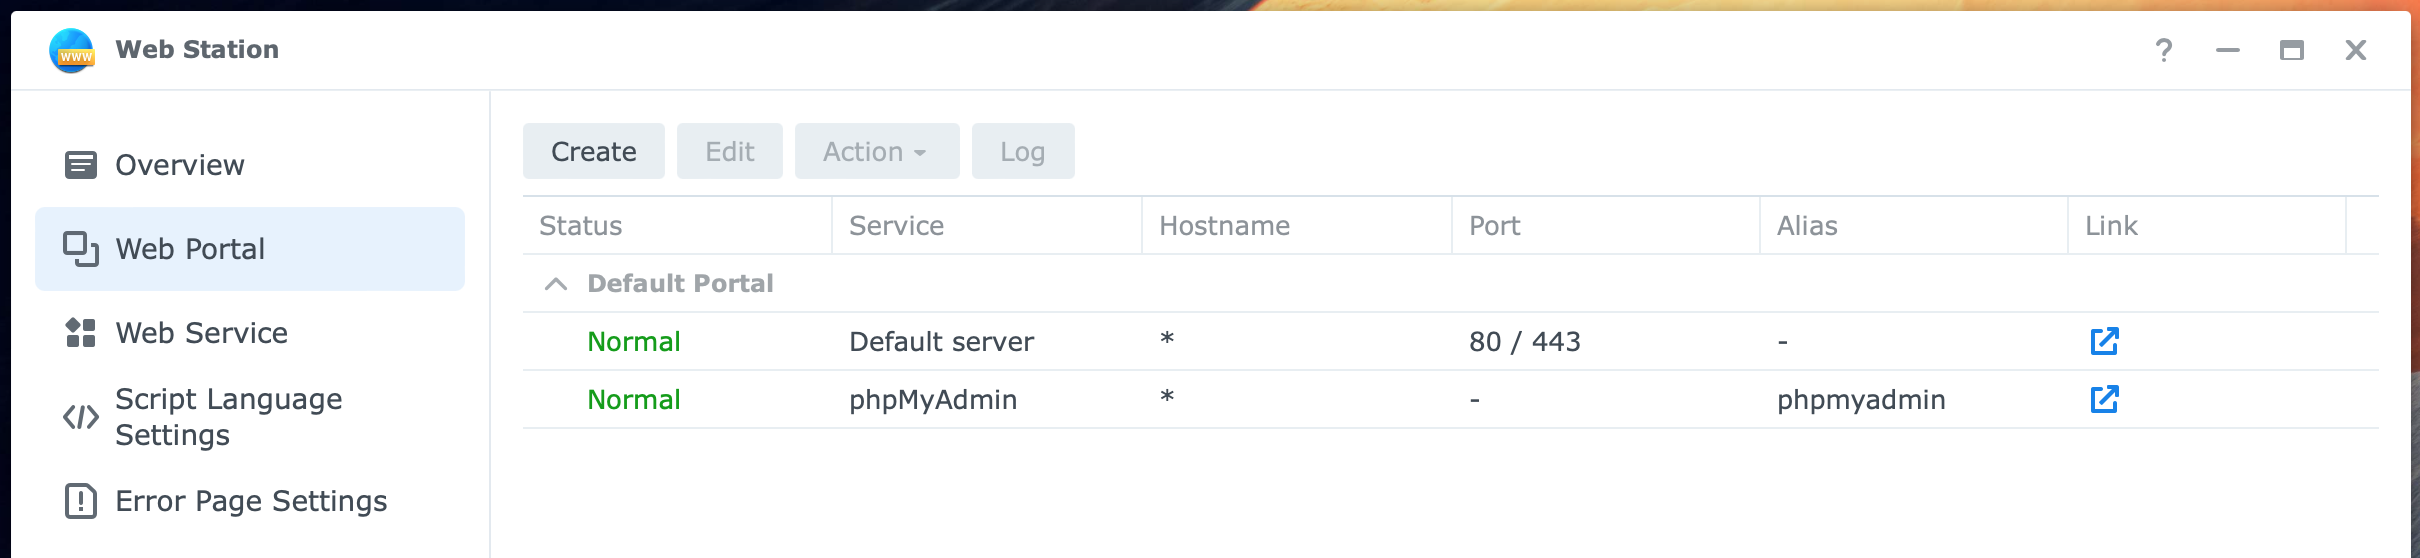
Under Default Portal, you will find the Default server and phpMyAdmin.
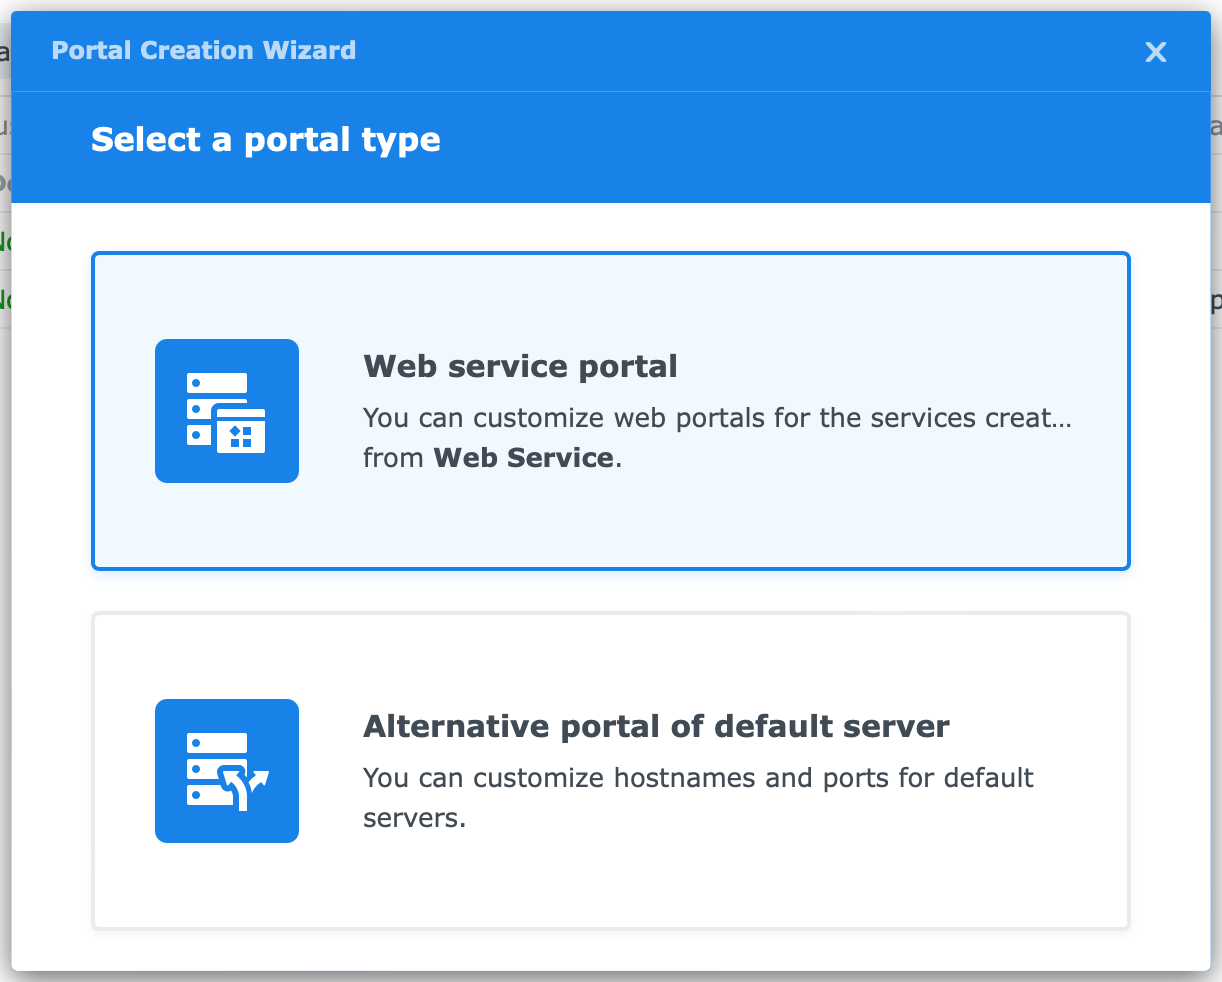
Click on the Create button. The Portal Creation Wizard opens. Select the Web service portal.
On the Set up a web service portal screen, fill in the following information:
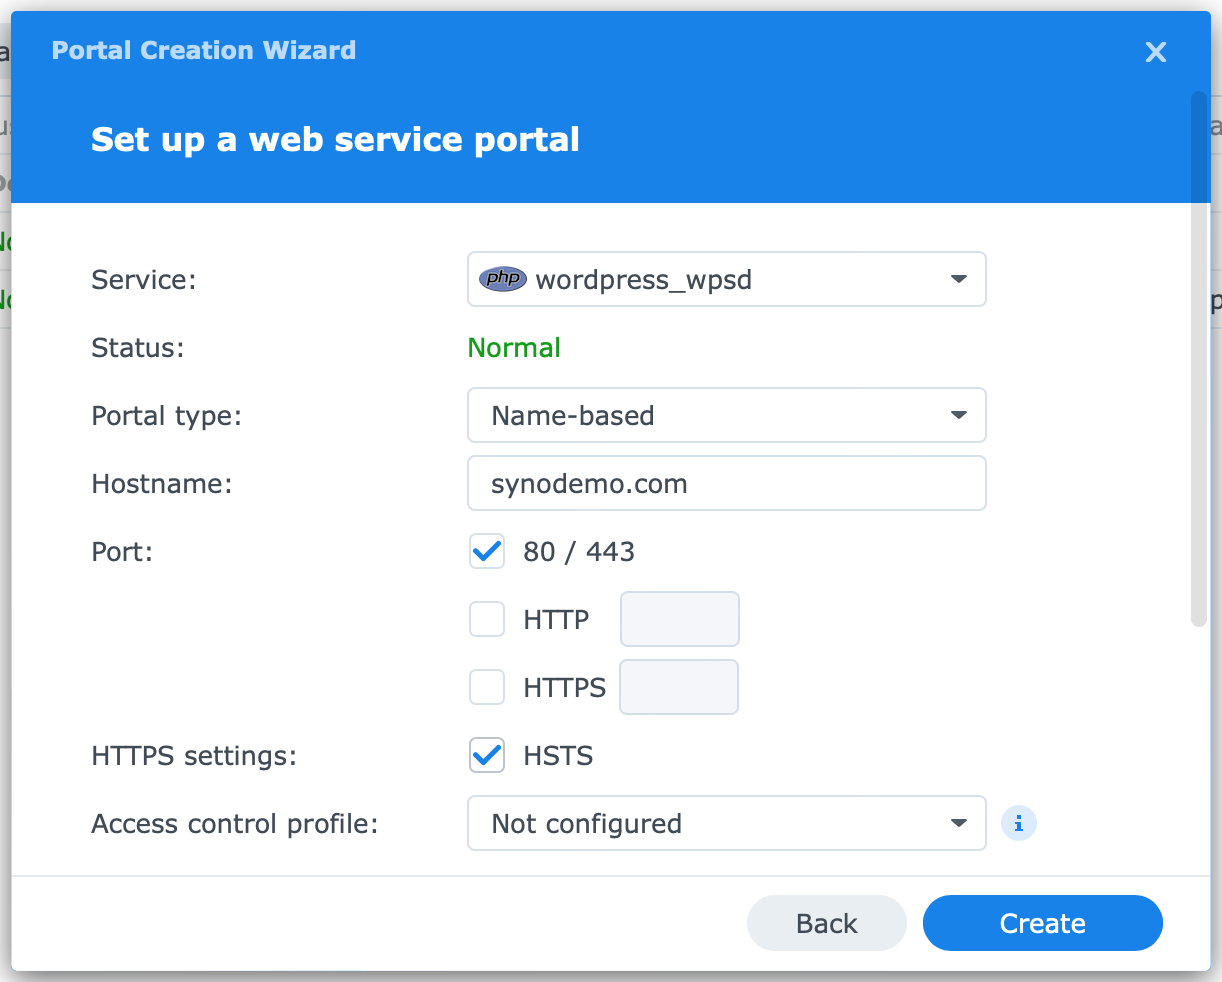
- Service
- wordpress_wpsd; enter what you filled in for the web service
- Portal type
- Name based
- Hostname
- the domain you registered for this website; synodemo.com in my example
- Port
- 80/443
- HTTPS settings
- HSTS enabled
You can further fine-tune the portal with an Access Control Profile, custom error pages, and more.
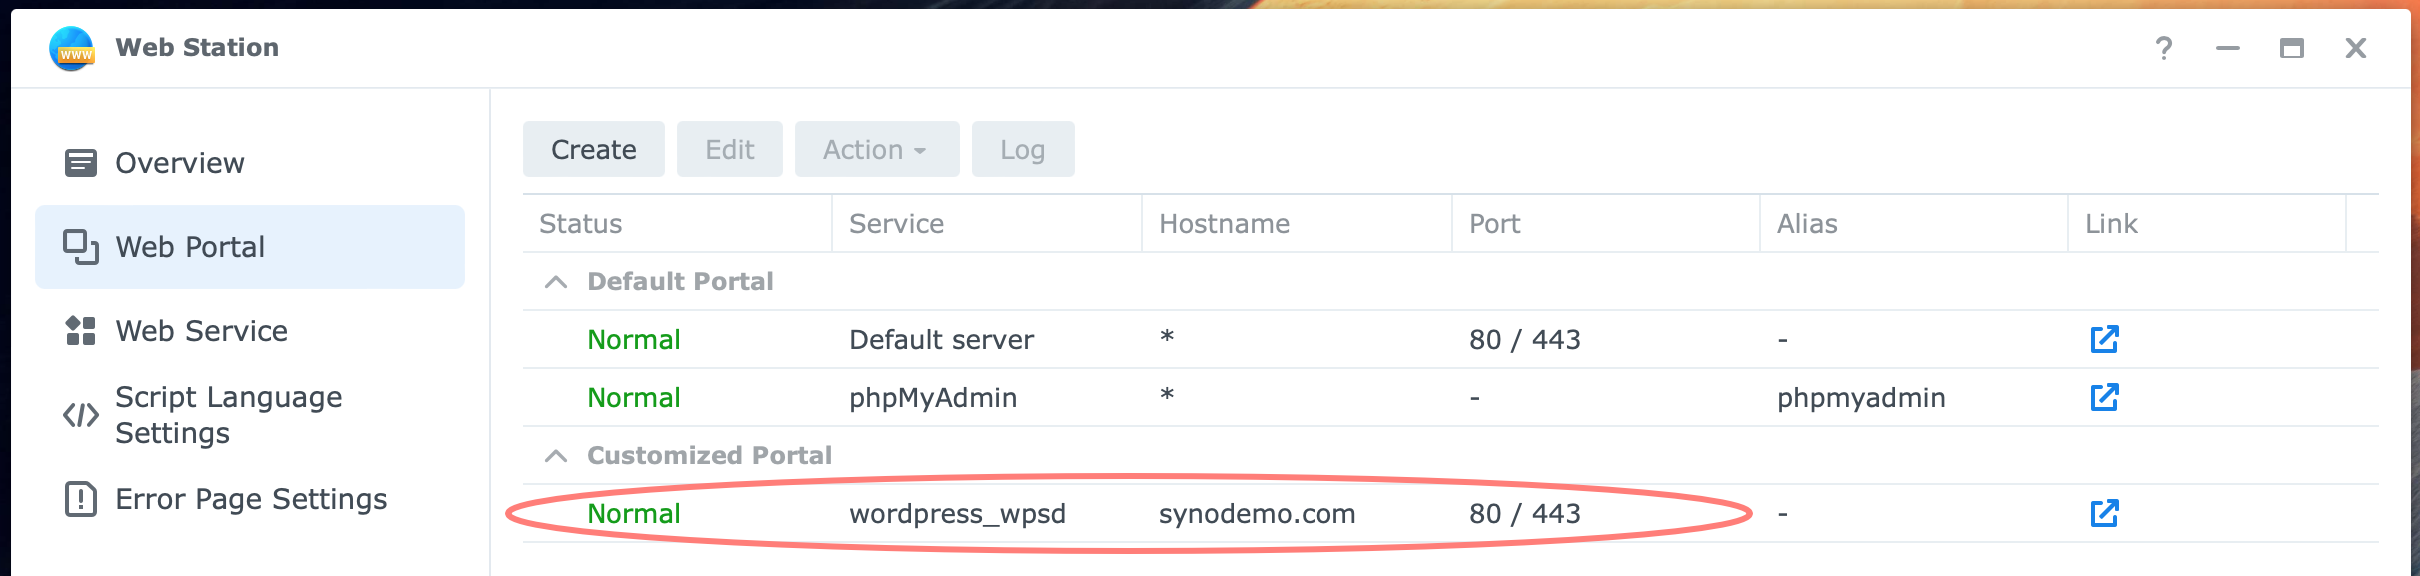
Click on the Create button. Notice the new web portal under Customized Portal.
Change wp-config-sample.php
The wp-config-sample.php will change into wp-config.php during the WordPress installation process. The sample file is a template. Adding some lines to the script before the WordPress installation starts ensures that your website will include this in the final wp-config.php file.
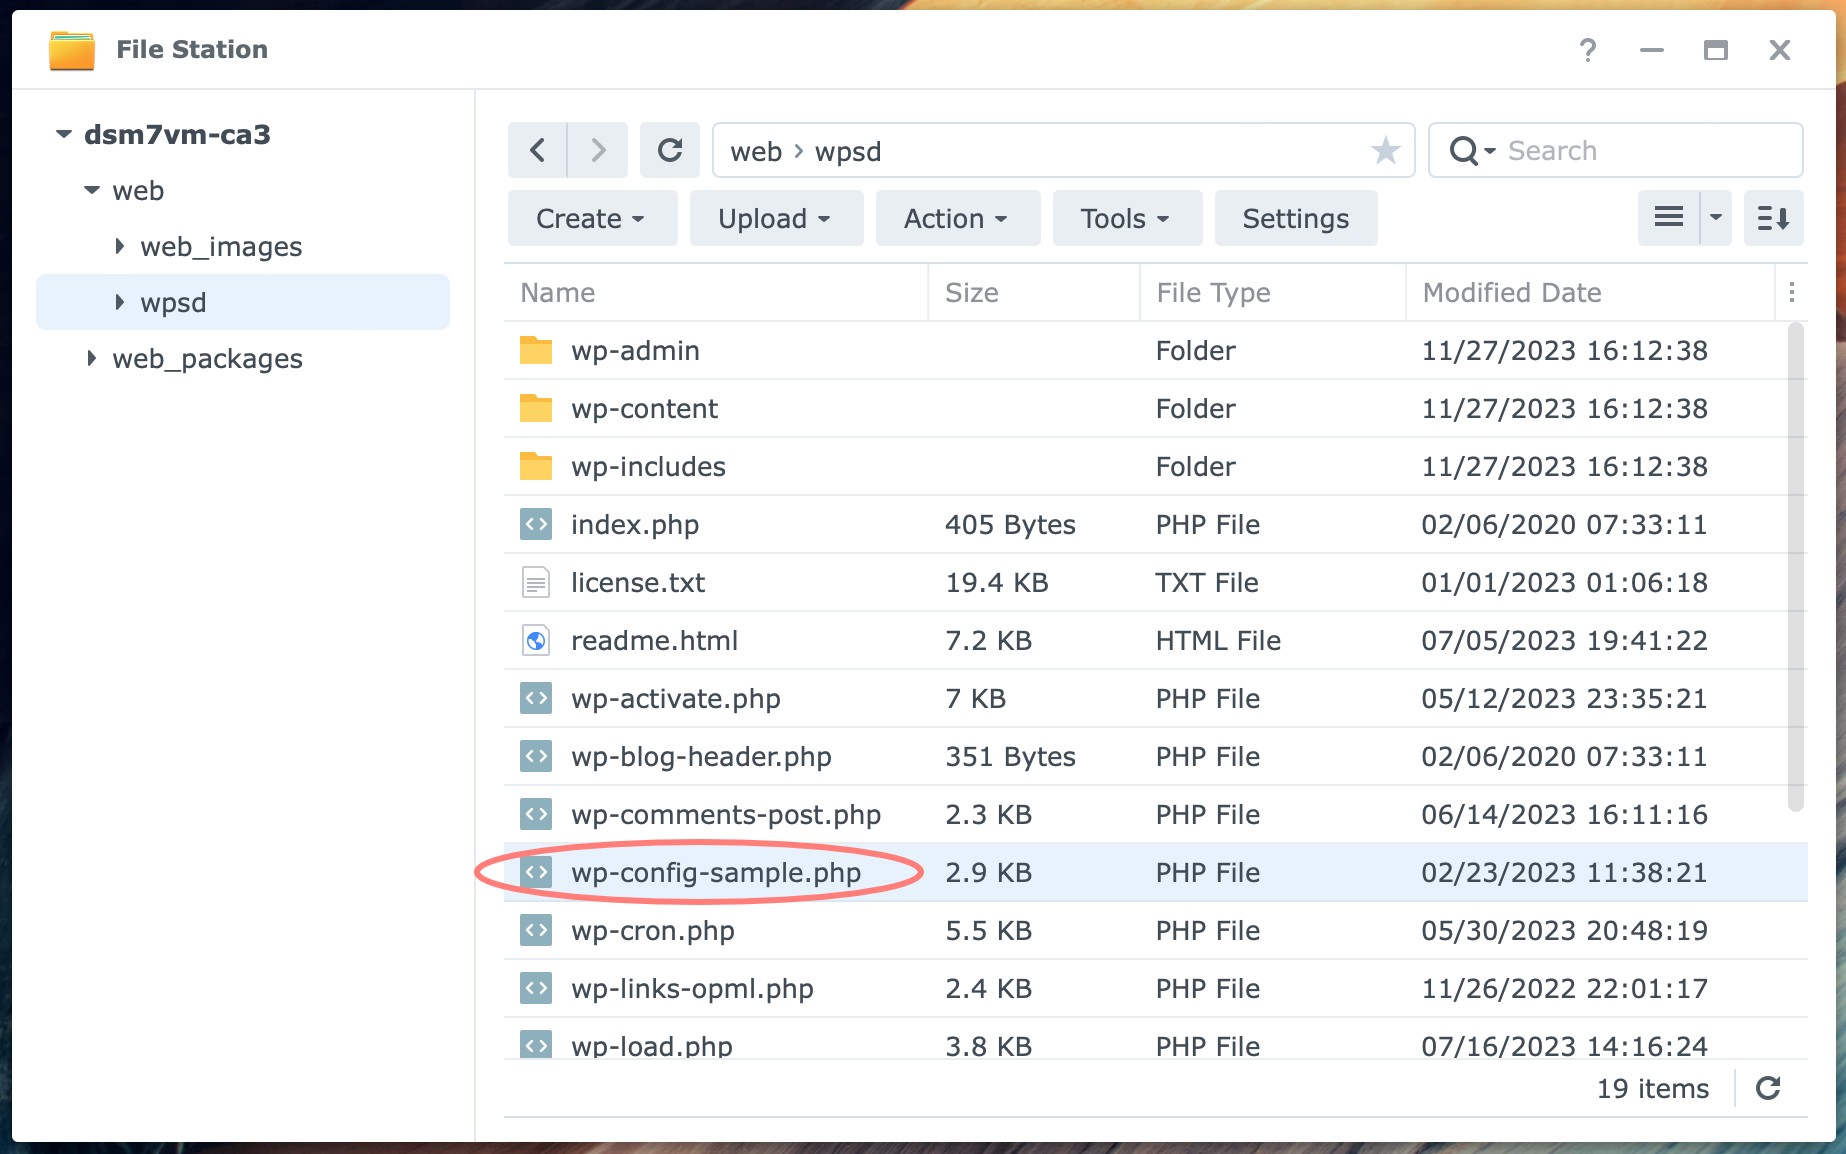
With the Text Editor application installed, go to /web/wpsd (or your folder name) and double-click on wp-config-sample.php. I should open it in Text Editor.
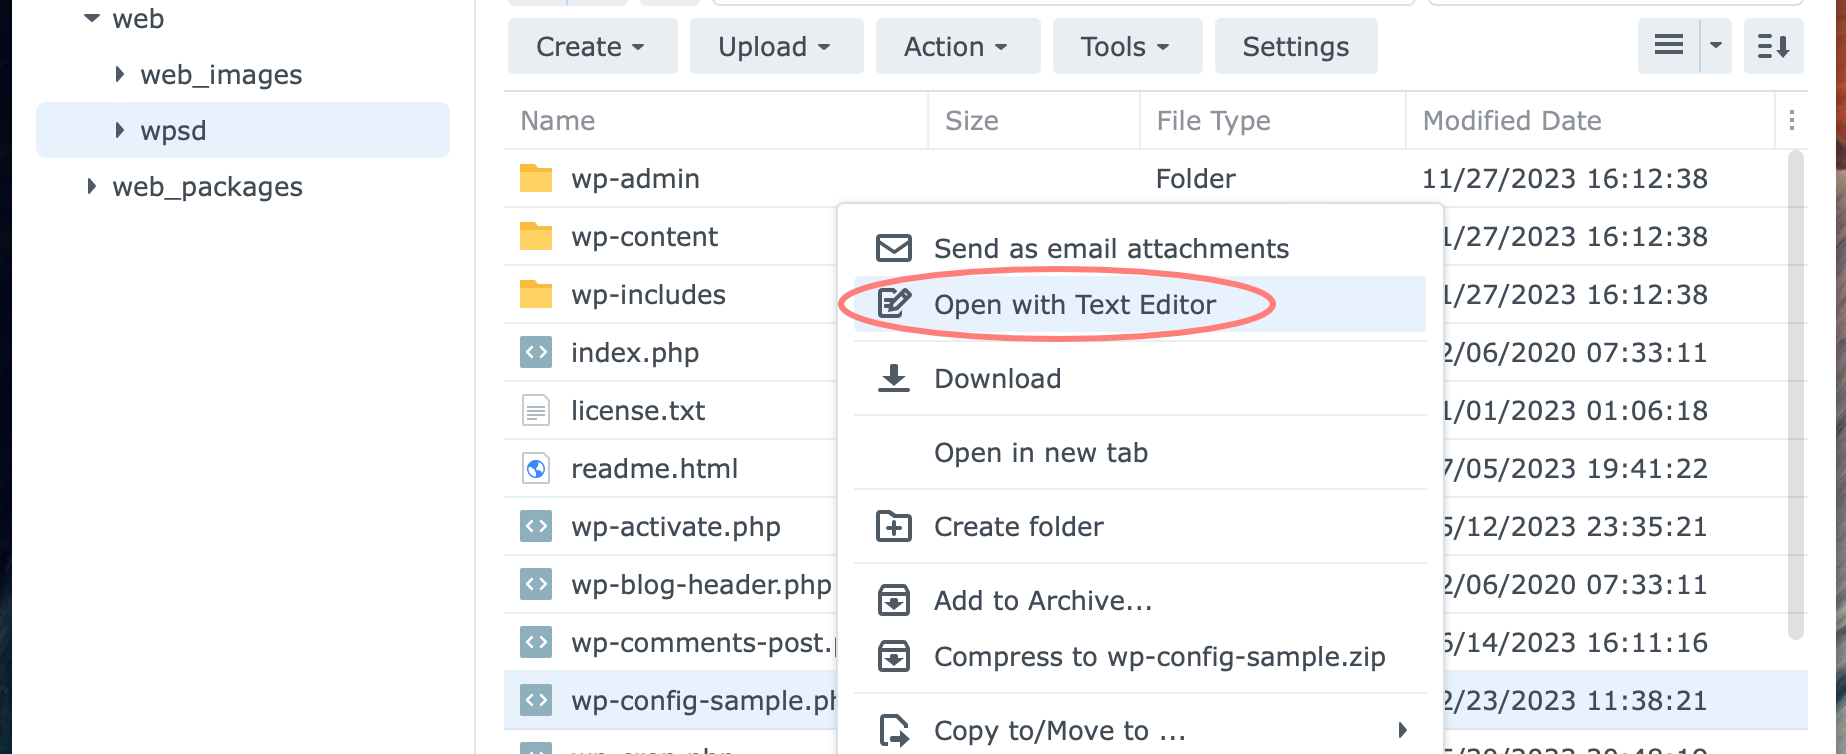
If not, right-click on the file and choose Open with Text Editor. When the Text Editor opens the file, browse to the end of it and create a new line.
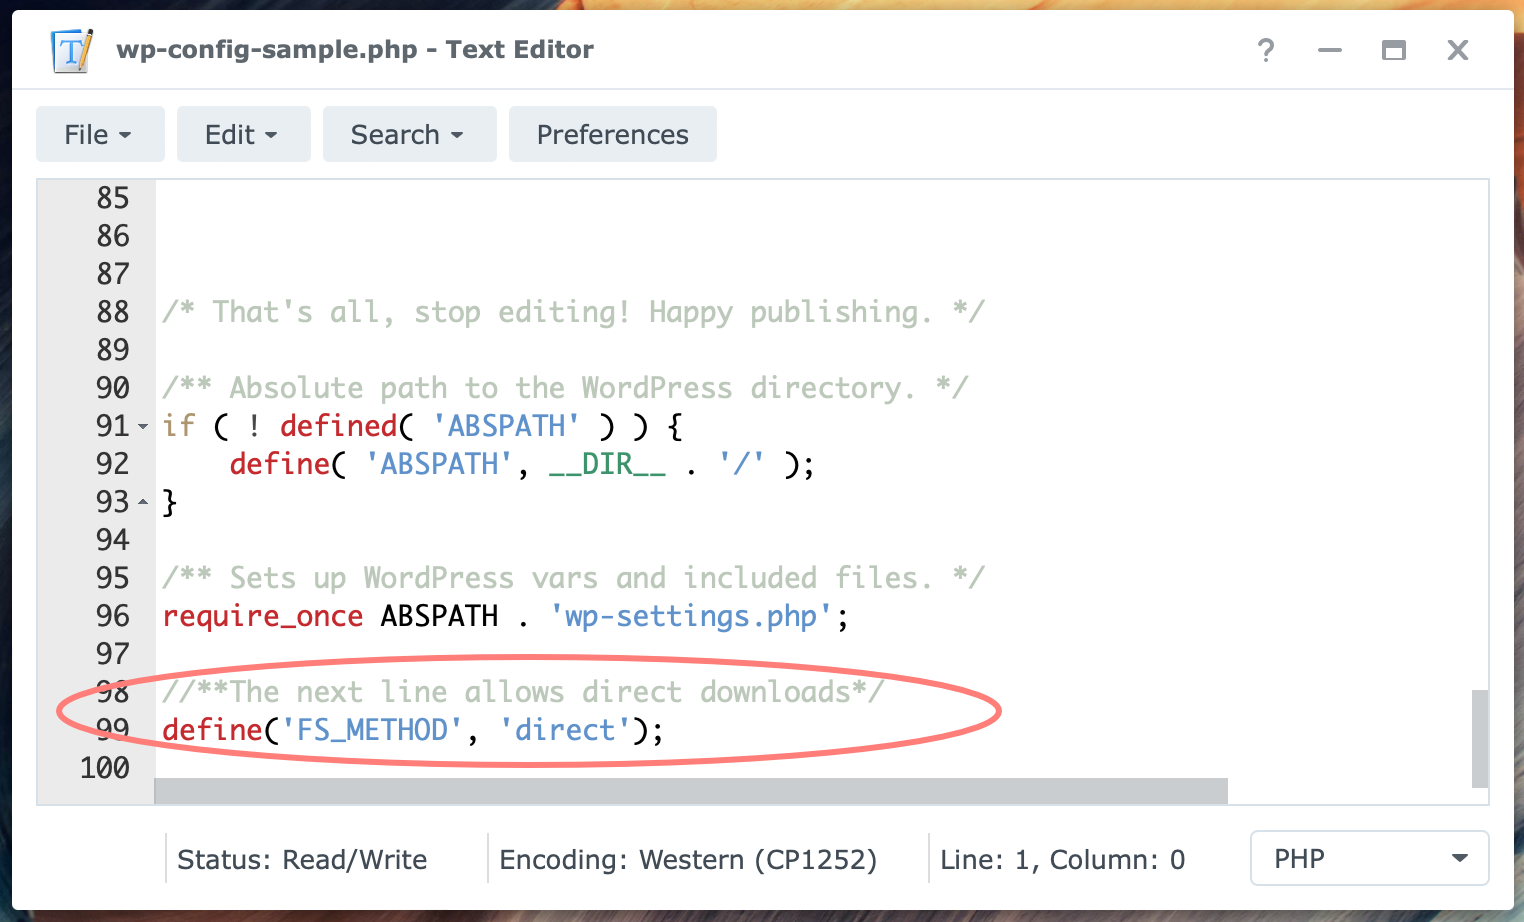
To allow direct downloads of updates from the internet instead of using FTP, add the following lines at the end of wp-config-sample.php:
//**The next line allows direct downloads*/
define('FS_METHOD', 'direct');
Click on File > Save to save the file. Close the Synology Text Editor.
Create a WordPress database and user
From your DSM desktop, open the main menu and fire up phpMyAdmin. Note that it opens in a separate browser window or tab.
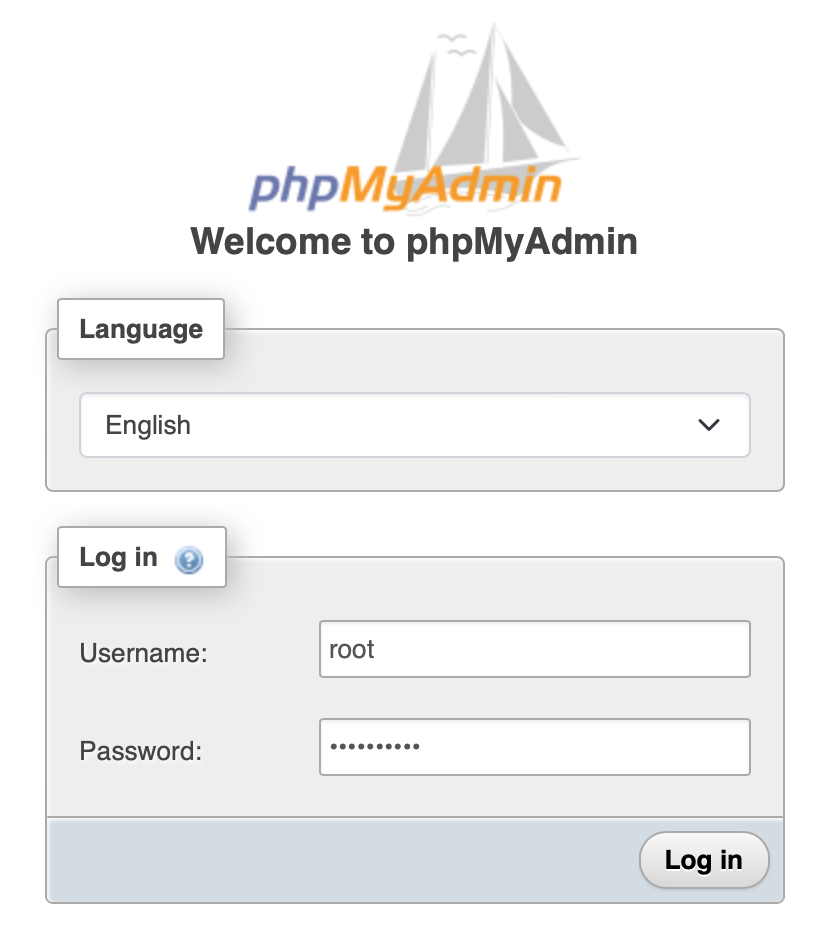
Login to the MariaDB 10 database with the account name root and the password you created during the installation.
phpMyAdmin is a web application; you can always open it from http://ip_address_nas/phpmyadmin/. You do not have to log in to DSM first.
Select New in the left column, and click on the User accounts tab at the top of the right pane. This opens the User accounts overview page.
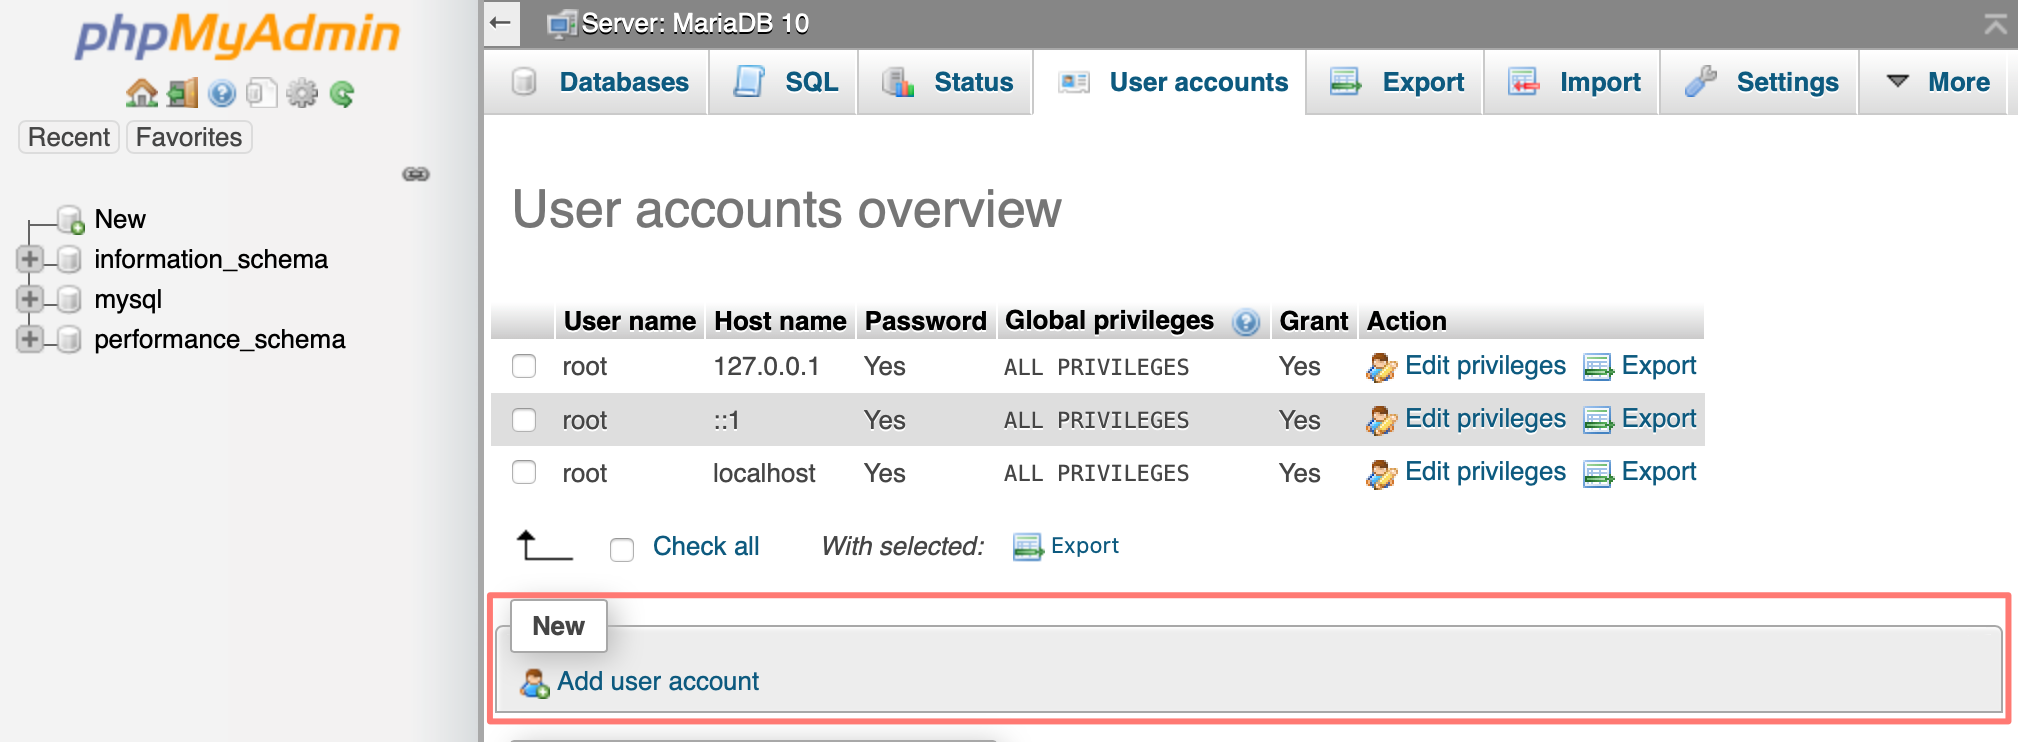
Click on the Add user account link under the New label. This opens the Add user account page.
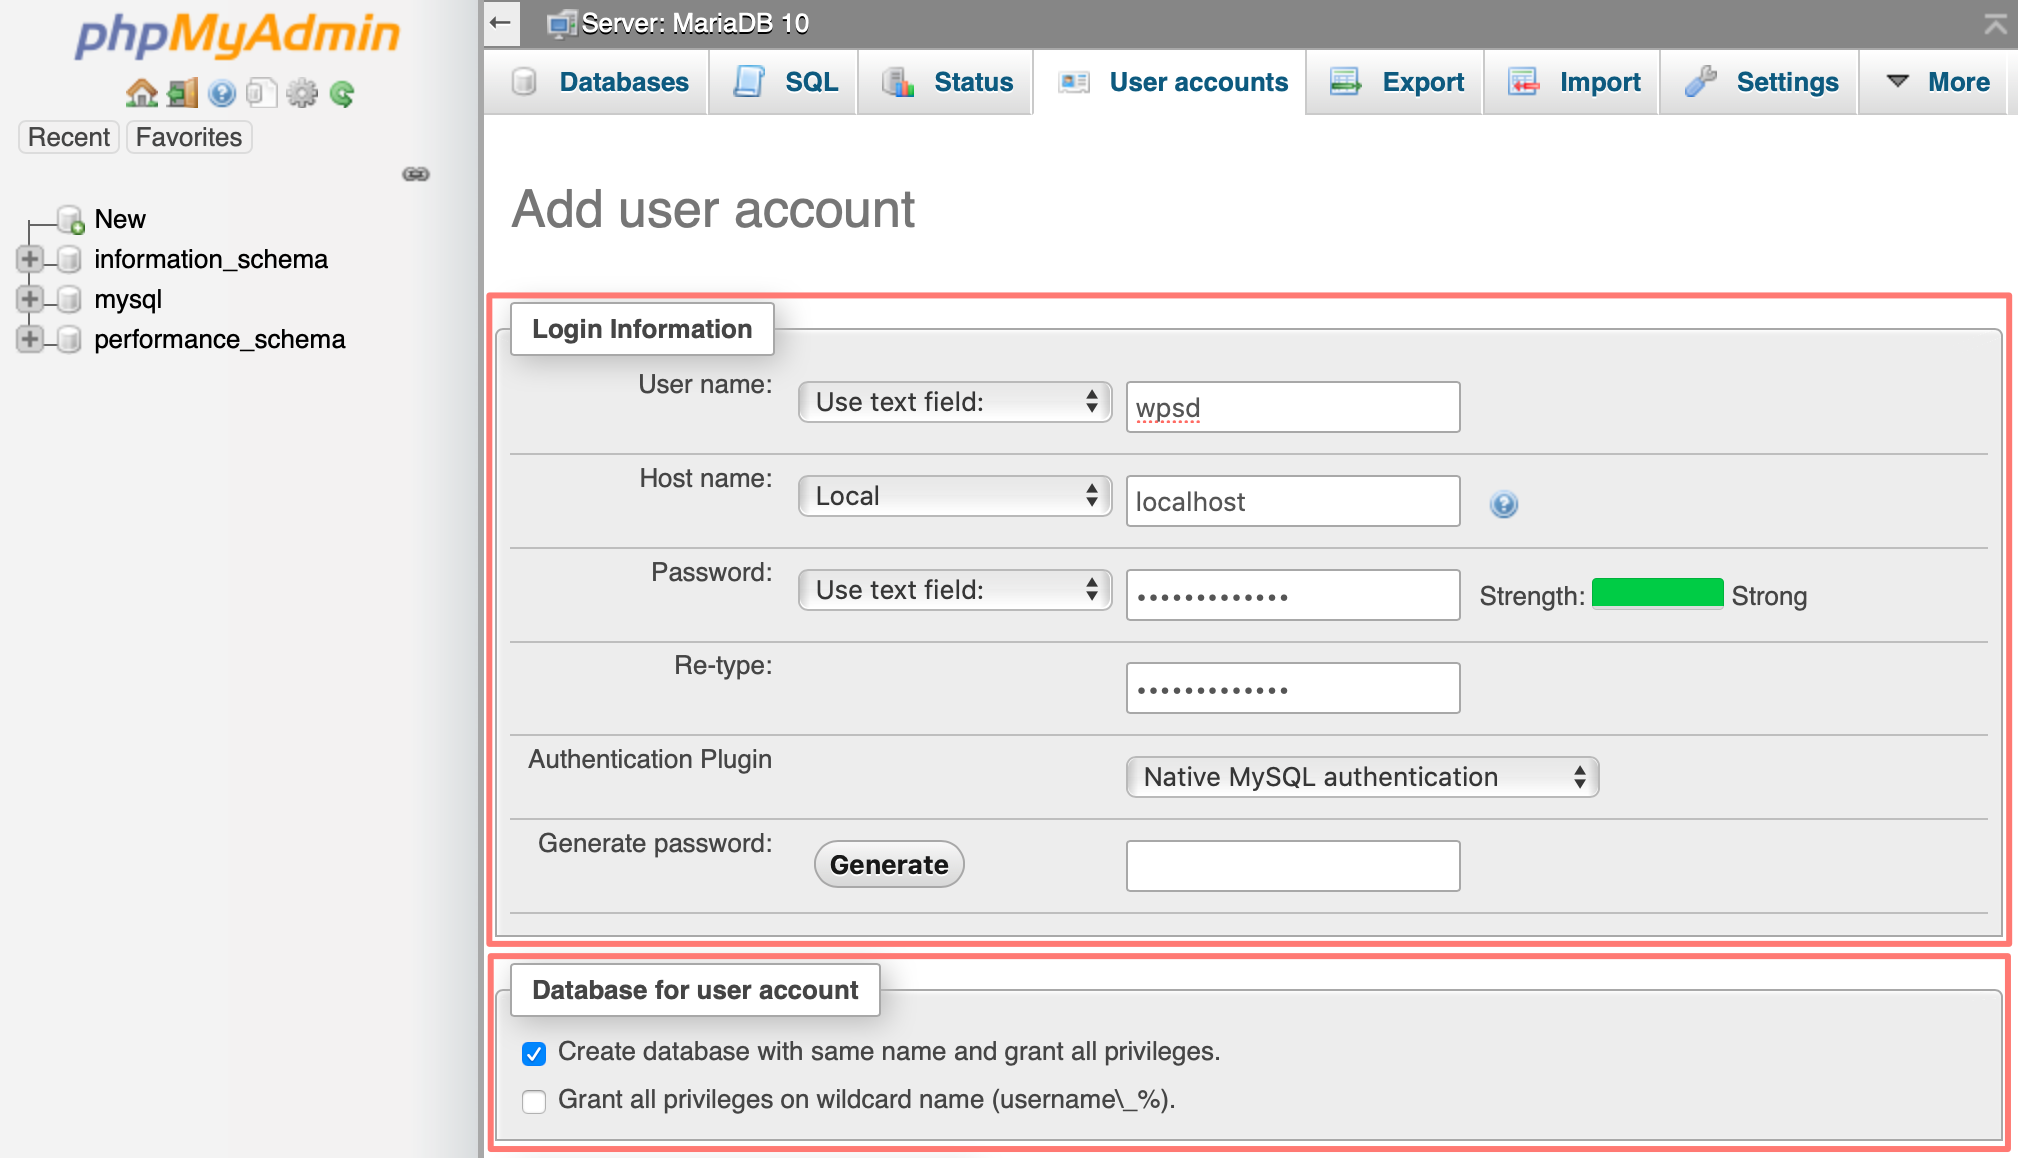
Fill in under Login Information:
- User name
- Use text field (from drop-down list)
- fill in a name for the database user; I use wpsd like the /web/wpsd subfolder I created earlier to keep it easy and consistent
- Use text field (from drop-down list)
- Host name
- Local (from drop-down list)
- localhost
- Local (from drop-down list)
- Password
- Use text field (from drop-down list)
- Generate a password with the Generate button. This fills in the password fields. Copy and paste the password in a safe place. If you already have a password you like to use, paste it in the Password field and Re-type field.
- Use text field (from drop-down list)
- Authentication plugin
- Native MySQL authentication
Fill in under Database for user account:
- Create a database with the same name and grant all privileges > enable
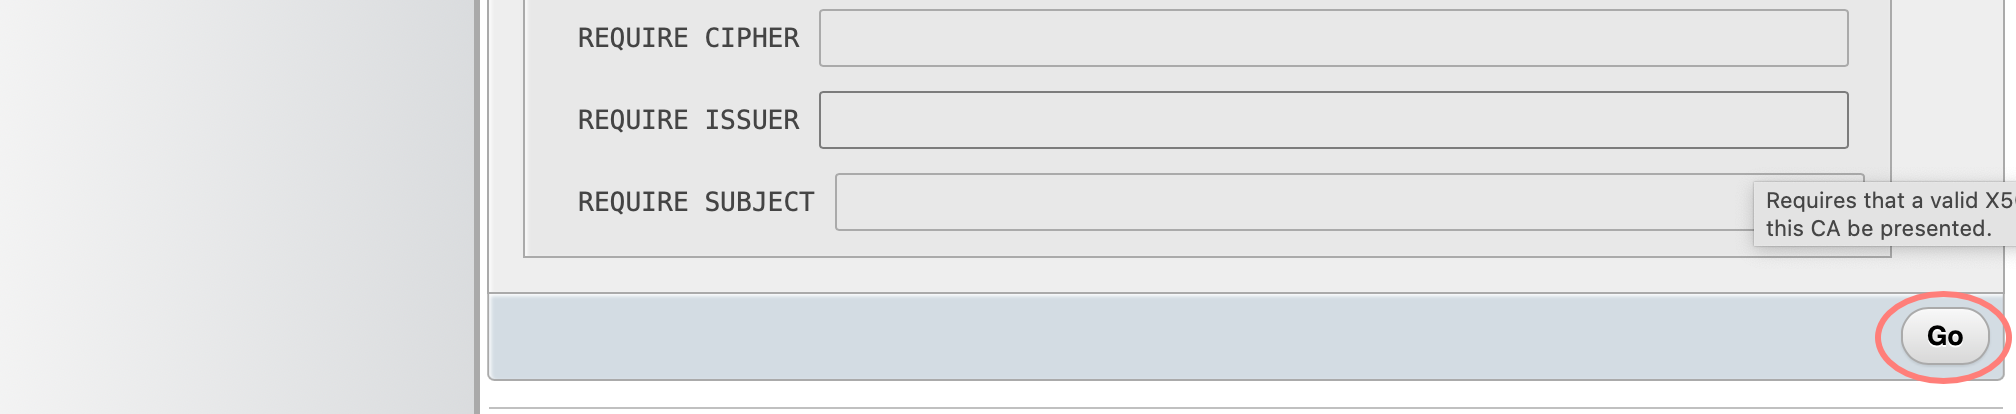
Now scroll to the bottom of the page and click the Go button.
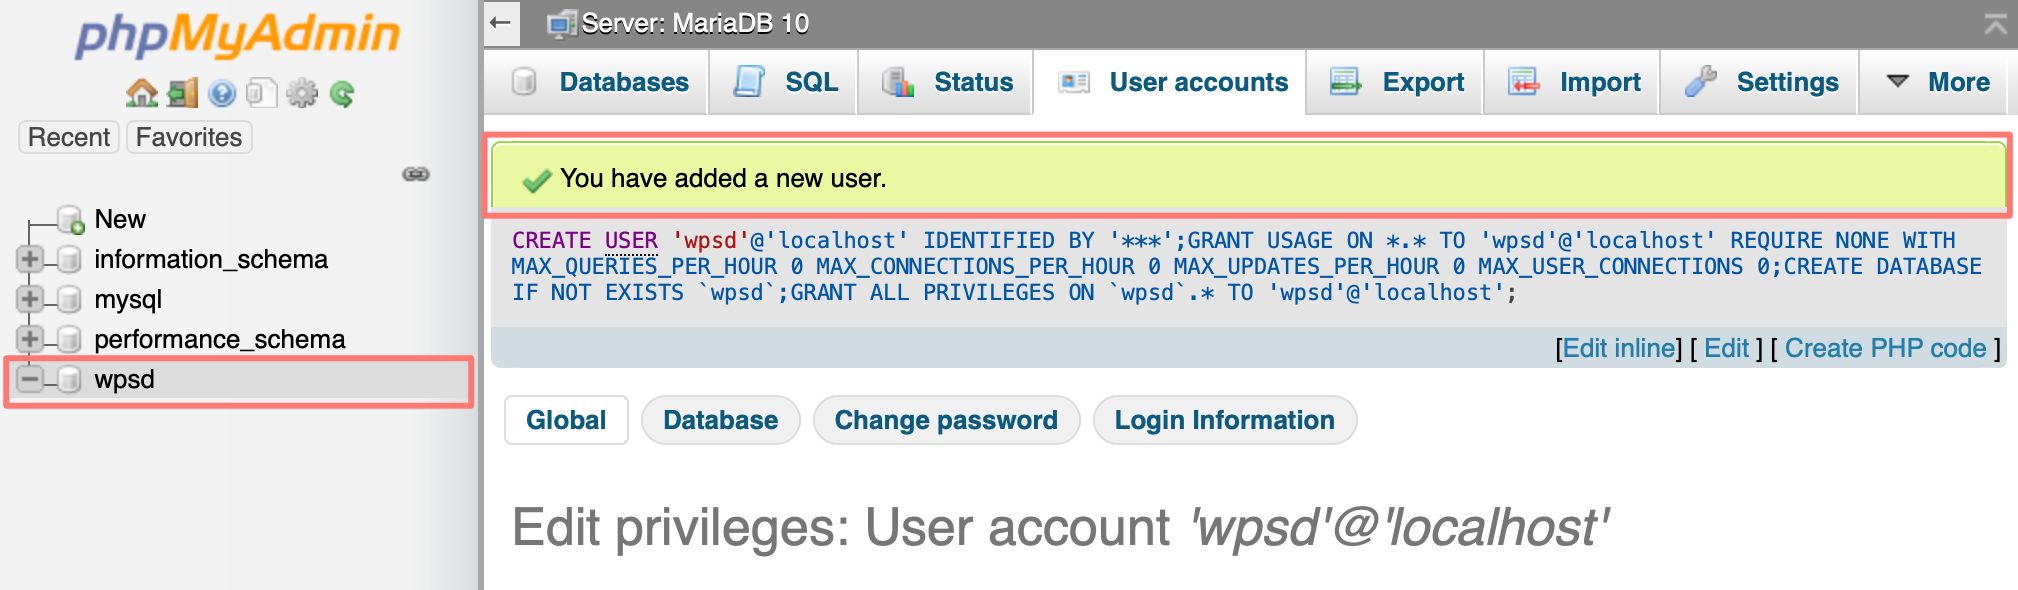
Notice the confirmation in the main screen at the top – you have added a new user – and the database wpsd in the left column.
Select the new database – wpsd in my example – in the left column. Notice that there are no tables yet in the database. It is empty. Once you set up WordPress, it creates tables in this database.
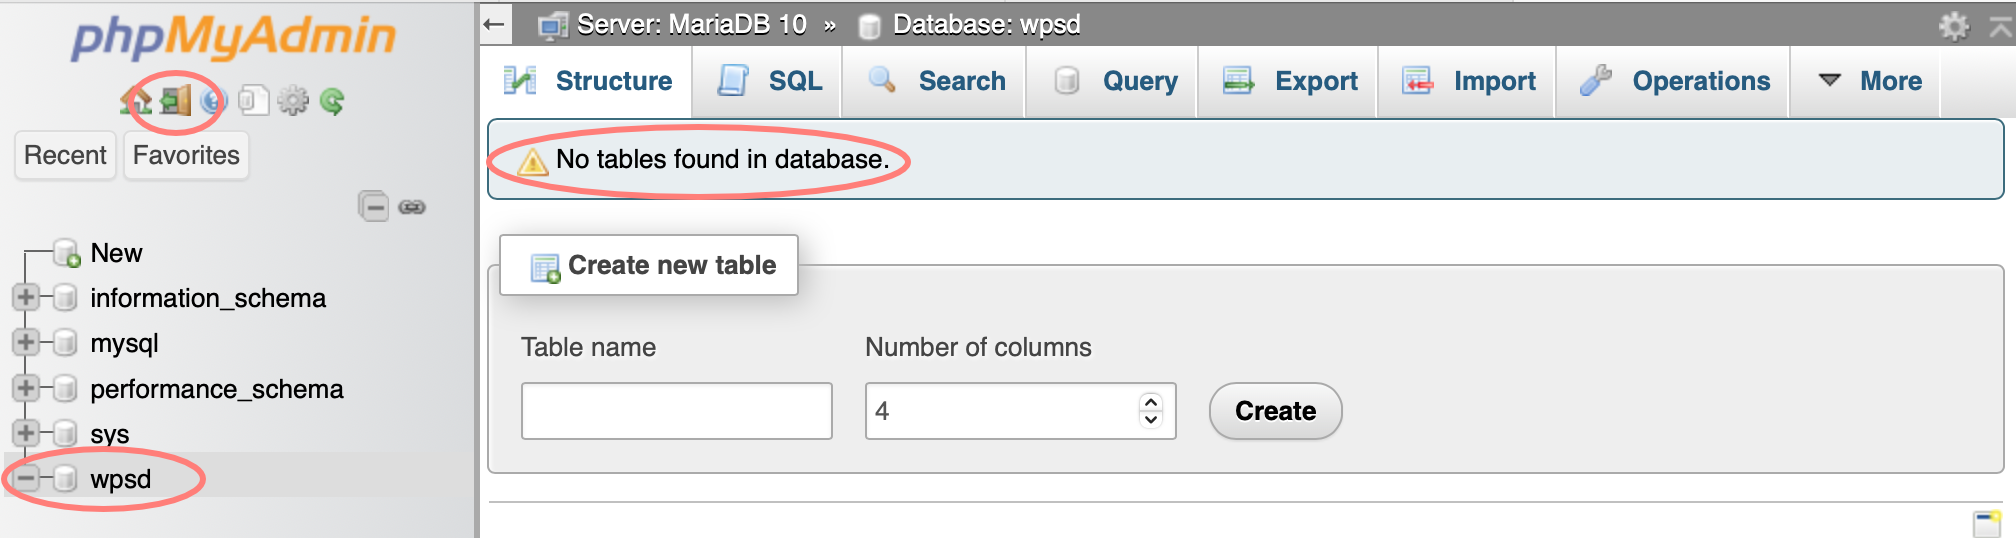
You created WordPress’s database and user account to access the database. Note that you need to copy the username and password into the WordPress installation in a minute.
Log out from phpMyAdmin from the column left, the second icon, a door.
Redirect traffic for domain name
If you plan to create a website with your domain name, you best set up DNS and port forwarding before starting the WordPress 5-minute install. Once correctly set up, WordPress will configure the domain name correctly internally.
- At the domain name provider, direct the domain name to the external IP address of your internet router.
- Create port forwarding rules for ports TCP 80 and 443 in your router to the same ports on your NAS. Use your router manual or search the web for instructions related to your brand and model router.
Suppose you like to use the registered domain name but use your website only internally; set up a DNS server on your local network. You can install a DNS server on your Synology NAS.
Install SSL certificate
If you plan to create a website accessible from the internet, I strongly advise installing an SSL certificate for the domain. To succeed, you must perform the actions from the previous steps where I discussed redirecting traffic for a domain name from your router to your NAS.
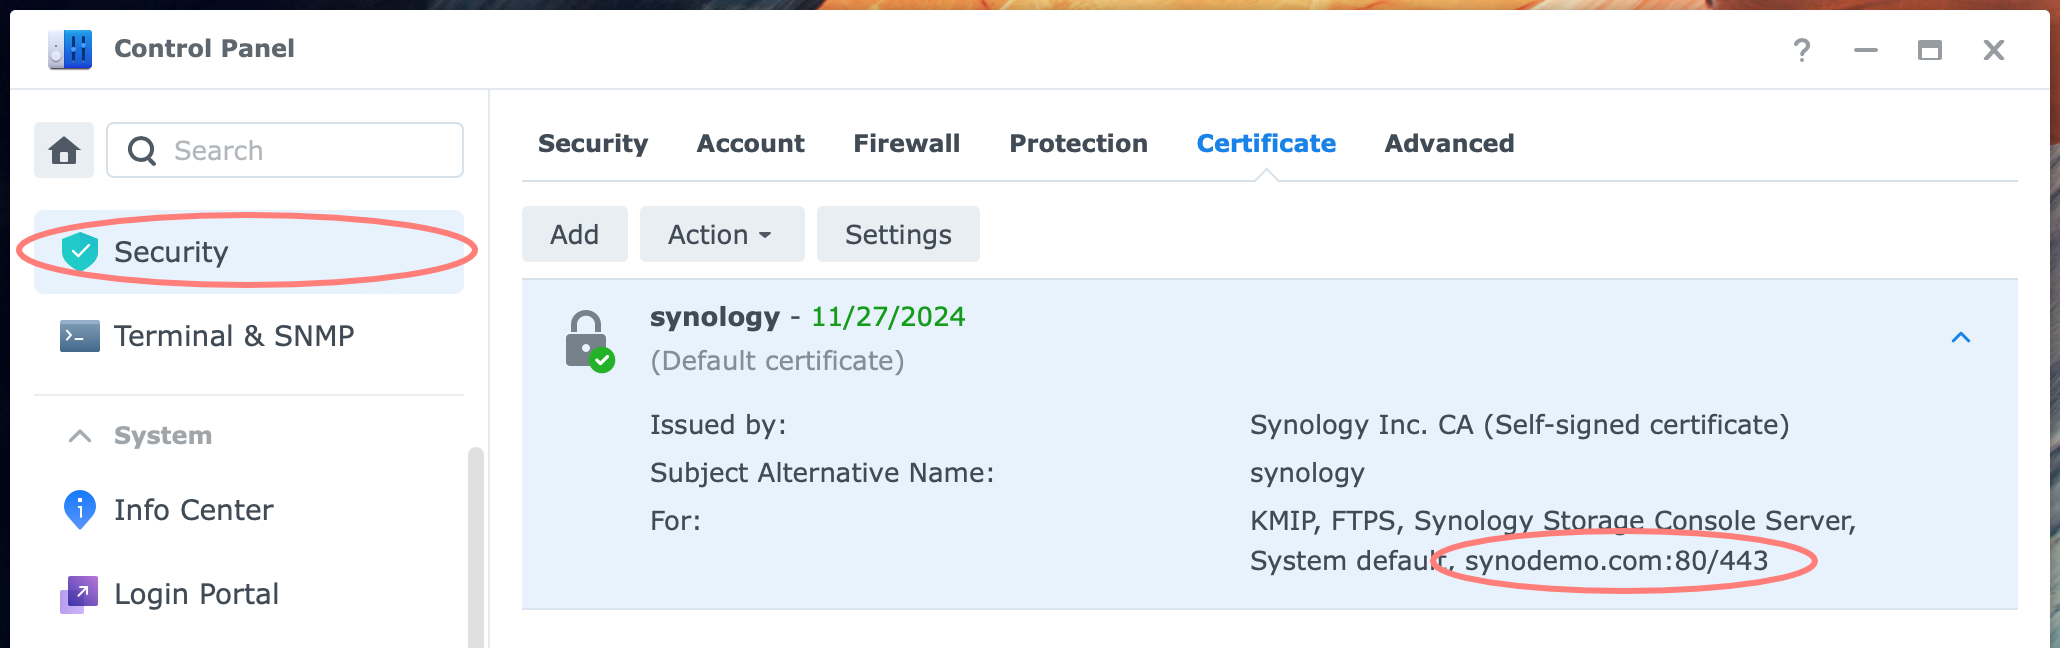
When creating a web portal in Web Station, you assign a hostname to a web service. In my example, the hostname is synodemo.com. Control Panel > Security > Certificate shows that the default certificate is linked to this service. You can use this certificate, but it will generate a safety warning in the browser when visiting the website because it is a self-signed certificate, and the domain name does not match. Request a dedicated certificate instead.
To request and install an SSL certificate from the Internet, your NAS needs to be accessible from the Internet during the enrollment process. Therefore, ports 80 and 443 must be forwarded from your internet router to your NAS.
You can, of course, use an SSL certificate from a provider different from Let’s Encrypt. You can do this later as well, and this only requires a change in the certificate configuration and does not affect your website configuration.
If you enabled a firewall on your NAS, ensure it allows TCP ports 80 and 443. Alternatively, temporarily disable the firewall until the certificate is issued.
Go to Control Panel > Security > Certificate tab. You can request a certificate for your host if you have not requested it now.

Click on the Add button. The Create certificate screen opens.
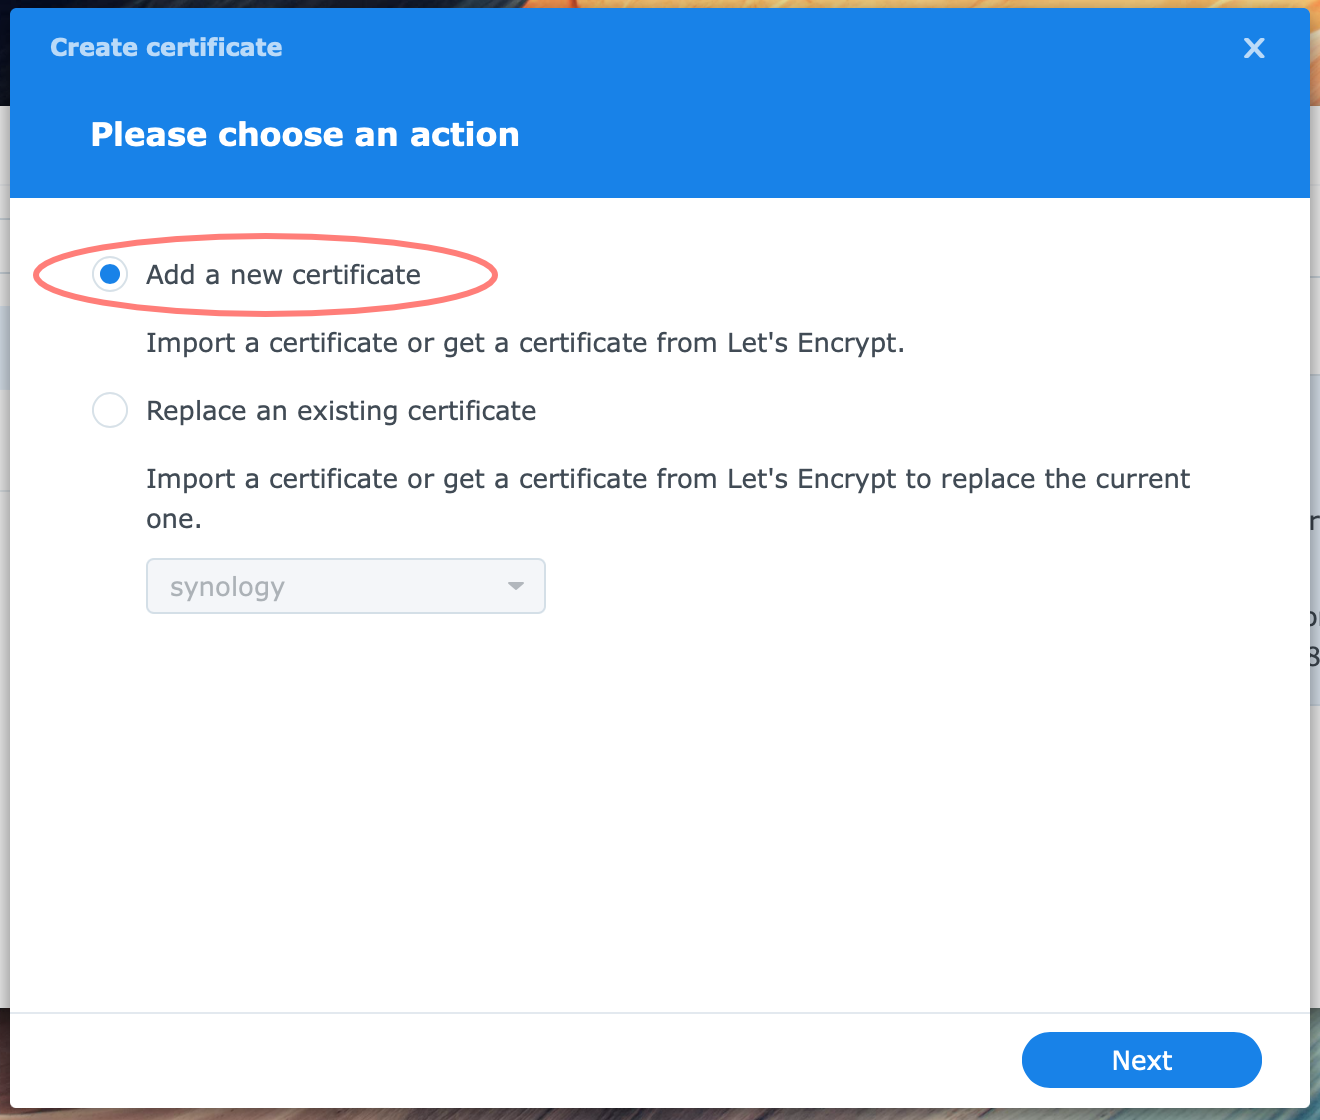
In the first Create certificate screen, choose to Add a new certificate. Click Next.
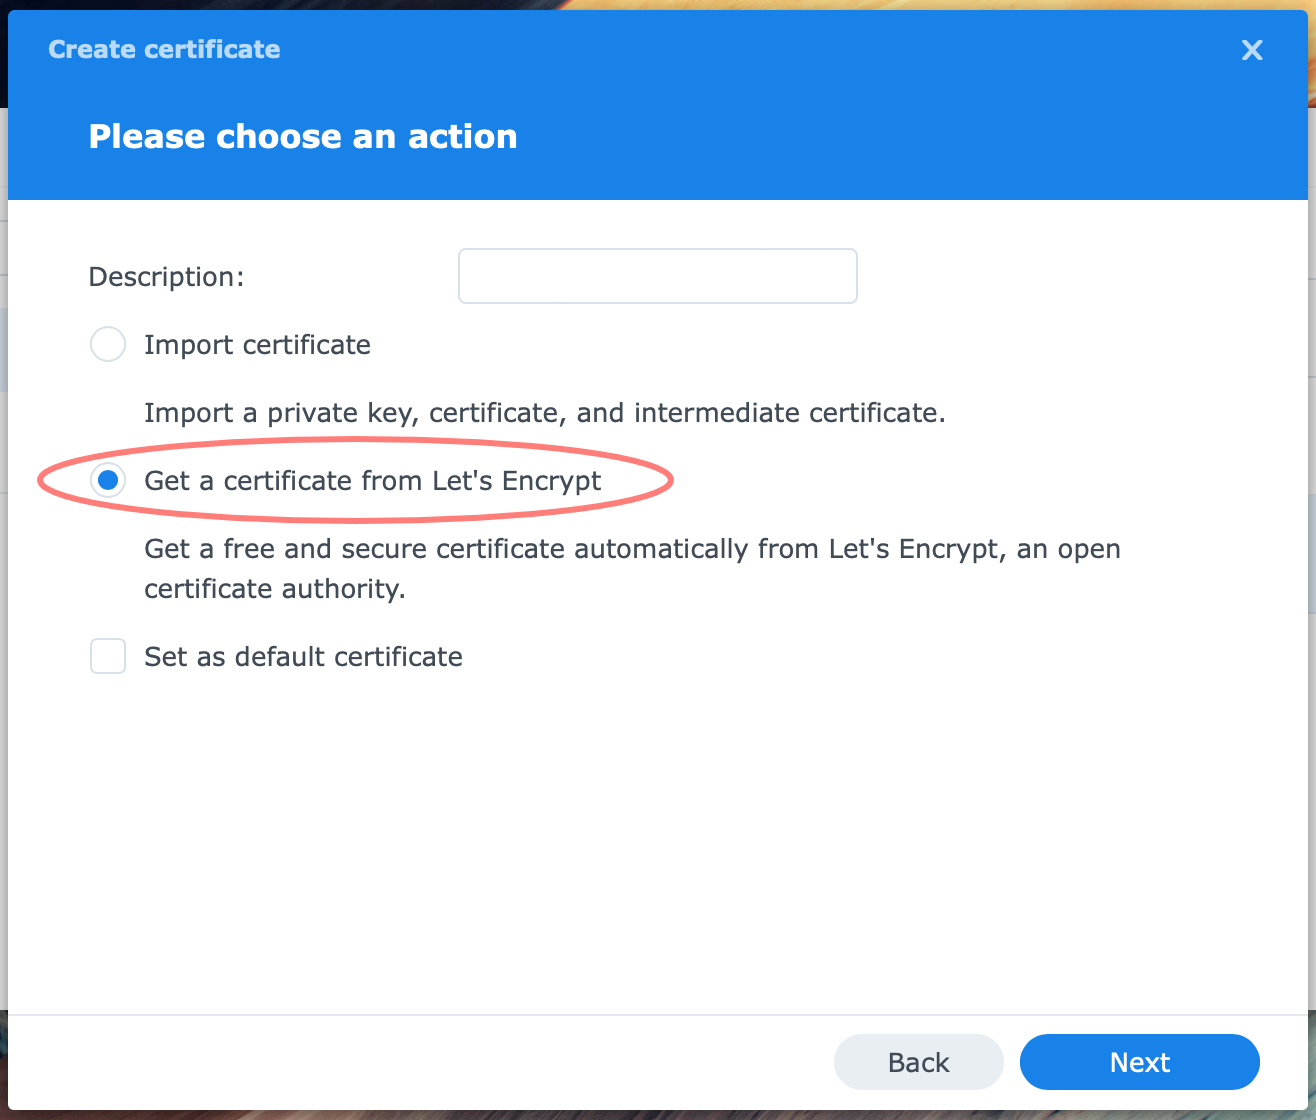
In the next screen, choose to Get a certificate from Let’s Encrypt. Click Next.
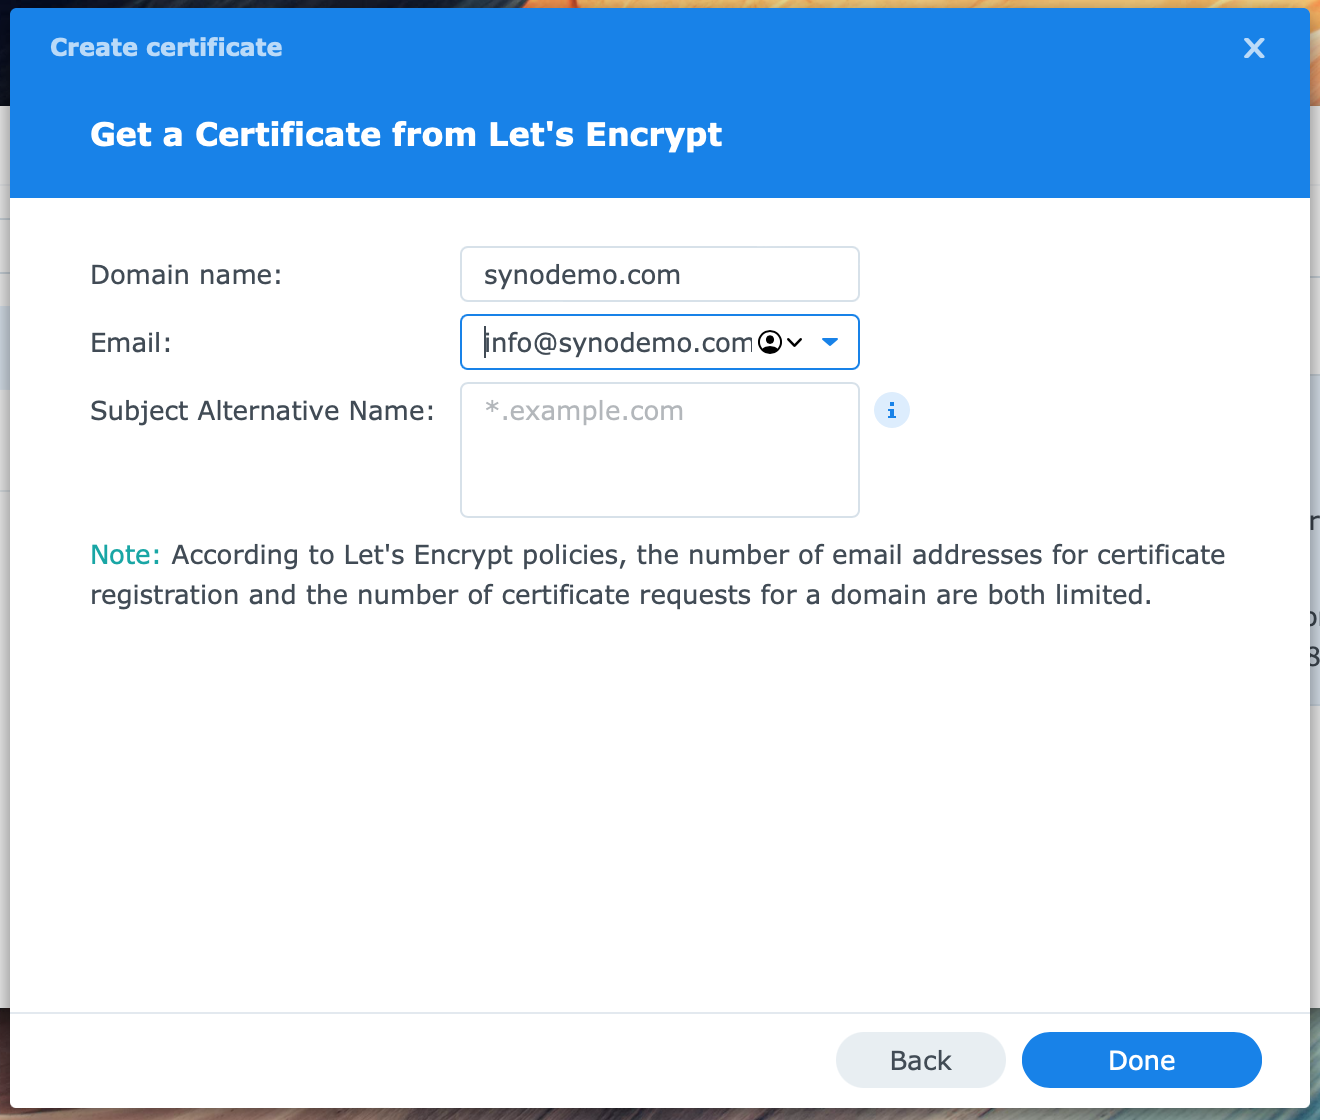
Fill in your domain name and a valid email address on the next screen. Click Done.
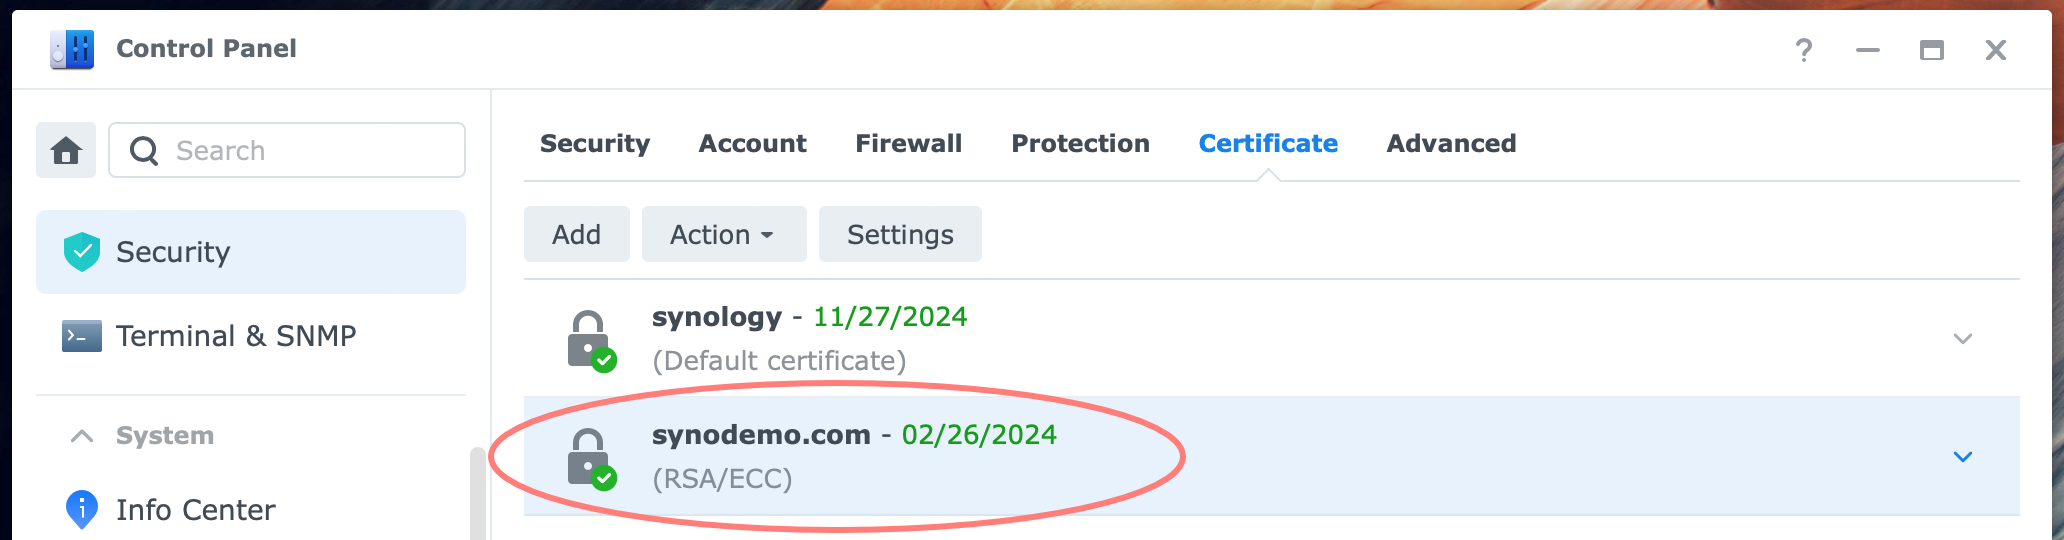
You now return to the Control Panel > Security > Certificate screen. Notice that the new certificate is added to the list.
To configure this certificate for the web portal or virtual host, click the Settings button on the Certificate screen. The Settings screen opens.
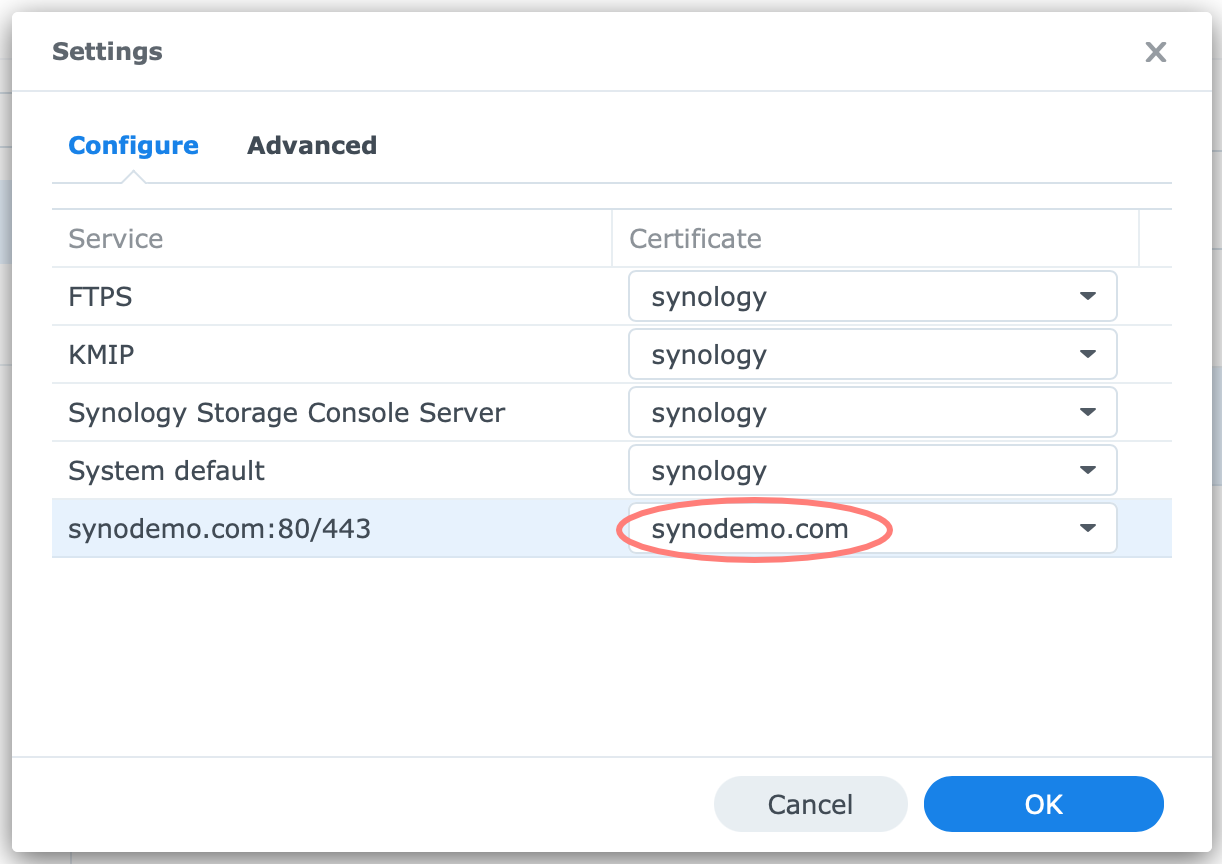
Select your domain or hostname in the Service column on the left, and select the certificate for that name in the Certificate column on the right. Click OK to confirm and close the dialog.
You may close the Control Panel.
Change folder permissions
We are almost ready to rock and roll, but there is still a step in the process we can not skip: folder permissions. As it is now, WordPress can not write to the folder in which you installed it. You use File Station from the DSM desktop to correct this.
As defined in this section, the permissions are working well from a system point of view but are not yet optimized from the WordPress perspective. Hopefully, I can provide an update soon.
Inherited or explicit permissions
Before we dive into the details, please be aware that a subfolder can inherit permissions from a parent folder or have its permissions set independently from the parent folder, also known as explicit permissions.
In our setup, the /web shared folder is the parent folder. The /web/wpsd folder is a subfolder to the /web folder. The /web/wpsd folder for WordPress inherits the permissions from its parent folder, the /web folder.
Web shared folder
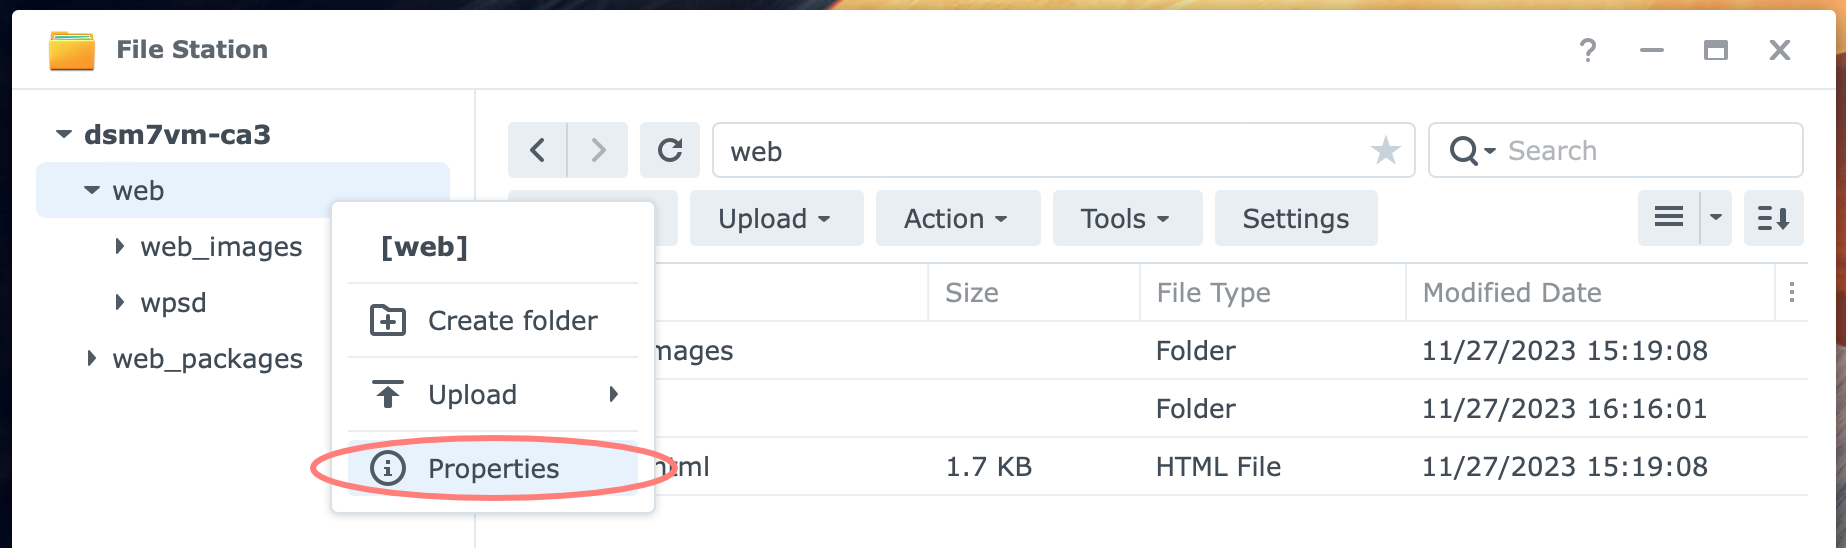
We first set the permissions for the shared folder /web. Open File Station, right-click on the shared folder and select Properties.
In the dialog that opens, select the Permissions tab. The screenshot below shows our starting point.
Notice that there is an http (user) and an http (group). You can tell the difference from the icons where a single head is a user.
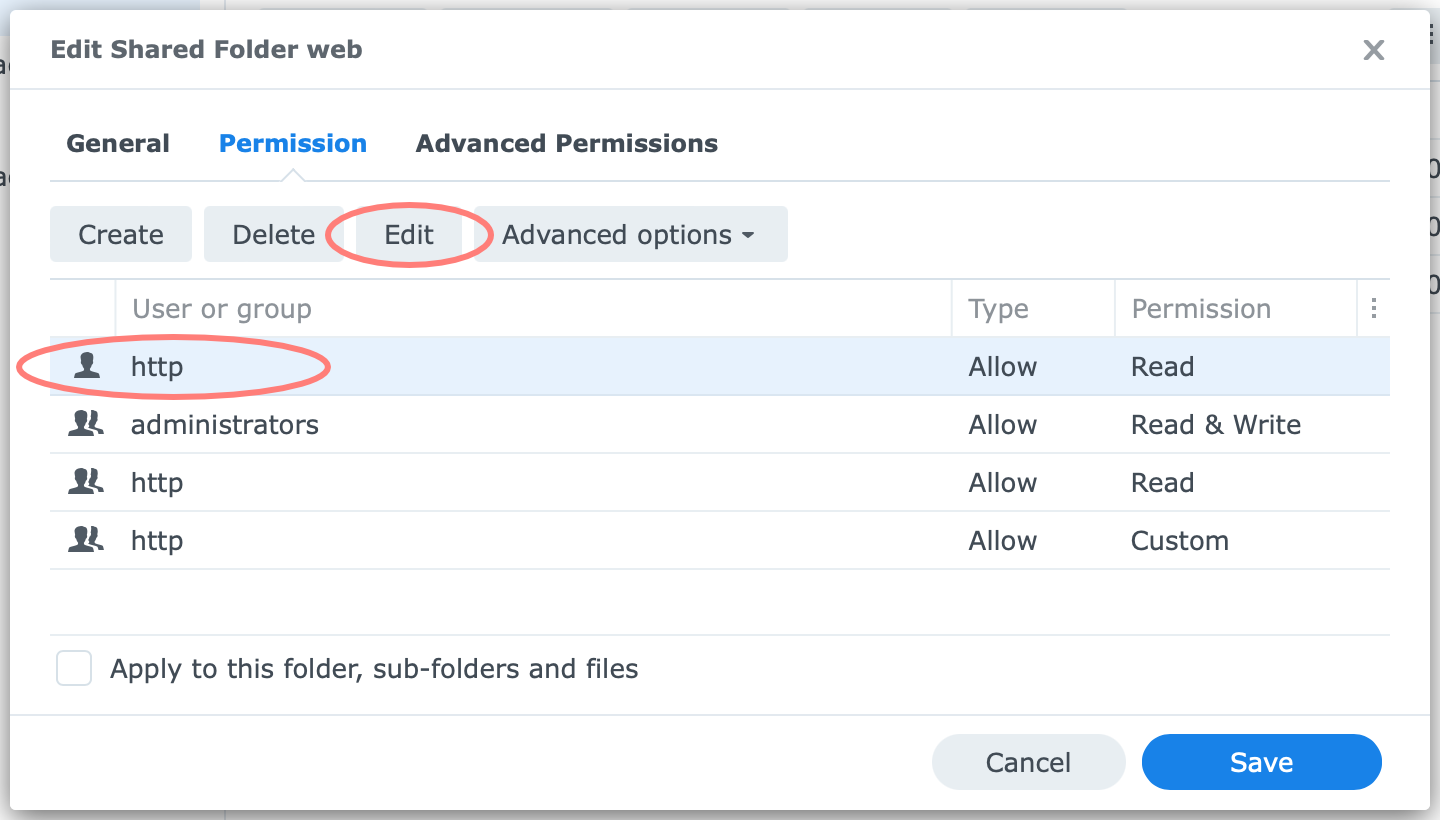
Select the http (user) and click on the Edit button. The Permission Editor opens.
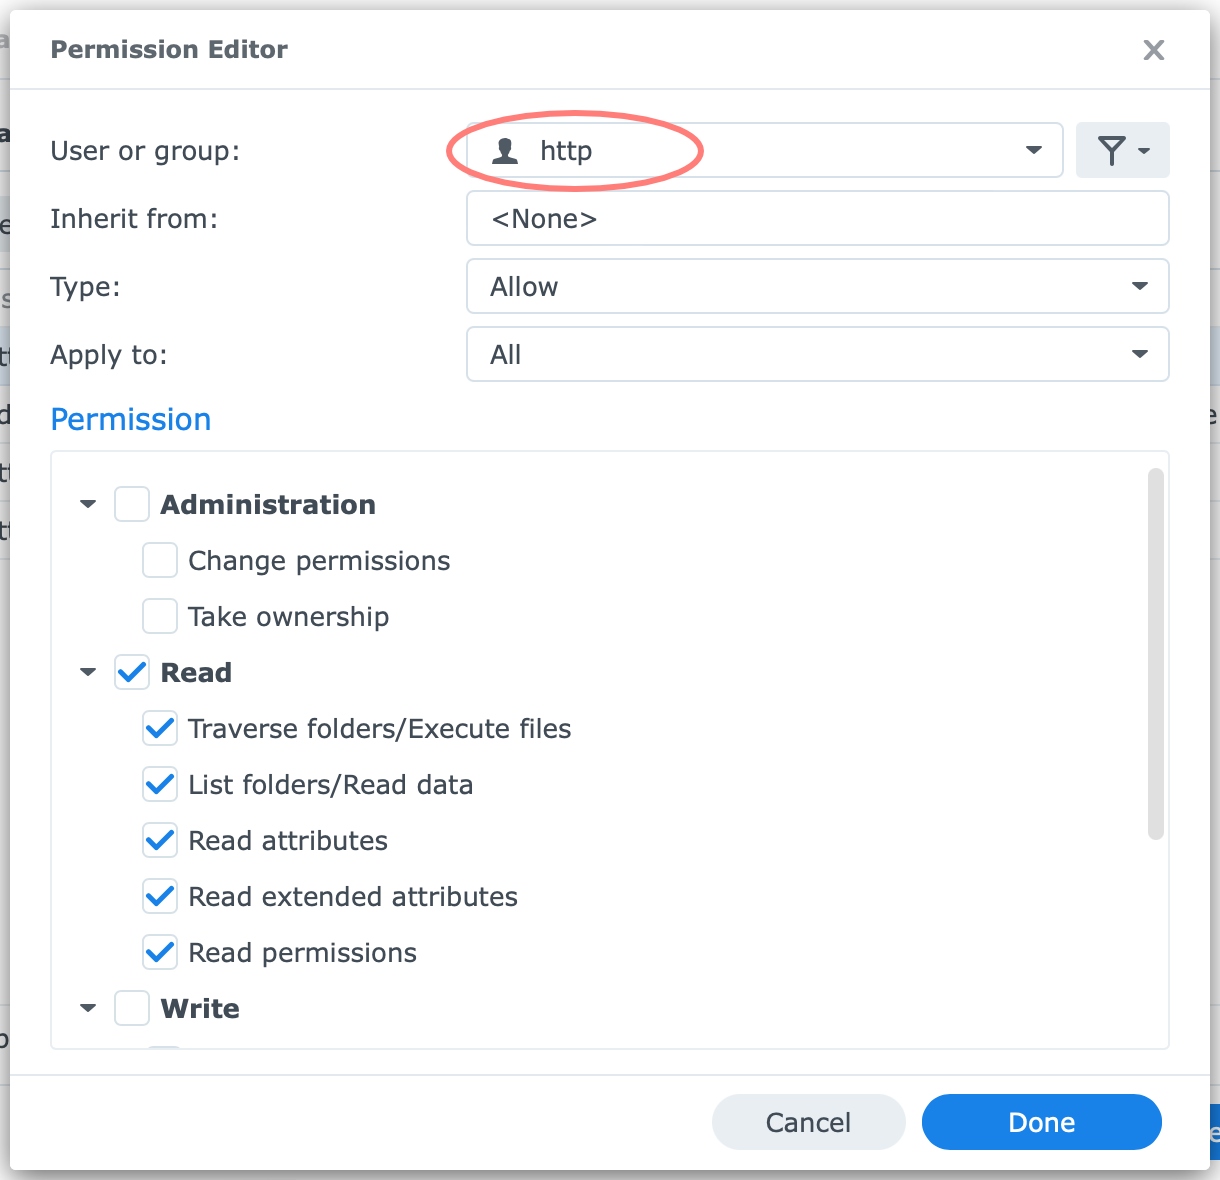
Open the User or group drop-down list, where the http (user) is selected. Scroll and select SYSTEM (group). Click Done.
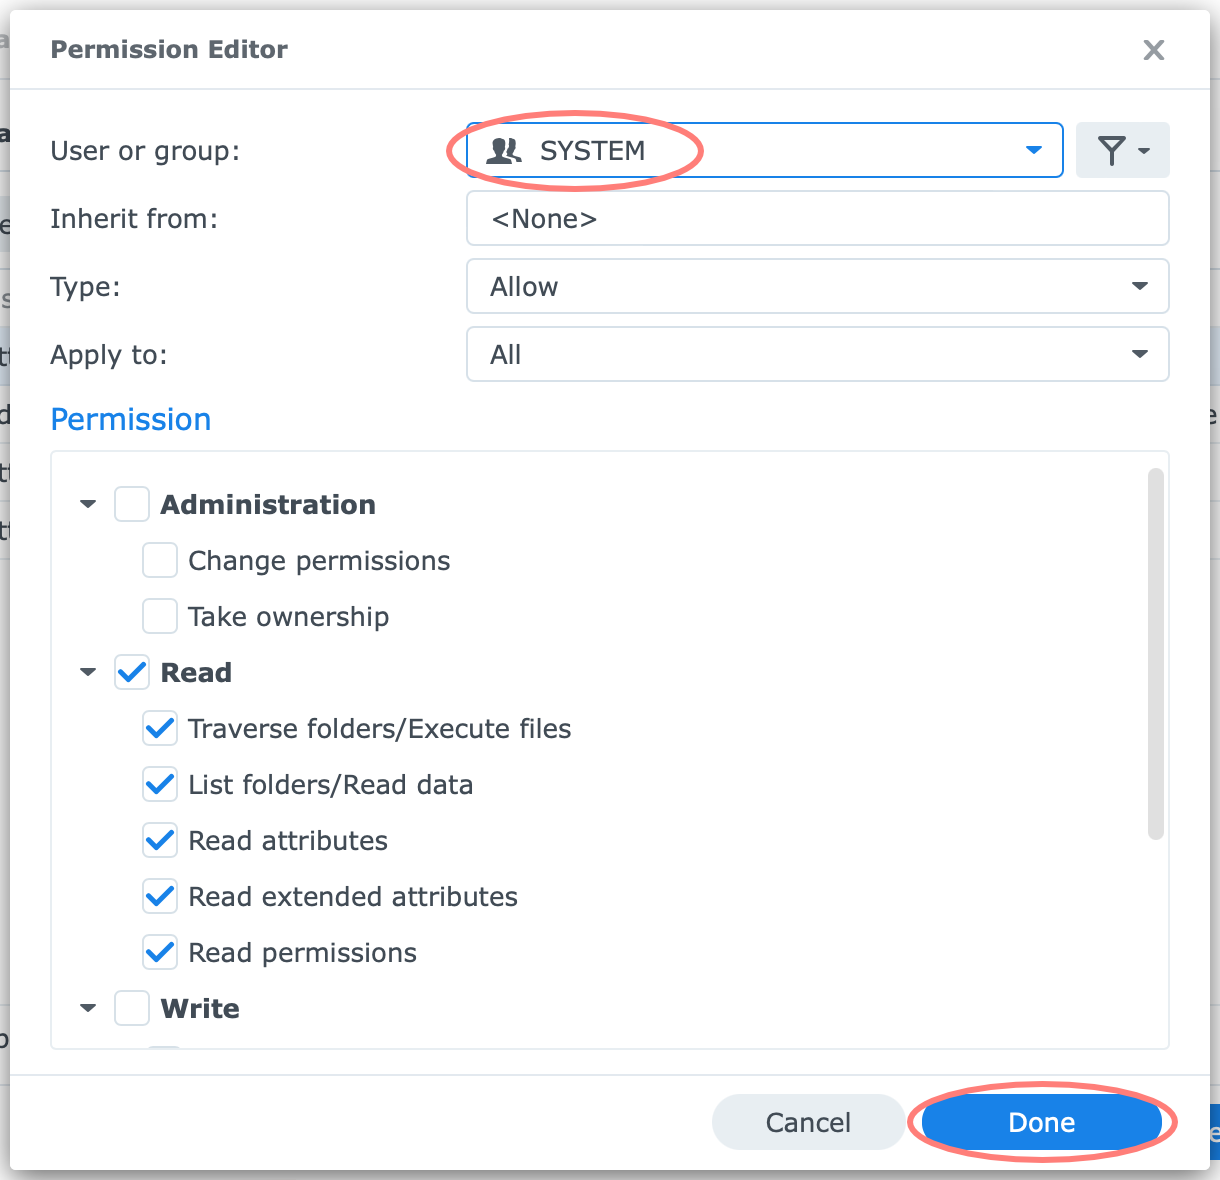
Review the result. It should be like the screenshot below.
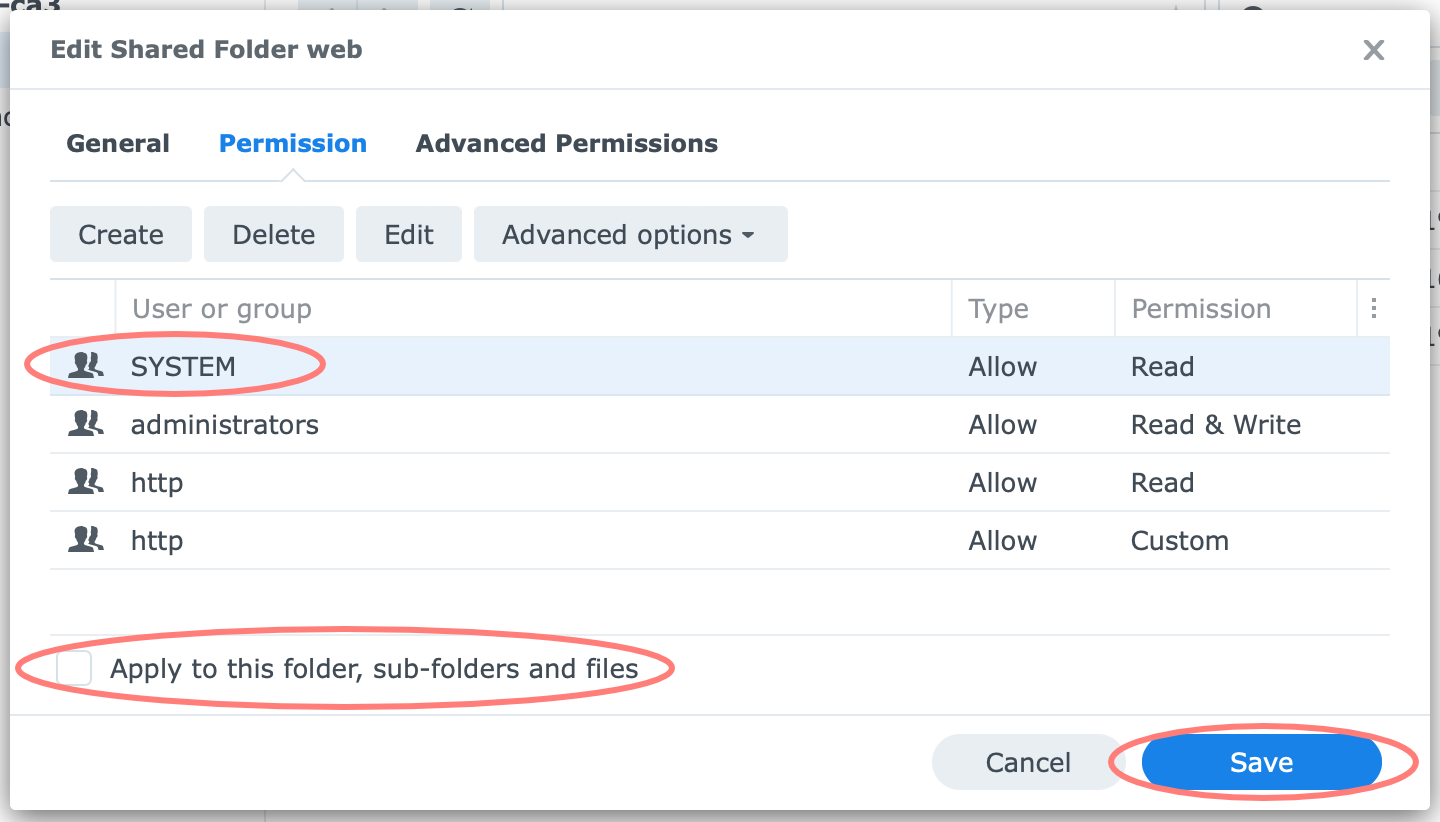
You do not enable the checkbox at the bottom because you change only the permissions for this folder. Click Save.
You have now set the proper permissions for the /web shared folder.
Set WordPress folder permissions
Next, browse to the /web/wpsd (or whatever your WordPress folder is called) folder. Right-click the folder and choose Properties. In the Properties dialog, open the Permissions tab.
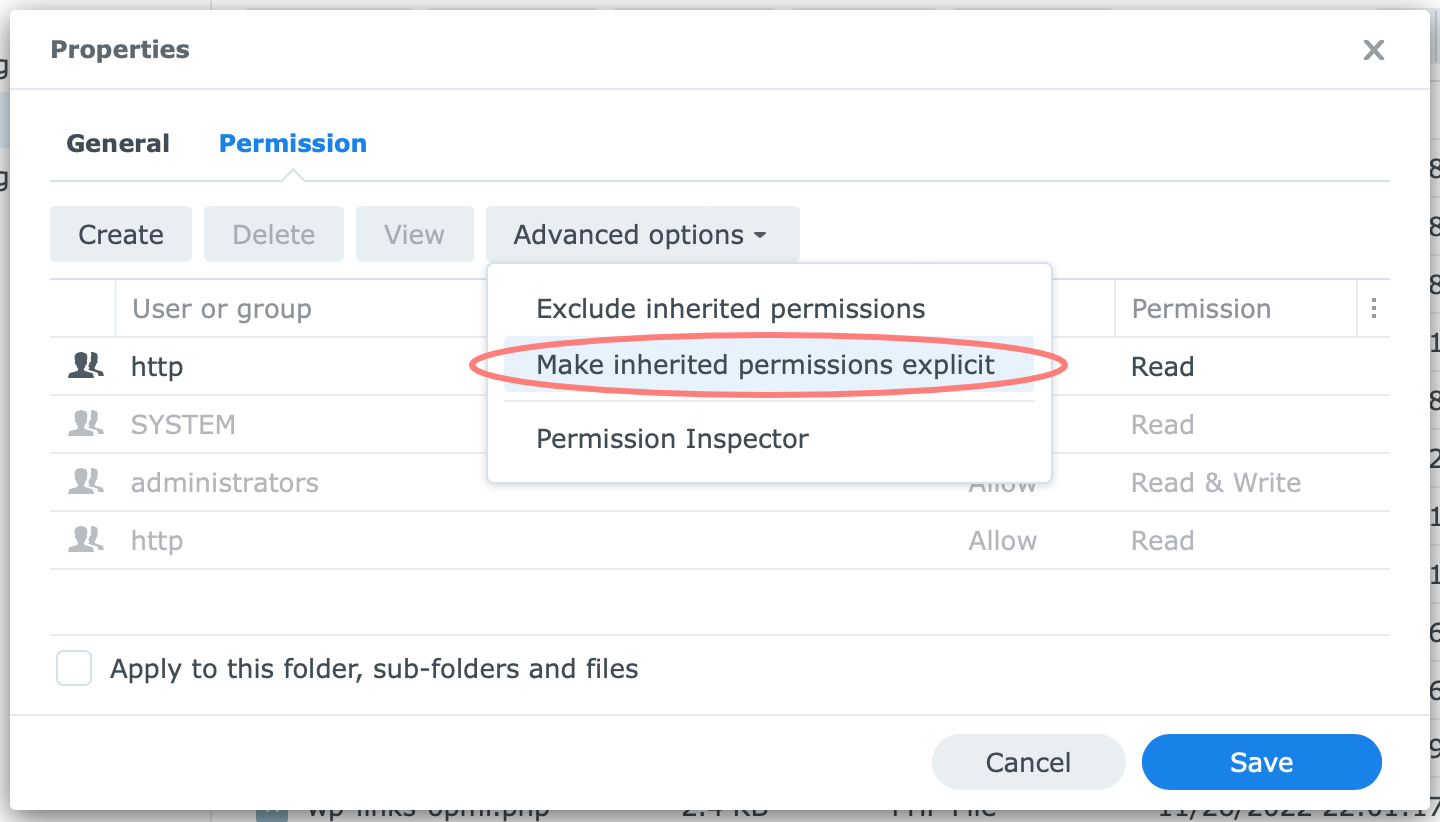
Notice that most permissions are grey because they are inherited from their parent, the /web share folder. First, we make the inherited permissions explicit. Click Advanced options > Make inherited permissions explicit.
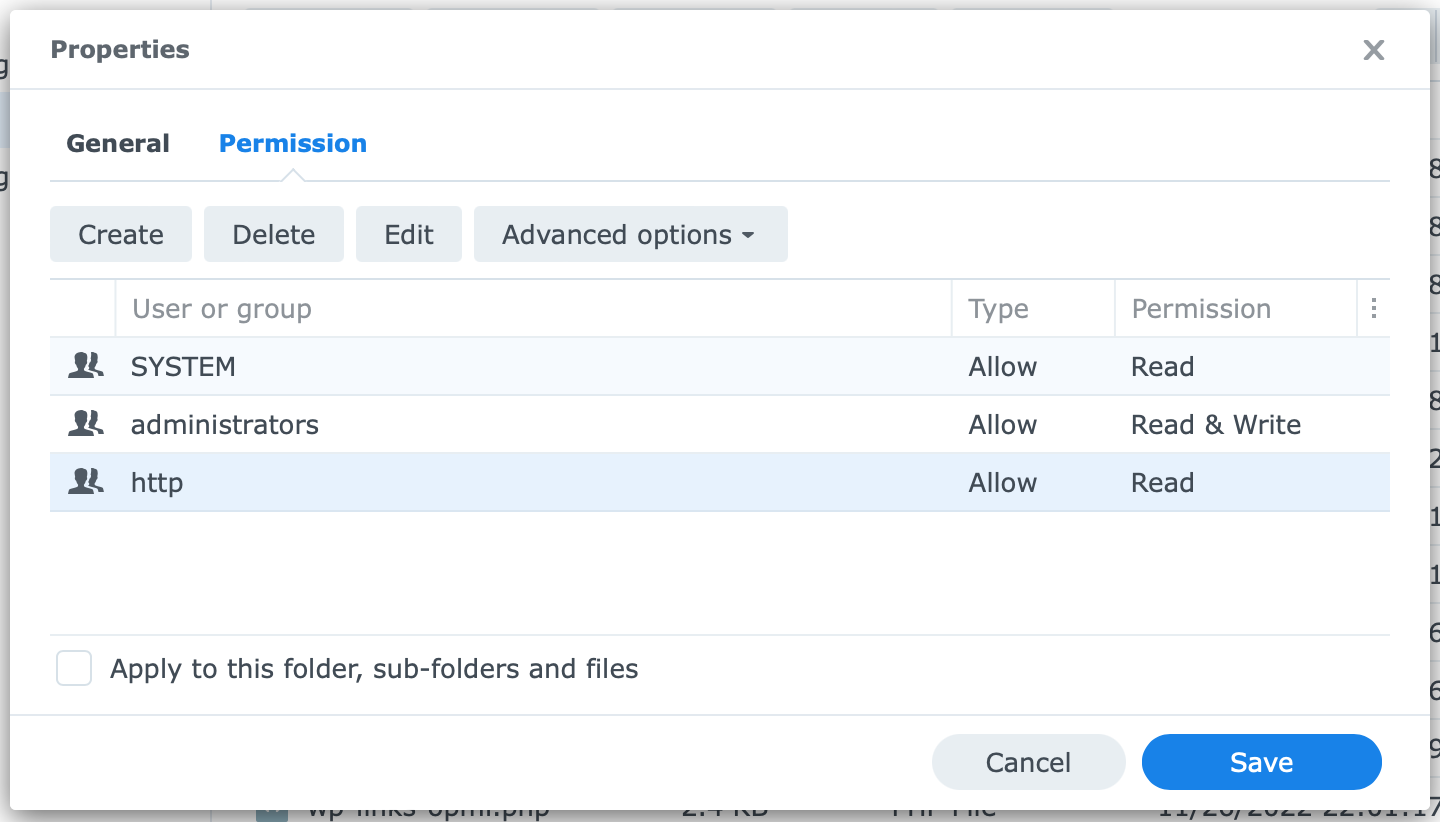
Review the result. Notice that all entries are black, not grey. Do not save and close the dialog, but continue to change the permissions. The process is similar to what you configured for the /web shared folder earlier. Only the permissions are different.
Select the SYSTEM (group), and click Edit. The Permission Editor opens. You will change the Read permission to a Custom permission.
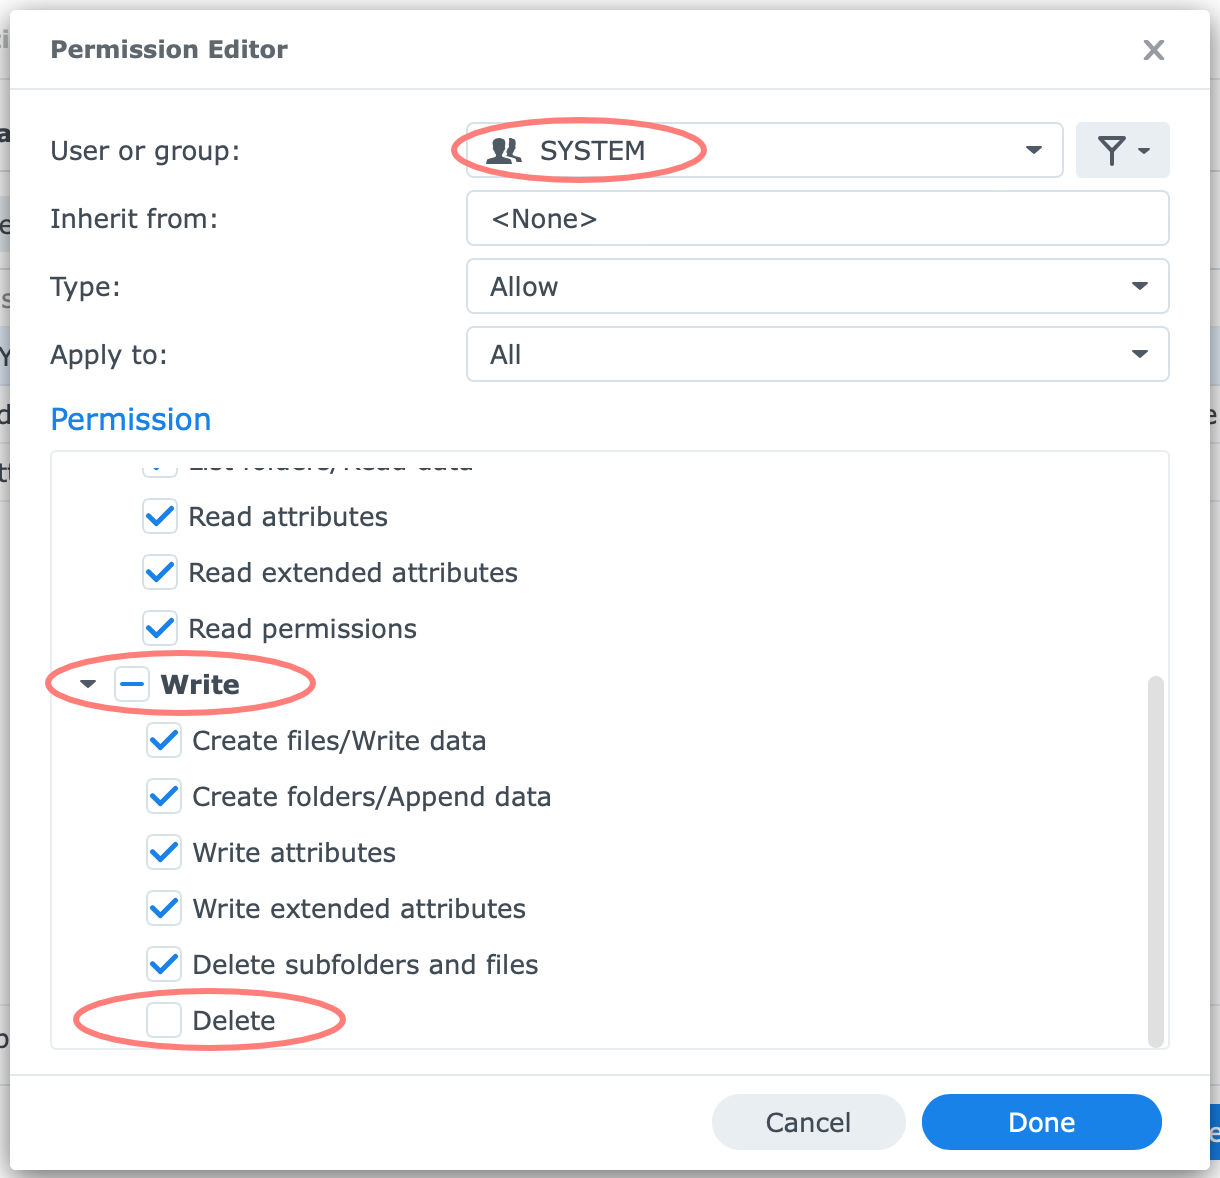
The custom permission for SYSTEM includes Write permissions minus the Delete permissions. In other words, SYSTEM can read and write but not delete. Please keep the Delete subfolders and files permission enabled. Click Done to confirm and close the editor.
Repeat the process – select, Edit, same custom permission – for the http (group). Next, choose the administrators (group), click Edit, and give full permissions: enable Administration in addition to Read and Write.

Click Done. A message about full administrator access for file services appears. Click Yes to close the message.
Last, create a new entry in the list for the users (group). Click Create, and an empty Permission Editor opens. Select the users (group) from the drop-down list at the top. Configure the same custom permissions as for the SYSTEM and http groups.
The final result should look like this.
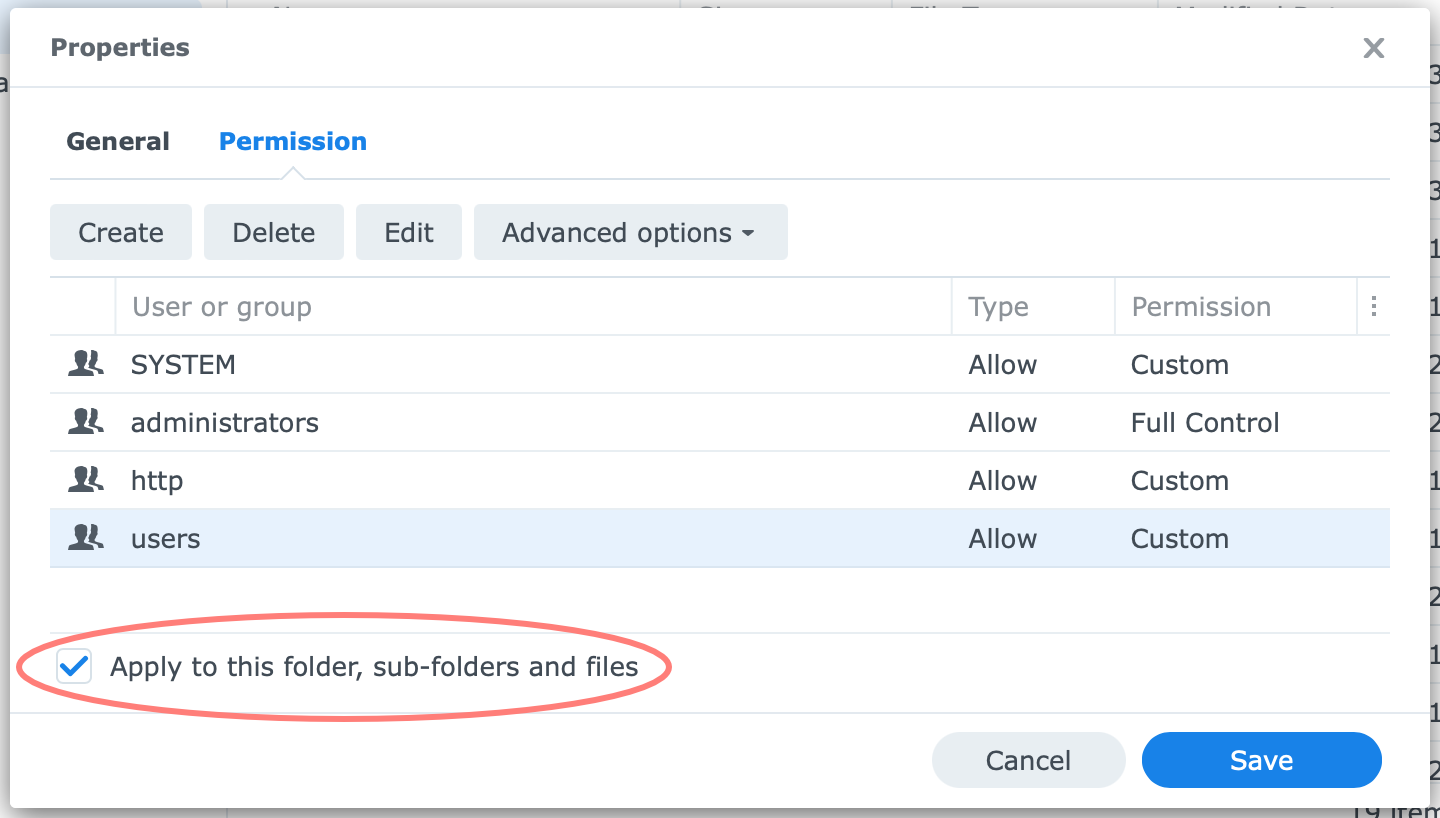
When you are done, set a checkmark in the box for Apply to this folder, sub-folders, and files. Next, click Save. All subfolders and files inherit the permissions from the /web/wpsd folder.
The Custom permissions mentioned above are Read + Write but not Delete. Please note to keep Delete subfolders and files enabled.
Run WordPress
Getting WordPress running is a two-stage process. First, you run the pre-install, linking WordPress to its database. Second, you run the 5-minute install, creating a website with all the default settings and the first user to log in with on the WordPress dashboard.
WordPress pre-install
Go to your browser and enter the name of the web portal you created earlier. In my case, I type the address synodemo.com in the browser, and you type in your domain name. Notice the padlock, meaning the certificate is correctly linked to the domain name.
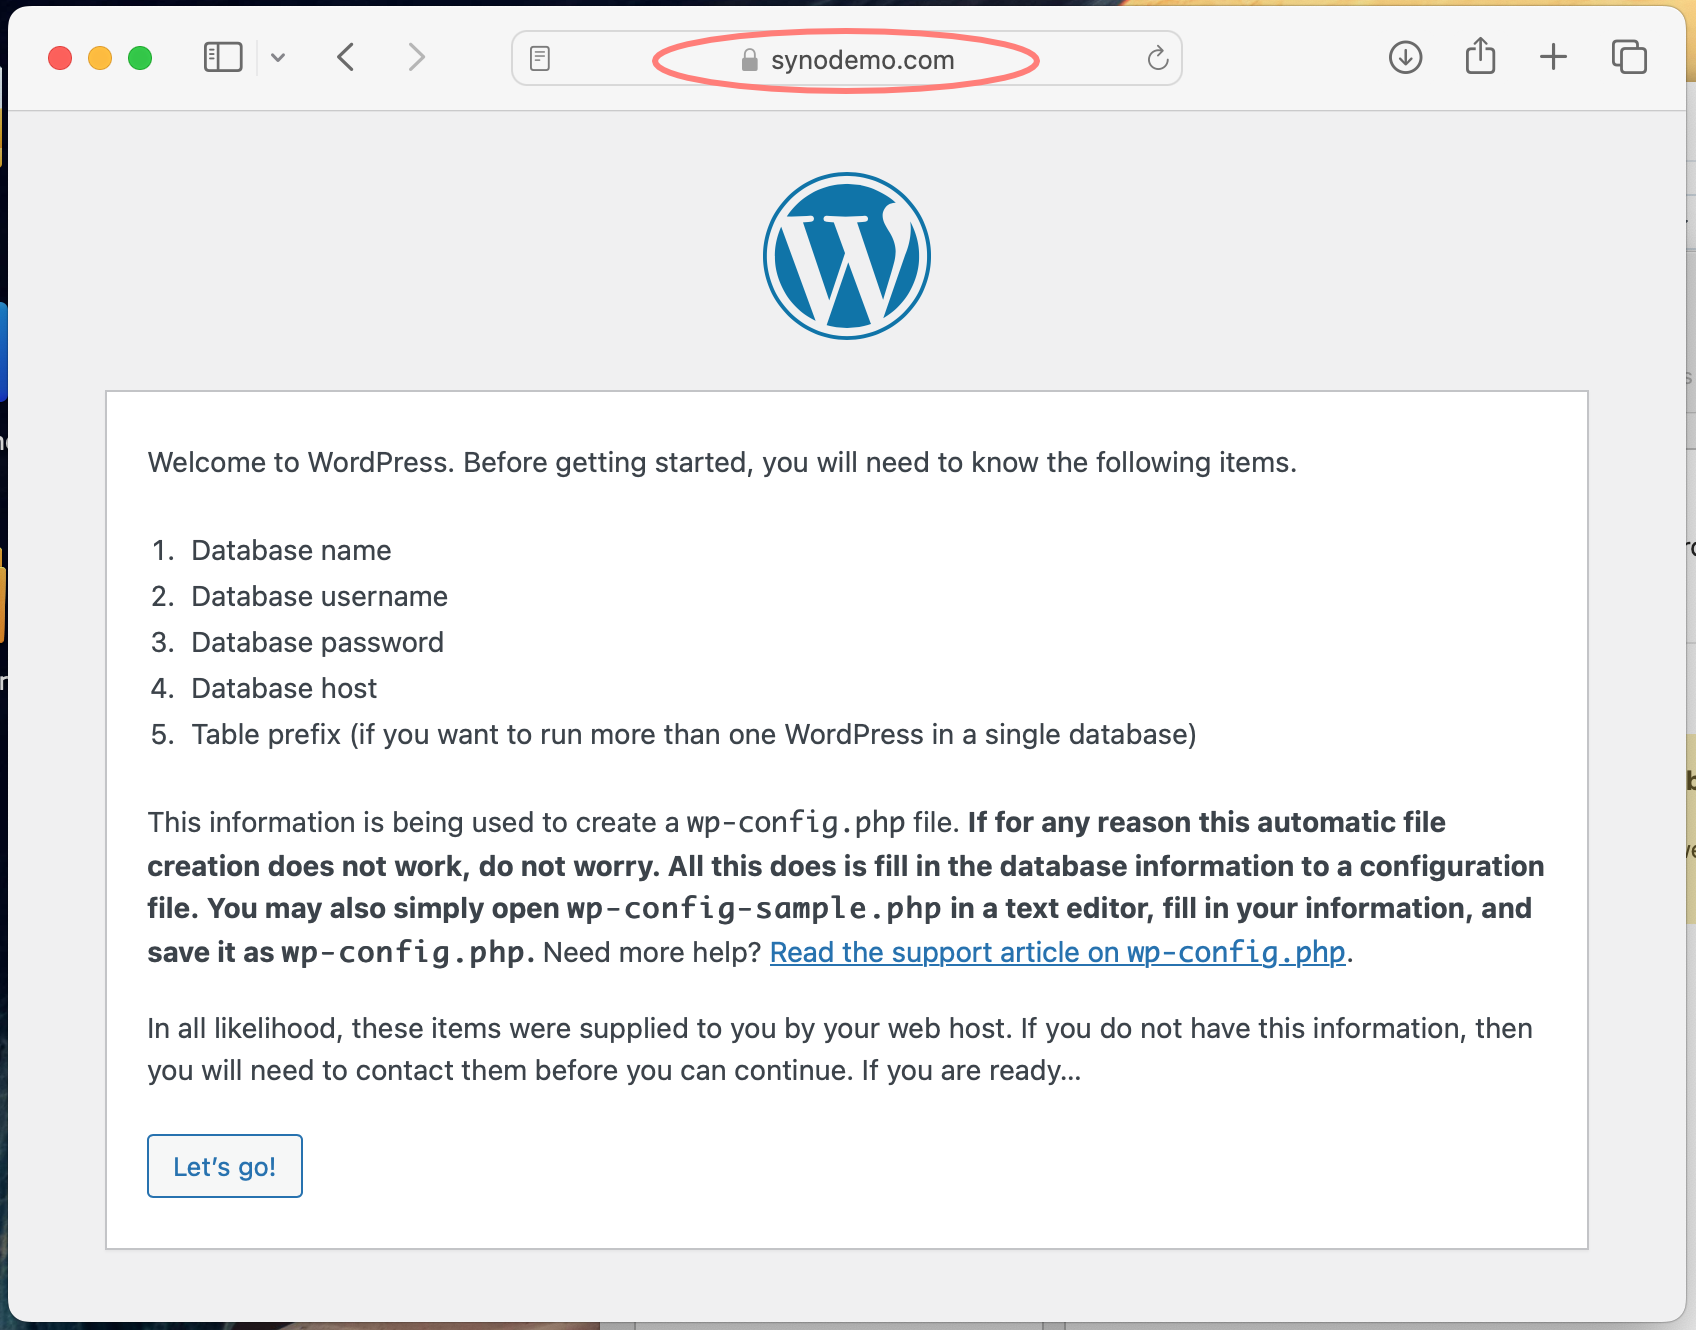
Because WordPress is in its uninstalled state, you are redirected to https://domain_name/wp-admin/setup-config.php. This starts the installation script. Click on the Let’s go! button.
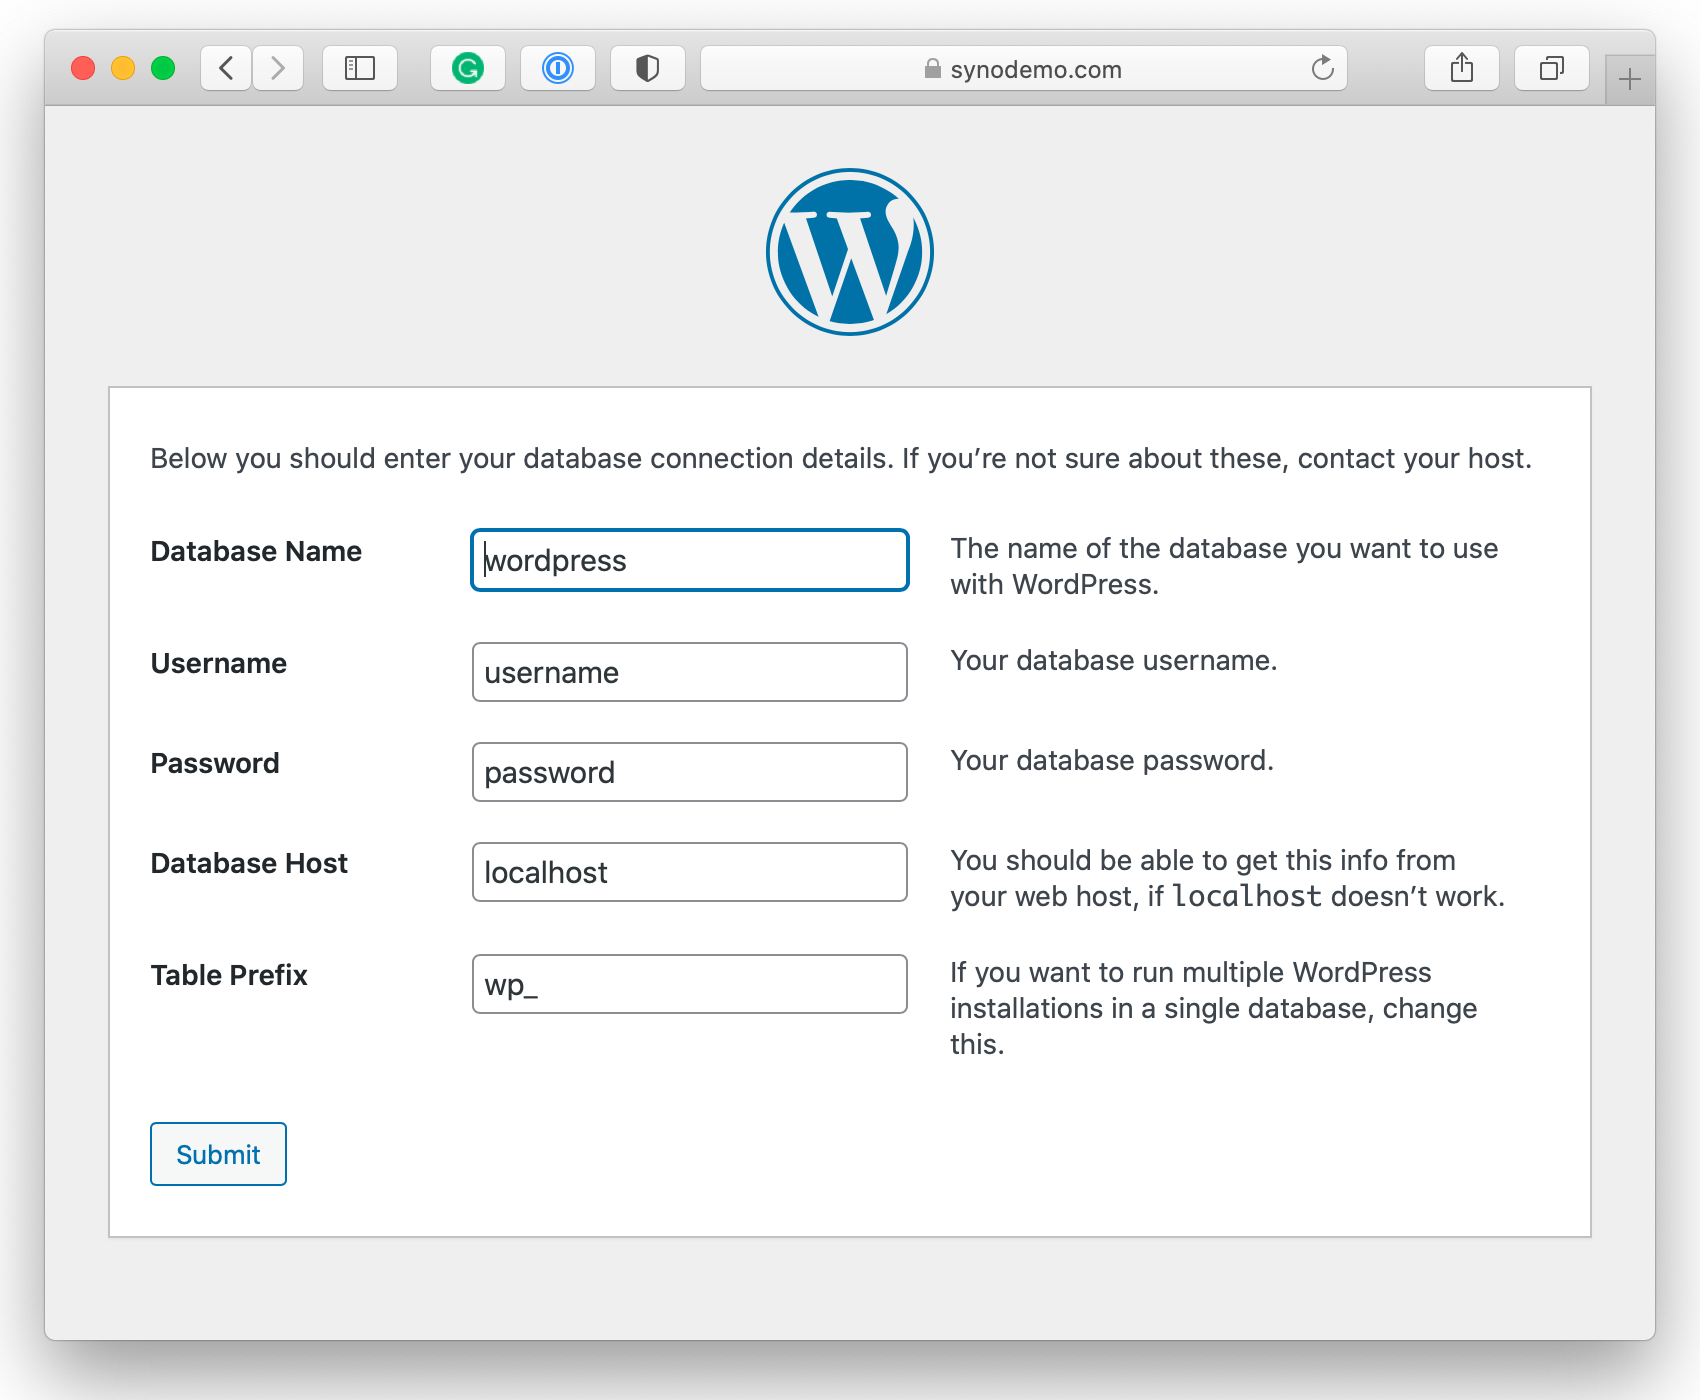
Start with connecting to the database.
- Database Name
- the database name you created, like wpsd in my case
- Username
- the user name you created, like wpsd in my case
- Password
- the password for the database user that you created earlier with phpMyAdmin
- Database Host
- this is important; localhost will not work; fill in: localhost:/run/mysqld/mysqld10.sock
- Table Prefix
- optional; you can leave it at the default wp_
Click on the Submit button.
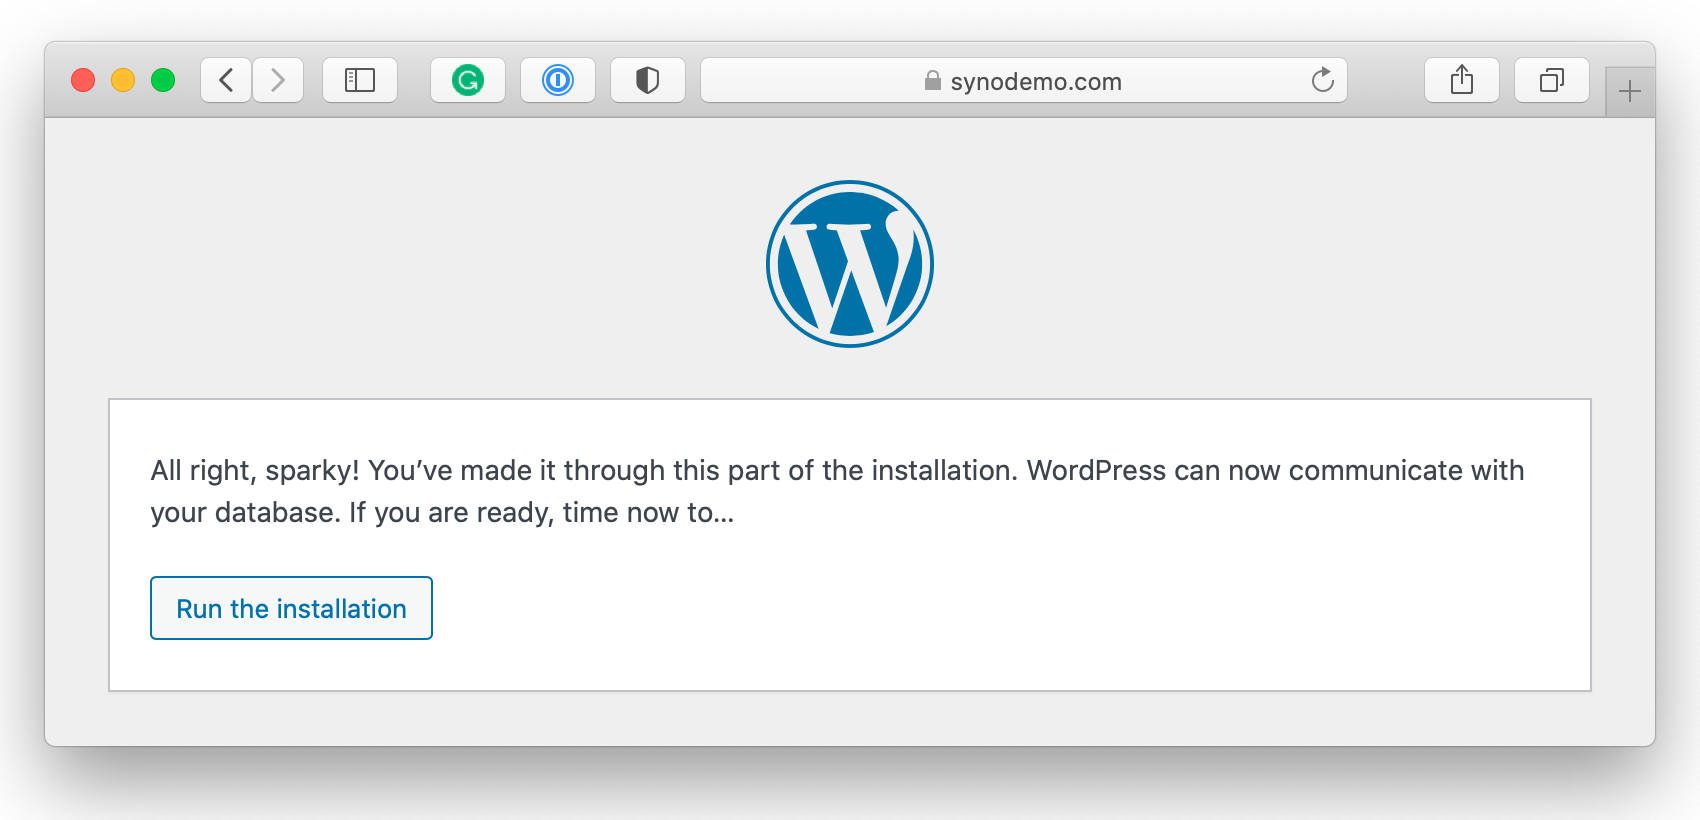
If the connection to the database was successful, you get the All right, sparky! message. Click on Run the installation to continue with the actual installation of WordPress, the famous 5-minute install.
Note for those who are interested: You just created the file wp-config.php. This is the main configuration file of your WordPress site, and one of its primary purposes is maintaining the connection to the database.
WordPress 5-minutes install
The actual WordPress installation asks you just a few things. Don’t worry; take your time; it is easy. After the pre-installation above, you are directed to https://domain_name/wp-admin/install.php.
In the Welcome screen, you are requested to fill in some information.

- Site Title
WordPress uses this as the title of your site. It can be your business name or your sports club or hobby.
You can easily change this afterward, so there’s no reason to sweat about it. - Username
This is the first user that you create to log into WordPress. It will have administrator privileges, and you will typically use it to set up your website in WordPress. You are advised to create at least one regular account later for creating content.
Tip: choose a name that is not recognizable as administrator. Avoid everything with ‘admin’ in it. - Password
This is the password of the user mentioned above. Again, create a strong and unique password, save it, and paste it into the screen to avoid typos. Do not reuse passwords.
Note: the generated password is strong and a good option. - Your Email
Enter a valid email address for the user. WordPress sends notifications to this address. - Search engine visibility
If you are building your website, you may not need search engines crawling your site. If you use your site internally, this setting does not affect it in any way.
That’s all. Click the Install WordPress button. WordPress will be busy for a few minutes. When finished, you get the Success! screen. Click on the Log In button.
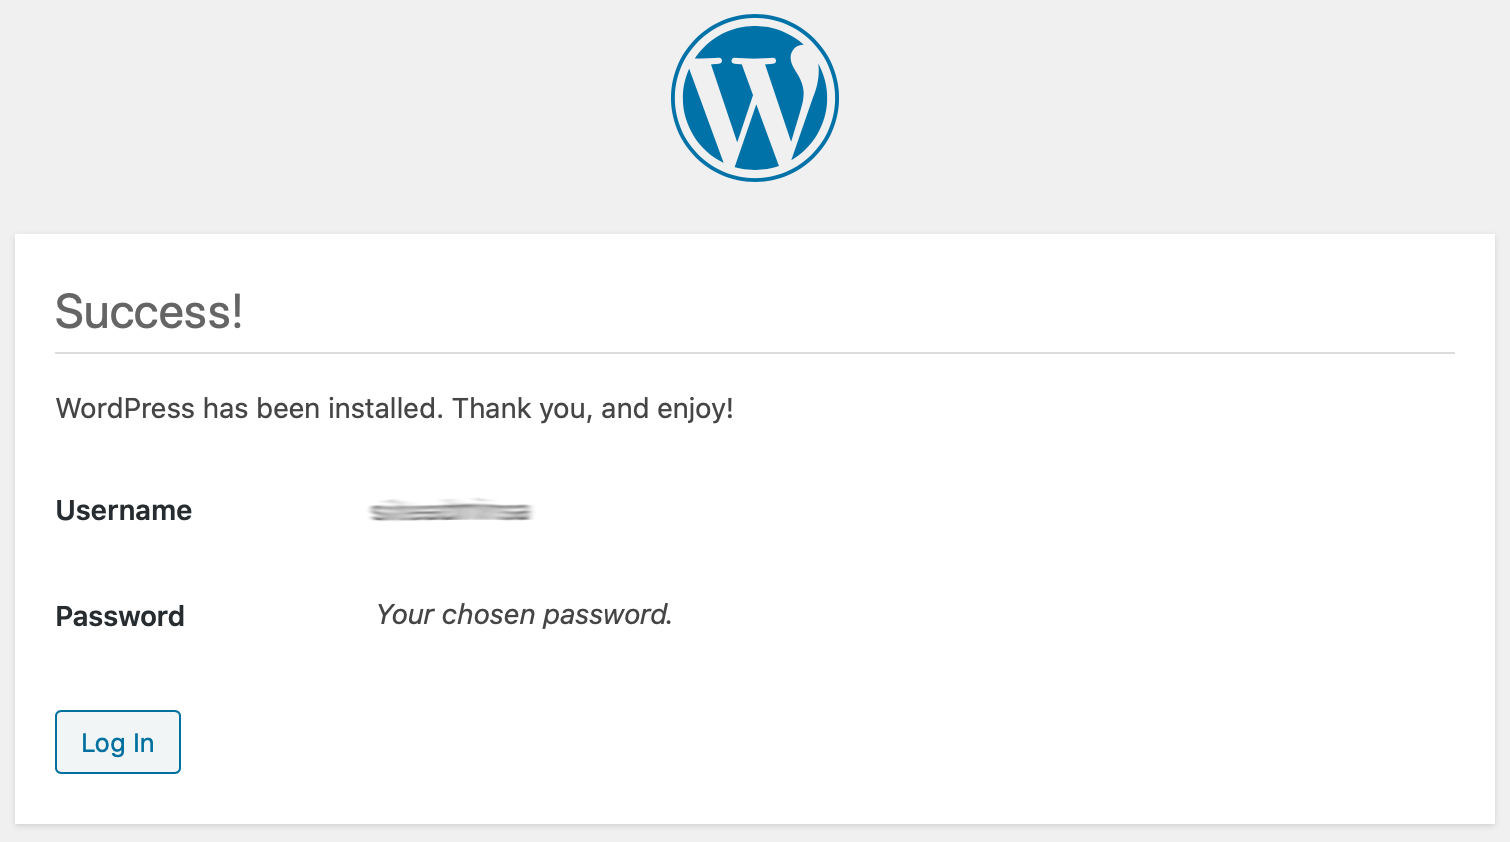
You now get the login screen that gives you access to the backend of your website.
Instead of logging in, let’s have a look at the website! Click in the log-in screen on Back to <site name> or type in the browser http://domain_name/.
You should see your WordPress website with the Site Title you just filled in. The layout is based on the default theme that WordPress installed.
With the address https://domain_name/wp-login.php you get the login screen again. Log in with the username and password you made with the WordPress installer. You are now on the admin pages or dashboard. Here, you manage your website. You can log out from the top-right corner.
Check for updates
You can log in to your WordPress dashboard and go to the Updates in the left column. Most likely, a pre-installed plugin needs an update. Performing the update is a good test before designing your site and filling it with content.
Thanks for reading
This post is donation-ware, and I made it to help you. Please consider leaving a comment or even buying me a coffee if it did. I will be eternally grateful.
Paul Steunebrink / Storage Alchemist
Thanks, Paul, so much for the detailed explanation of setting up WordPress for Synology NAS. I was able to replicate your explanation and created my first Blog. As I faced a lot of troubles setting up WordPress using Synology NAS in-app store.
Thank you, Ahmed. Great to hear it helped you out.
Best regards, Paul Steunebrink / Storage Alchemist
Dear Paul,
I have tears of joy in my eyes writing this. After weeks struggling to set up the NAS as webserver for our small company this tutorial was the final step to get it running. I have not realized that all of my troubles were related to the Synology-built wordpress installation. The other headache was that our internet provider gives “real” IP4 connections only by request. Thank you very very much.
Martin
Dear Martin,
Great to hear that this post helped you to achieve your goal. And thank you for ‘Buy me a coffee’ rewards!
Best regards, Paul Steunebrink / Storage Alchemist
Hello Paul,
Great tutorial! I had trouble using the standard WordPress package from Synology in combination with my ‘virtual host’ under DSM7 (you can’t choose from web_packages and tricks with symbolic links etc didn’t work). Your description and using the standard WP-stuff did the trick. Now I can start creating my (WP) blog/ website.
Thanks a lot!
Regards,
Aad.
Good to hear Aad, good luck with your website design.
Best regards, Paul Steunebrink / Storage Alchemist
This is very detailed, thank you for taking the time to write this!
I am getting a little hung up configuring DSM 7 without a domain name though. I essentially just want to create an internally hosted WordPress site and don’t need or want it exposed to the internet. Is it possible to configure WordPress for http://*nas-ip-address*/wordpress/?
Hi Brandon,
This is a good question. To be honest, I did not investigate this scenario with the WordPress.org setup. Of course, you can do this with the Synology WordPress package, as discussed in part 2 of this series. Alternatively, if you prefer the custom setup with WordPress.org (part 3), and do not like to register a domain name externally, you can set up DNS on your Synology NAS. You still have a domain name (which you might not want) but no need to register a domain. Choose a domain name that does not exist on the internet, like mydomain.local
Best regards, Paul Steunebrink / Storage Alchemist
Hi Alchemist,
I have the same question as Brandon encountered: I just need to create an intranet WordPress (only computers which are in the same LAN can access it) and don’t need or want it exposed to the internet. From your answer above, I’d like to make sure some steps:
1) Install SSL certificate (which needs Domain Name)
2) Create Virtual Host (which needs Hostname)
Do you mean that even if I didn’t register a domain name formally, I still can fill a fake domain name in those two places and it’ll work too?
Hi Thelma,
Regarding the SSL certificate: do you need one for internal use? I do not see the benefit. But if you like, you could use a self-signed certificate. There is already one on your NAS. Note that browsers always issue a warning with self-signed certificates, which you can disable. Certificates from external sources like Let’s Encrypt perform a domain validation during issuance. In other words, you need a registered domain name for that.
Regarding the virtual host, you could fake a hostname with the help of a DNS server on your internal network. Your NAS can be a DNS server. I have not explored this option, so this is theory only. It is on my to-do list.
Best regards, Paul Steunebrink / Storage Alchemist
Hi Alchemist,
Thank you for your response.
Because I just need to create an “intranet” WordPress, from your response, I can just skip these 2 steps (“Install SSL certificate” and “Create Virtual Host”), right?
Still thanks a lot~!!
Hi Thelma,
Is there a reason you did not go for the WordPress package from Synology? In part 1 I explain the differences and which one is best when. In part 2, I explained the installation in full detail. You can prevent all those questions if you would go that route. I am curious why you preferred to go the WordPress.org download installation and deviate from that scenario?
Best regards, Paul Steunebrink / Storage Alchemist
Hi Alchemist,
I’d try downloading from WordPress.org because the package is up-to-date. But I’d try your part II if I can’t solve the problems I encountered now. Thank you~!!!
Storage Alchemist and others for localhost only:
First off, Storage Alchemist, thank you for the very detailed instructions. I too had this same issue, trying to do only a localhost. After trying .local, etc., I found that if you just drop the ending all together, it works. If you just have hostname set as your domain, instead of domain.com, put “domain” only. In your browser, just type in the “domain” and it works like a charm.
Again, thank you for all your help, I’ve tried this several times and spent many hours without success until now thanks to your help. Hope this helps others out as well!
Jon
Hi Jon,
Thank you for your comment and for sharing your experience with the local domain. Very helpful.
Best regards,
Paul Steunebrink / Storage Alchemist
Thankyou for this superb tutorial on getting this set up. I did my website the manual way by downloading WordPress myself onto my DS1821+ and it worked superbly.
Thank you Stephen for sharing your experience. I am very happy it worked for you.
Best regards, Paul Steunebrink / Storage Alchemist
Hello Alchemist,
I have a question here:
“Set phpMyAdmin folder permissions (DSM 7)
Next, select the /web_packages/phpMyAdmin folder. Right-click the folder and choose Properties. In the Properties dialog, open the Permissions tab. Set the permissions as for the /web folder.”
1) Does it mean that “right click on the folder of phpmyadmin >> choose Properties >> open the Permission tab >> select http(user) >> click Edit button >> scroll and select System(group) >> and click OK” ?
2) I set wrongly on the permission at first on “web_packages” and I don’t remember the original setting(what it has now is SYSTEM: read, administrator: read&write, http-group: read). I’ve changed something into “SYSTEM: read”. Is it ok? Or may you tell me the default setting?
I’m a little confused now… Thank you so much for the information
It is important to mention in the permissions section, that the instructions refer to restricting the explicit delete permission. I had also unchecked “Delete subfolders and files” and that caused some issues with the system being able to add things, but not remove the .maintenance file or removing old plugins. 😅
Hi Erik,
Thank you for your feedback. Much appreciated. I updated the section on custom permissions of the WordPress folder accordingly, both with text and an additional screenshot.
Best regards, Paul Steunebrink / Storage Alchemist
Hello! First of all, the install worked perfectly. Sparky is happy. One observation: On Installing “loginizer” the plugin warns about wp-config and htaccass as well as suggests other filer permissions than the ones created e.g. for /wp-admin ect (0755 suggested rather than 0775). What do you think is to do here?
Thanks! Mac
Hi Mac/Sparky,
Good to hear it helped. With regards to the permissions, you have a point. I will look into it and update the post.
Best regards, Paul Steunebrink / Storage Alchemist
Very good tutorial. One thing I am missing is the proper permissions settings for WP.org as well as reasonable Firewall-Tweaks on the Synology NAS to minimize security issues. Also, are there any procedural changes when using the latest OS 7.1 v3?
Thanks again!
Jon
Hey, just saw the person before asking a similar question, so pls omit the permissions question but how about the firewall optimization? Do you recommend filtering everything going through ports 80/443 except say ones own country? Cheers! Jon
Hi Jon,
For the website, ports 80/443 are sufficient but depending on other services you run on your NAS, you might open more ports in the firewall.
Best regards, Paul Steunebrink / Storage Alchemist
Hi Jon,
Thanks. I am not sure I follow you on the missing permission settings. What are you missing from what is described?
About DSM 7.1 Update 3, I do not expect any procedural changes, but if you run into any issues, please let me know.
Best regards, Paul Steunebrink / Storage Alchemist
I followed your guide to set up WordPress 6 on DSM 7.0.1-42218 Update 3 and it worked great (thank you).
However, I recently updated to DSM 7.1.1-42951 and WordPress is no longer working, I just get “Unable to connect” when I navigate to my website. I ran through this whole guide again and although everything still looks to be configured correctly, I just can’t get it to work 🙁
I’d be interested to know if anyone else is running DSM 7.1.1-42951 yet, and if so is WordPress still working?
Hi Andrew,
Sorry to hear that the 7.1.1-42951 (Release Candidate) broke your WordPress setup. Hopefully this improves once the final 7.1.1 release is available. Feel free to comment here once you have updated to that release.
Best regards, Paul Steunebrink / Storage Alchemist
Thanks for replying, Paul.
I updated to 7.1.1-42962 today, which I believe is the final release, but I am still getting the “unable to connect” error it seems 🙁
When I get some time I’ll try backing up my wordpress database, uninstalling everything and starting from scratch again. Not sure what to do other than that.
Just strange that the DSM update broke it for me, as it was working perfectly before the update.
Sorry to hear that, Andrew. I have not heard any similar report. I hope reinstallation will work for you.
Paul
I was almost there in my initial attempt without seeking internet help but i struggled with numerous issues through my process. Your tutorial was a hit first time. I forgot to add ‘…mysql.sock’ file reference, this was my main issue. Though I still cannot get the any website to work via a ‘port-based’ at least using ‘name-based’ works. For now I am happy with that until i get bored and want to figure out why ‘port-based’ does not work.
Excellent and thorough enough to work at first attempt.
Thanks for the great tutorial for installing the updated wordpress.org instead of the outdated synology package.
With the syno package, it is possible to navigate to domain.com/files for filestation, but that doesn’t appear to work when using the wordpress.org install. Is there a way to get this working?
Hi Kerry,
Good question. The alias (../file for File Station suffix) will not work with the domain for your WordPress domain and site.
Maybe you can link a different domain for this purpose via a reverse proxy. I have never tried to combine this with a website on the same NAS.
Best regards, Paul Steunebrink / Storage Alchemist
Take a look in Control Panel | Login Portal where you can enter a custom domain name for accessing DSM and the Synology Packages like File, Drive, etc.
Thanks, Darren, for the tip.
Best regards, Paul Steunebrink / Storage Alchemist
Truly an amazing and accurate guide… Highly appreciated. Worked like a charm on the latest DSM7.
Thank you Bart for your feedback; also highly appreciated.
Best regards, Paul Steunebrink / Storage Alchemist
Great guide, helped me a ton! Juts an FYI – I must have set the permissions up for the web shared folder in a different way… Basically I didn’t have the option to configure Windows permissions. In order to fix it I had to goto ControlPanel->SharedFolder select the “web” folder, right-click and select Action->”Convert to Windows ACL”. I was the able to set the permissions as you had shown.
Thank you for the feedback. The Windows ACL conversion is new to me but something to consider.
Best regards, Paul Steunebrink / Storage Alchemist
Excellent article! Best one on the topic I have read so far. Easy to understand and follow, even for a layman. Have you ever contemplated to implement a cloudflare tunnel so no ports would have to be forwarded? And if, at what stage of this guide would you implement it? Curious to know your thoughts on this.
Hi Oliver,
Thank you for your friendly comment. I have not considered a Cloudflare tunnel and, therefore, would not know where to include this in the manual. I guess, I would set the tunnel up before I start with the installation and configuration on the NAS.
Best regards, Paul Steunebrink / Storage Alchemist
Thank you so much for this insightful post. I’m excited to host a personal website on my Synology to learn about webdev. However, after following all your instructions, I get all the way to WordPress install screen (asking for database name, username, password, database host, and table prefix), and when I input everything you have advised I am greeted with “There has been a critical error on this website Learn more about troubleshooting WordPress.” very discouraging. Are there any specific troubleshooting items to check first? Quite lost at such a vague message. Thanks again, Tim
Hi Tim,
Sorry to hear about the error. I would go through all settings as described in the post, in particular, the permissions. Also, can you connect to the database with the user you created? You can check that with phpMyAdmin. Last, you can search for this particular error on the web. I hope this helps.
Best regards, Paul Steunebrink / Storage Alchemist
Thank you Paul. I was eventually able to sort it out. I hadn’t granted extensions to the proper php profile. When I granted them via the default like you directed then it worked perfectly. Thank you tons for this guide. Even an absolute beginner like myself was able to follow. Cheers
Work Amazing and well written. Highly recommend to all Synology users.
Thank you for your comment!
Best, Paul Steunebrink / Storage Alchemist
Hi there,
Thank you for a pretty well written guide. However, I have difficulties to find the “http (user)” to set up permissions for web-folder. I can only see “http (group)”. What might be the issue here please? Thank you in advance.
Kind regards, Hamid
Hi Hamid,
In DSM7 the http (user) seems to have disappeared. It does not matter. The intention is to give Read permissions to the http (group), which is still there. I will update the text.
Best regards, Paul Steunebrink / Storage Alchemist
Hello Paul,
Thank you so much for amazingly quick clarification. I will go ahead give it a try.
Best, Hamid Aminrezai
Hi again Paul,
My apologies for bothering again.
I have reached pretty far in the configuration. Actually I have installed ssl-cert. and about to connect to the DB, I have created. I can sign-in to the database with my creds on phpMyAdmin. However, when I try to install WP, I cannot connect to DB. I use the same creds for phpMyAdmin, and as you suggest in the guide, I use Database Host “localhost:/run/mysqld/mysqld10.sock”.
Is there anything I should conf. on my NAS or should I enter different Databas Host?
Thank you
Hi Hamid,
As you might know, the user for logging in to phpMyAdmin is in general, ‘root’, whereas the user that accesses the DB for WordPress is a different user. If you are not sure about the user credentials, you can delete the DB and user and create it again. See part 4 of this series to delete the DB and user.
Best regards,
Paul Steunebrink / Storage Alchemist
Thanks for this post! I was struggling to get this to work. Two questions: 1) for security settings, with DSM 7 there is no http user. Your instructions now say that is ‘fine’ but instructions are unclear what to do (i.e. is there *nothing* to do? there are no changes requested here for the http group? Nothing to do per phpmyadmin instructions? )
2) I’m using DDNS via synology.me for external access, and a CNAME record in DNS to redirect www for http://www.conant.com hosted on my synology. But I can’t do this for the apex domain. This keeps me from setting up the certificate on conant.com as well. What are my options? Thanks!
Hi Mike,
1) nothing to do
2) not sure I understand the question, sorry.
Best regards,
Paul Steunebrink / Storage Alchemist
I followed your setup which has worked great. I’ve had some questions about permission in regards to security of files. I see others have asked as well but didn’t see an answer.
Based on your DSM 7 folders permissions, this sets all folders and files to 777. If I limit http and users to read, I get 775.
WordPress recommends 755 for all folders, 644 for all .php files, and 440 for wp-config.
I’ve played around with the System permissions, set owner, set via the file explorer UI and chmod via ssh.
The problem becomes when should I use recursive or send permissions down to child folders? Also when I make these changes it seems to kill access for other wordpress features like updating plugins and file access.
What do you recommend? Can you consider updating the post accordingly?
Hi Travis,
I agree that the permissions need some tweaking, and I have not figured this out yet. Thank you for bringing this to my attention. I will update the post when I know more.
Best regards, Paul Steunebrink / Storage Alchemist
I get that this post is a little on the older side, but the first post asking about permissions is over a year old in itself. You have yet to post an update for the permissions, as you’ve said multiple times.
Hi Bob,
Thank you for reminding me.
Best regards, Paul Steunebrink / Storage Alchemist
Hello,
This is a great set of instructions on setting up WordPress on the Synology NAS when not using the Synology-supplied method.
I have just one question, in the setup of the Virtual host, a ‘Name Based’ method is used. Then further down you use your hostname to access the wordpress installation screen. I cannot get that to work. My hostname xxx.com gives me that default Synology web screen. I need to add the \wordpress name at the end of the URL to get to the site to be able to install it. It kind of makes sense when you think that a Name Based method has been used, but how did you get it to work with just the URL/Hostname?
Can I set the URL/Hostname to ‘point’ to the full link (xxx.com\wordpress)? I would like external users to type in the Hostname to be able to access the site otherwise, they would not know how to get to it?
P.S.: I have my router set up as needed to forward the ports etc.
It looks like I sorted this out. I created a port-based Portal Type Virtual Host. Used an internal HTTPS port like 4437. The router has port 443 redirecting to port 4437. Now the expected wordpress install screen comes up as expected, using the Hostname only (with no \wordpress name extension).
Hi John,
Good to hear you sorted it out.
Best, Paul Steunebrink / Storage Alchemist
Hi Paul,
I appreciate your work above. I have followed the instructions until I go to check on Web Station, where it states that Default server status: Abnormal & Web service portal status: Abnormal (Virtual Host). Any thoughts?
I wondered whether it is because I’m trying to run this on a Synology DS120J, and it is not compatible. I have successfully installed your Part 2 process, but this gives me problems with plugins.
Hi Ian,
I am afraid the error is difficult to diagnose from this end. I have installed the setup I described on a DS118, without issues.
Best regards, Paul Steunebrink / Storage Alchemist
Very informative article! One question – in Webstation for DSM 7.2, there is no Virtual host option. There is only “Web Service Portal” and “Alternative portal of default server”. Any recommendations on what the settings should be?
Hi Lee,
I admit that I need to rewrite this post for DSM 7.2. I have put this on my task list. Thank you for reminding me.
Best regards, Paul Steunebrink / Storage Alchemist
I’m stuck at the same problem now =) But thank you for your hard work! I’ll make sure to buy you some coffée
Thank you Stefan for your comment and the coffee. I am currently working on an update of part 3 for DSM 7.2 with Web Station 4.2.
Hope this helps.
Best regards,
Paul Steunebrink / Storage Alchemist
My solution to the DSM 7.2 was:
Create a webservice. Click native script, Select PHP 7.4. Then fil in the name, description, set teh document root, and change the http server to Apache. Then Clik next, and create teh web service.
Then go into web portal and click web service portal. Change the service to the web service that I just created and set the host name and click create.
First I tried using the PHP 8.0 but it did not have any xmlrpc. So I guess that PHP 8.0 is not an option. It worked with PHP 7.4 though 🙂
Thank you, Stefan, for sharing your discoveries. My DSM 7.2 / Web Station 4.2 version of this tutorial is almost finished. I think you’ll like it.
Best regards,
Paul Steunebrink / Storage Alchemist
Hi Stefan,
The WordPress instructions are now rewritten based on DSM 7.2 and Web Station 4.2. Hope this is useful.
Best regards, Paul Steunebrink / Storage Alchemist
Hi Lee,
The WordPress instructions are now rewritten based on DSM 7.2 and Web Station 4.2. Hope this is useful.
Best regards, Paul Steunebrink / Storage Alchemist
Hi, I have followed your instructions (part3 ) Thank you so much, great detail and straightforward. But I have run into a problem, so my website is now hosted on my Synology Nas, but when I try to access my site externally, I can only do so by typing in http://domain.com and https://domain.com.
If I try with http://www.domain.com I can’t access my site, there seems to be an issue with using www in the url address
Hi Philip,
I suggest you do a search for something like ‘find wordpress website with and without www’. There are tons of articles that can help you.
Best regards, Paul Steunebrink / Storage Alchemist
Thanks Paul
Dear Alchemist,
Firstly, thank you so much for your instruction in detail.
I did it completed well, but I meet a problem that can not access my web (timed-out) with host name https://xxx.com from outside wi-fi source.
Inside wi-fi (same LAN with NAS) is OK.
I already forwarded/opened port 80/443 in the router.
Could you please teach me how to fix it?
Best regards,
Long
Hi Long,
It could be a DNS issue. Can you check that the DNS server for your domain resolves to the external IP address of your router?
Best regards, Paul Steunebrink / Storage Alchemist
Best tutorial I’ve found – thanks so much!
I’m so close (but no cigar) and followed your instructions closely. I got to the point of running WordPress for the first time and get this error: “PHP installation appears to be missing mySQL extension…” I’ve triple checked and the checkbox is indeed checked.
Any advice? Other internet searches show this is a common problem, but haven’t found a resolution.
Please help if you can. Thanks!
Which PHP version do you use?
PHP 8.0, but could switch if it’s worth trying an earlier or later version. Thanks in advance with assistance!
Ideas come to mind? I’m baffled, and also far from an expert.
Hi Steve,
PHP issues in combination with WordPress is not my field of expertise, I am afraid. I suggest testing with different versions of PHP, like 7.4 and 8.1. I browse the web and communities for insight. Hope this helps.
Best regards, Paul Steunebrink / Storage Alchemist
Hello Storage Paul.
I was following your part 3 tutorial try and revive an old wordpress with a data base called “blog2”. Great tutorial! Somehow it is gone after hyperbackup transfer to my new NAS a DS3622xs+ from my old DS3615xs. I never deleted anything and there is a chance it was made with MariaDB5. When I open MyPHPAdmin on the 3615 it is not listed. Is there a way to revive or search for this data base? best joe
Hi Joe,
Most probably it was MariaDB 5 on your DS3615xs. I suggest you export the database on the old NAS with phpMyAdmin, and import it with the same tool on the new NAS. Next, you can manually connect WordPress to the database with the credentials in the wp-config.php from the old NAS.
Hope this helps.
Best, Paul Steunebrink / Storage Alchemist
Hello Paul, synology support was able to use ssh coding to find “blog2” data base and restore to PhpMy Admin yet it didn’t have any tables! Who is an expert with Maria DB on synology NAS? I would like if possible to recover the data base. best joe
Hello Joe,
How unfortunate, that despite the efforts from Synology support you still have no working copy of your database. I suggest to browse the web for WordPress maintenance guys or girls. MariaDB is nothing different on Synology NAS or else. I assume your old NAS is not operational with a working database?
Best regards, Paul Steunebrink / Storage Alchemist
Well I got my data base working and I followed your tutorial 3 and have the website blog.songswell.com working on a virtual host. The only thing that is not working is the FTP connection allowing wordpress to update plug-in packages. Any advice on that? best joe
Hi Joe,
Good to hear you made such great progress. The FTP issue for updating plug-ins could be an issue with wp-config.php, but it is hard to diagnose remotely. This is a rather common WordPress issue and I suggest to browse the web in WordPress support forums.
Best regards,
Paul Steunebrink / Storage Alchemist
Paul,
I’m brand new to using a NAS and therefore Synology as well. I’m also new to WordPress. I could get WordPress working but there were always issues when looking at site health (file/directory access, https wasn’t working, url had to include the subfolder /wp, etc).
I removed it all and tried your guide and it works great! MariaDB, Apache and WordPress is all working along with my SSL cert so HTTPS works too. Thank you! I’m going to look on your site now to see if you have a ‘tip jar’ to send you something to say thanks!
Hi Chris,
Great to hear it worked out well for you. And yes, there is a donation button. Appreciated! Have a nice day.
Best regards, Paul Steunebrink / Storage Alchemist
Hello Paul, I am making some progress. We have restored “blog2” data base. I have a folder named “wordpress” in my web folder and I have been able to connect to this folder typing in blog.songswell.com and I am able to connect to my wordpress site. But if I type blog.songswell.com/wp-admin it takes me to a wordpress login window asking for username or email and Password. Do I need to create a new username and password in PhpMyAdmin to get this to worK? best joe
Thank you. Awesome guide. I actually got WP working and got my test site up and running.
The Permissions setting I found slightly confusing but the rest was a breeze.
A question though –
I registered my Domain with Squarespace and I’m using an A record pointing to my public IP. However I’m on a dynamic IP from my ISP.
I do have DDNS on my Synology configured but when I use that URL my browser takes me to my NAS’ default Web Station website. I think this means I can’t use a CNAME redirect as it’ll load the Web folder’s index.html file.
Is there a way to use my DDNS name so I’m not paying a monthly static IP fee ?
Thank you, and donation made 🙂
Hi Scott,
Thank you so much for your feedback and donation. Describing permissions is always a challenge. I will look at it with the next revision.
With regard to your (D)DNS issue, have you considered to remove the index.html file? I am familiar with the CNAME record in combination with DDNS, but admit I have not tested it as far as I recall.
Thanks again.
Best regards, Paul Steunebrink / Storage Alchemist.
Thank you so much for this post! It helped me set up my website on NAS!
But I face a problem and I wish to get some help! I loaded Astra theme but it does not load the images. I loaded Kubio theme and it loads fine. As I try other theme, some theme load the images, some don’t (i.e., Kadence)
Another issue I found that could be related: when I turn on HSTS in web portal, my site gives an error “The page isn’t redirecting properly”
I could really use help to get WordPress properly set up! Thank you!
I have a NAS with WordPress installed (manually, not the Synology version). On the local network I can access the site by name (after adjusting the windows hosts file), but it does not work by IP address. When I browse to the IP address I see the default Webstation page, but I want to see the WordPress page. The WordPress page is only showing up when I browse to the domain name, which I have include in the hosts file. I think I need a change in the Apache config, but don’t know precisely.
Hi Mark,
You need to use the domain name to enable Web Station to redirect to the WordPress installation. An IP address won’t work and will show you the Web Station index page, as you noticed.
I am not sure why you want to use the IP address. I suggest you make a bookmark in your browser if you rather not type the domain name.
Best regards, Paul Steunebrink / Storage Alchemist
HI Paul-
Thank You for such a detailed and clear explanation of setting up my website. I have been following word by word to setup WordPress. I am at a stage where I need to Redirect traffic for domain name.
I have a domain name (at godaddy.com) that I want to use. And I have a Verizon FIOS internet with dynamic IP (not static) connected to my Netgear Orbi router (my Synology is hard wired to the Orbi router).
I am stuck and unclear of how and what changes do I need in order to get it setup so that I can access my website from outside my home network.
Will appreciate some detailed instructions or directions on what to look for in the internet to get more details.
Overview of steps:
– give NAS a static address on local network
– port forward HTTP (80) and HTTPS (443) TCP ports to NAS in router
– enable a DDNS service; you can use the built-in DDNS in your NAS
– create a CNAME record for your domain to the DDNS name
Can you please advise how /where can I add a CNAME so that I can use that to direct my domain name to connect to my website, instead of using the ip address.
Hi Ajay,
You can go to the DNS provider, where you registered your DNS domain and create a CNAME record in their Admin or Control Panel.
Best regards, Paul Steunebrink / Storage Alchemist
Brilliant. Having followed guides like this in the past, when I started I mentally gave this a 20% chance of success – my bad – I should have kept the faith – it was faultless. It deserves and received coffee.
Thank you Anthony for your comments and your coffee support! Much appreciated.
Best regards, Paul Steunebrink / Storage Alchemist
I had test WordPress working fine with the creation of containerized script language services, but since I wanted all my wordpress to connect and use the already install maria db (and phpmyadmin!) rather than having a container running for each.
So far it seemed good but I can’t access my wordpress created this way. I have : too-many-http-redirects, or load-cannot-follow-more-than-20-redirections-errors.
Any idea where it can comes from? DO I need to uninstall NGinx?
Hi Marc,
I belief that DSM uses Ngnix for its web services. But I admit I have no experience with uninstalling Ngnix. Make sure you have a backup and give it a try.
Best regards, Paul Steunebrink / Storage Alchemist
Greetings,
Unfortunately, the latest version has removed ‘web station’. I’m not sure where to go from here.
Thanks
Hi Jim,
I am not sure I understand your comment. The latest version or what? I still have Web Station available.
Best regards, Paul Steunebrink / Storage Alchemist
What i try….. i’ll stay in the web map. I made 2 website names under the folder web. I followed the manual. But when i go to my domain name or my ipadress, i constantly come in the web folder.
Hi Bas,
I suggest to carefully look at the settings in Web Station. There you make a link with the appropriate web folder.
Best regards, Paul Steunebrink / Storage Alchemist
Hi Paul
did it and it works right now!
I made, in web portal, 2 lines for one website. One line to reach the website as http://www.yourdomain.nl and a line to reach yourdomain.nl.
Not everyone is typing www.
Hi Bas,
Good to hear everything works fine now. Thank you for the tip to make to line in web portal.
Best regards, Paul Steunebrink / Storage Alchemist