There is a fast and easy way to copy files between two Synology NASs: the Mount Remote Folder tool in File Station. Once you establish the connection between the two NASs, data flows directly between them.
Quickly Copy Files Between Two Synology NASs
Imagine copying or moving files between NAS devices, a scenario that typically occurs when you reorganize data or add or replace another NAS.
The standard method is to grab your computer, mount a shared folder on each NAS, and copy data between them. The process could be slow depending on your computer’s network connection, its power state, and whether the user remains logged in.
Mount Remote Folder
Fortunately, there is a much safer, more reliable, and faster way to accomplish this task: the Mount Remote Folder tool in File Station. Once set up and started, the process runs unattended.
With the Mount Remote Folder tool, you mount a remote folder from one NAS, say the source, in another NAS, the target. As mentioned, this is great for copying data between both devices. Note that the copying runs manually. There is no automated copying or syncing process. There are other tools for that, like Shared Folder Sync and Synology Drive ShareSync.
A side effect of this tool is that users may see and access the mounted source NAS folder as a folder on the target NAS. As a result, users can access shared folders from different devices from a single NAS. If that is intentional, that’s fine; if not, be aware. I do not discuss this side effect in detail in this post, but I did not want to omit it.
Note that this tool is designed to connect two Synology NAS units on the same local network, not for a remote connection.
The Mount Remote Folder Tool
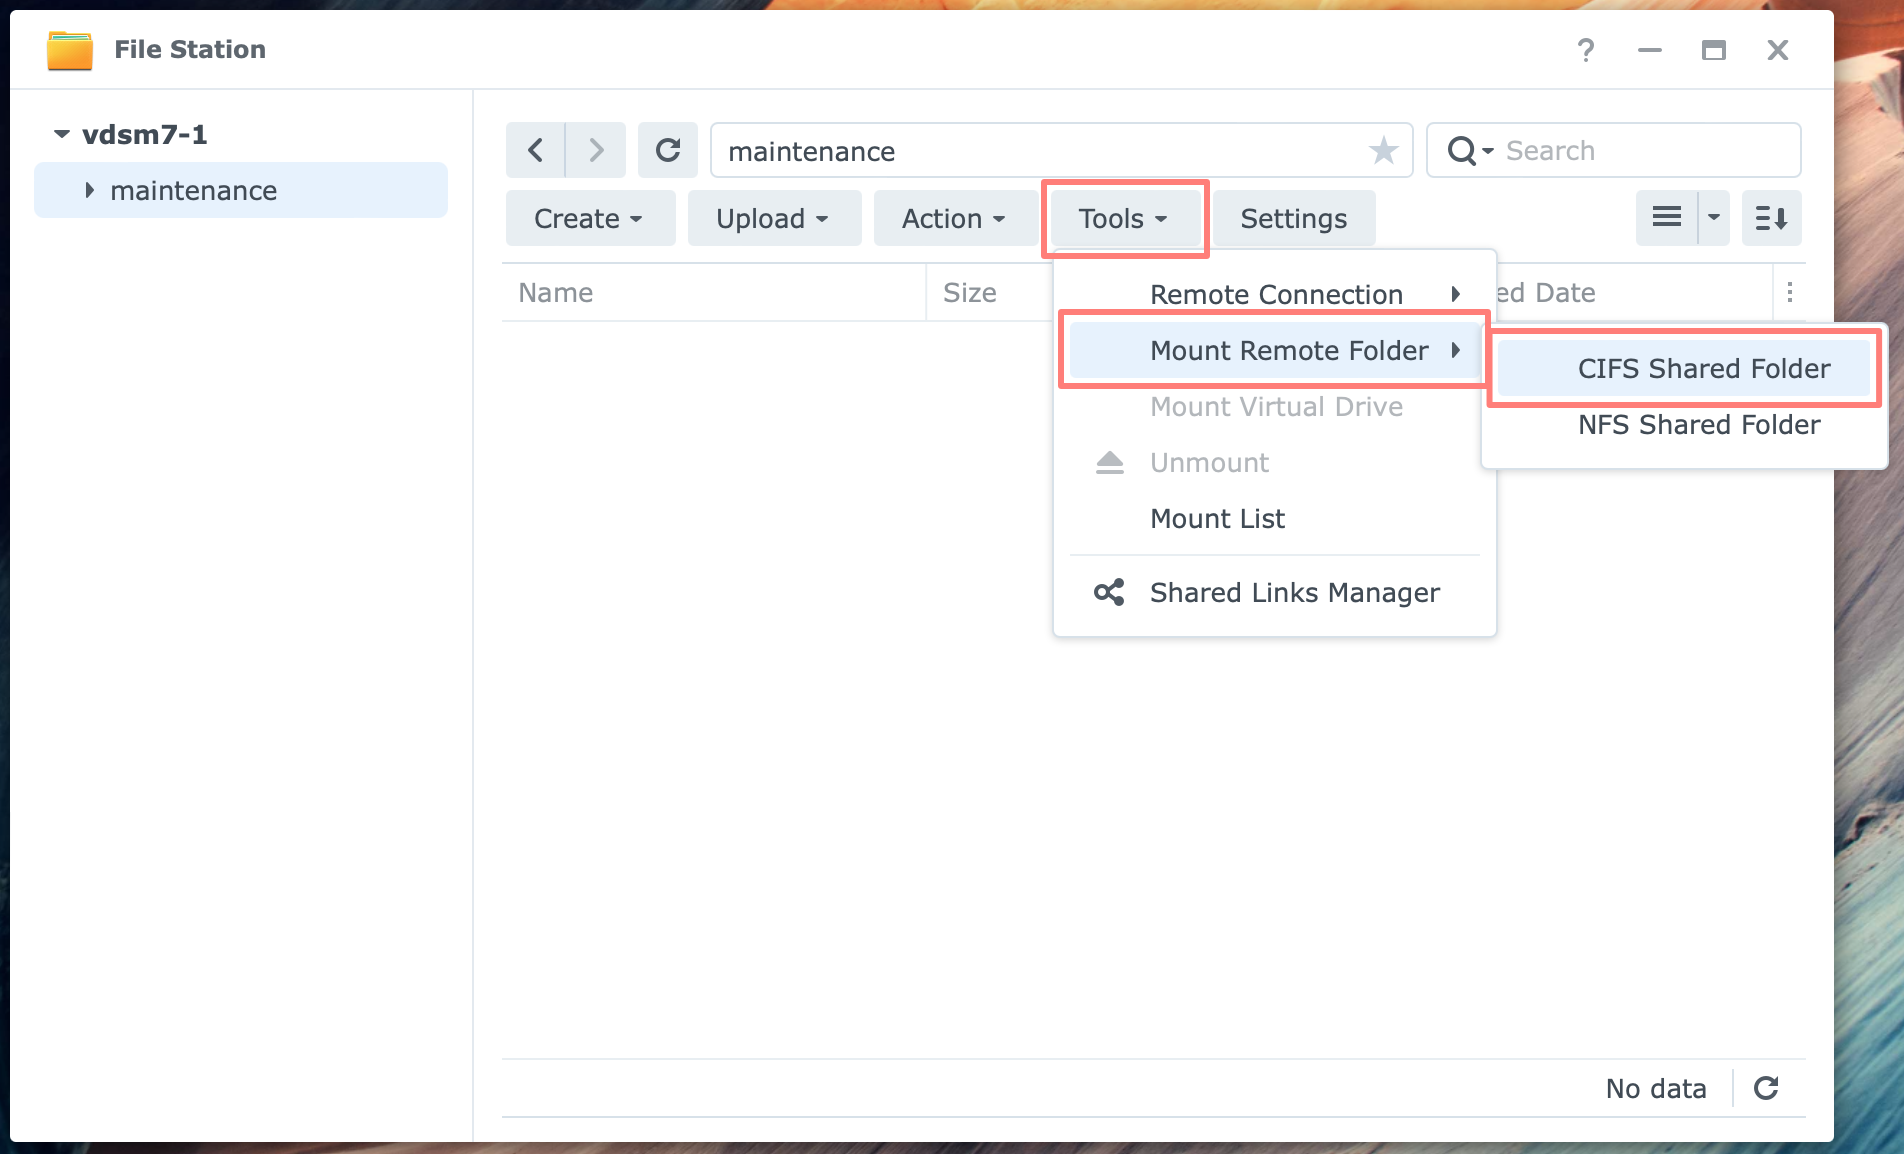
Let’s start to discover this fabulous tool. Log in to the DSM desktop or your NAS, open File Station, click Tools, then select Mount Remote Folder, and choose the CIFS/NFS file service for the connection.
But before we get started, you should consider a few points.
Considerations
Before we get started, we make a few preparations.
- mount permission
- user visibility
- type of connection (SMB/NFS)
- defining the source or target
- remote connection details
- mount on startup
These items may seem more complex than they are, and they will help you establish a quick, secure connection later. Let’s discuss them briefly.
Mount permission
By default, administrators can use this tool. You can change it in File Station > Settings > Mount/Connection tab to allow it for all users.
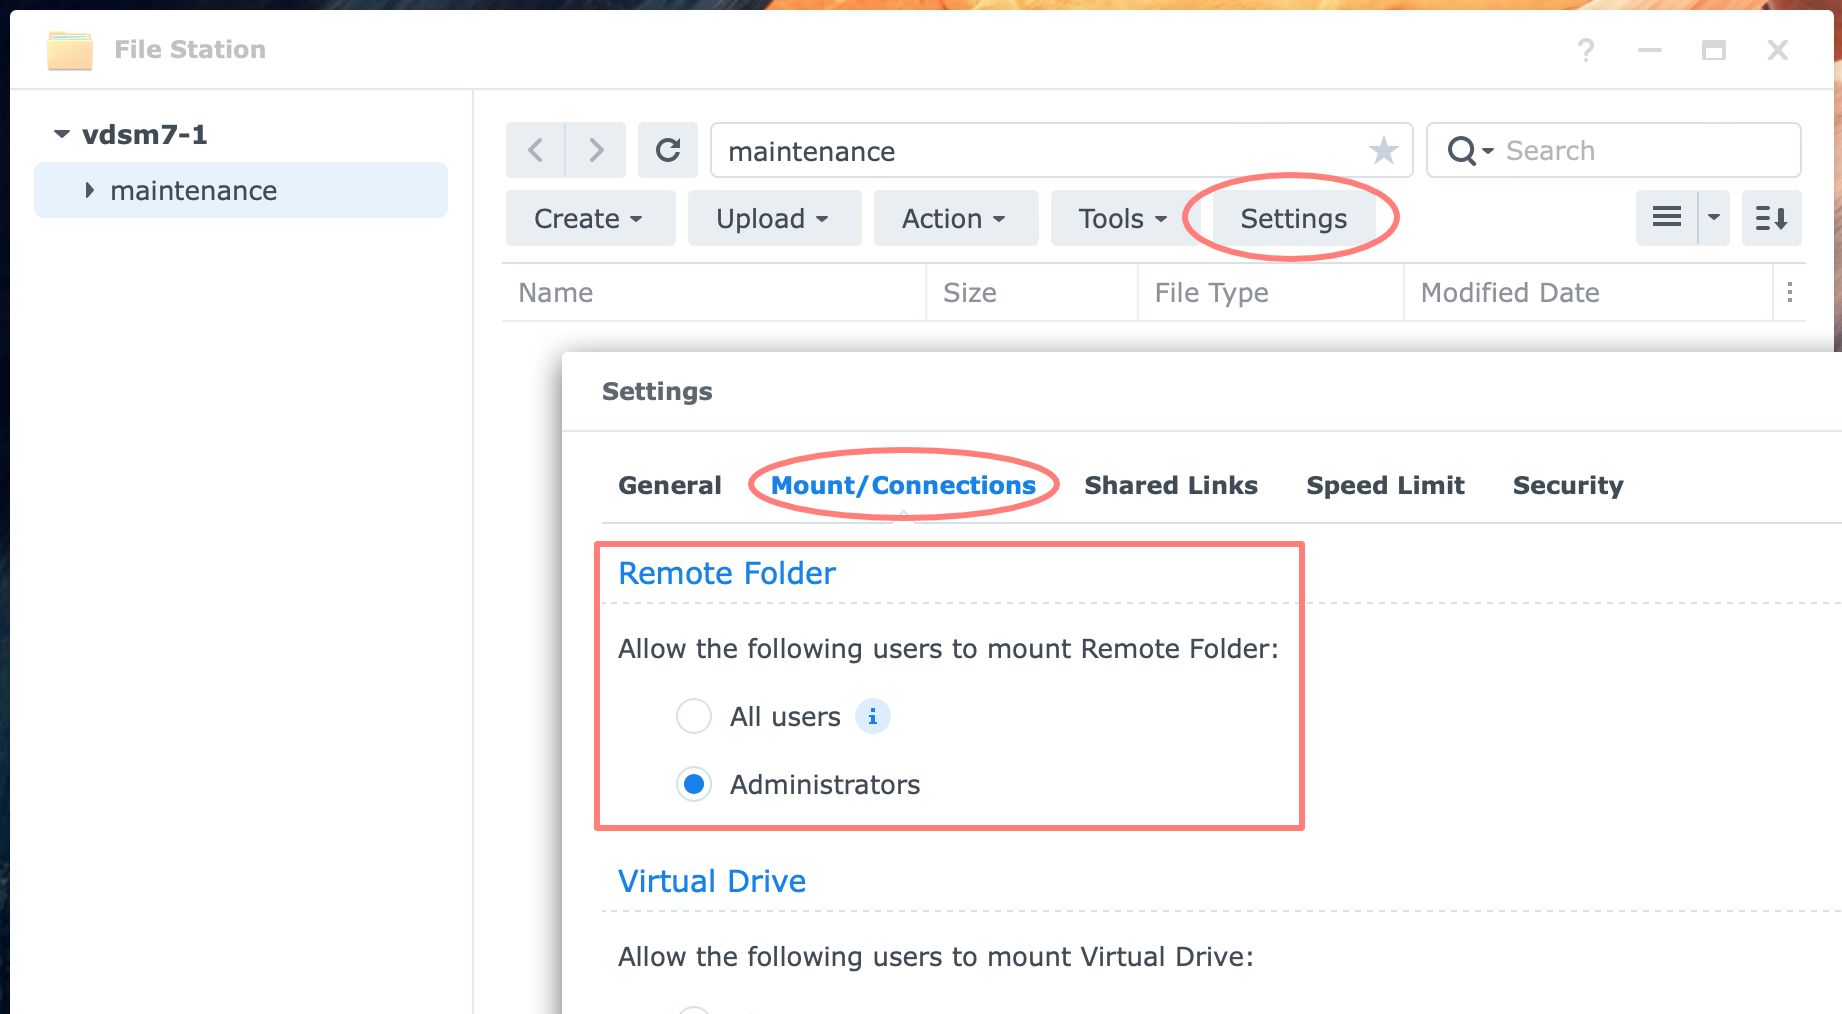
Under the Remote Folder section, select All users or Administrators (default).
User visibility
I mentioned this earlier, but when you mount a remote folder into an existing folder accessible to users, users can access the remote folder’s contents.
To prevent this from happening, for example, when you use this tool for maintenance purposes, like a copy task, mount the remote folder in a shared folder that only administrators can access.
Tip
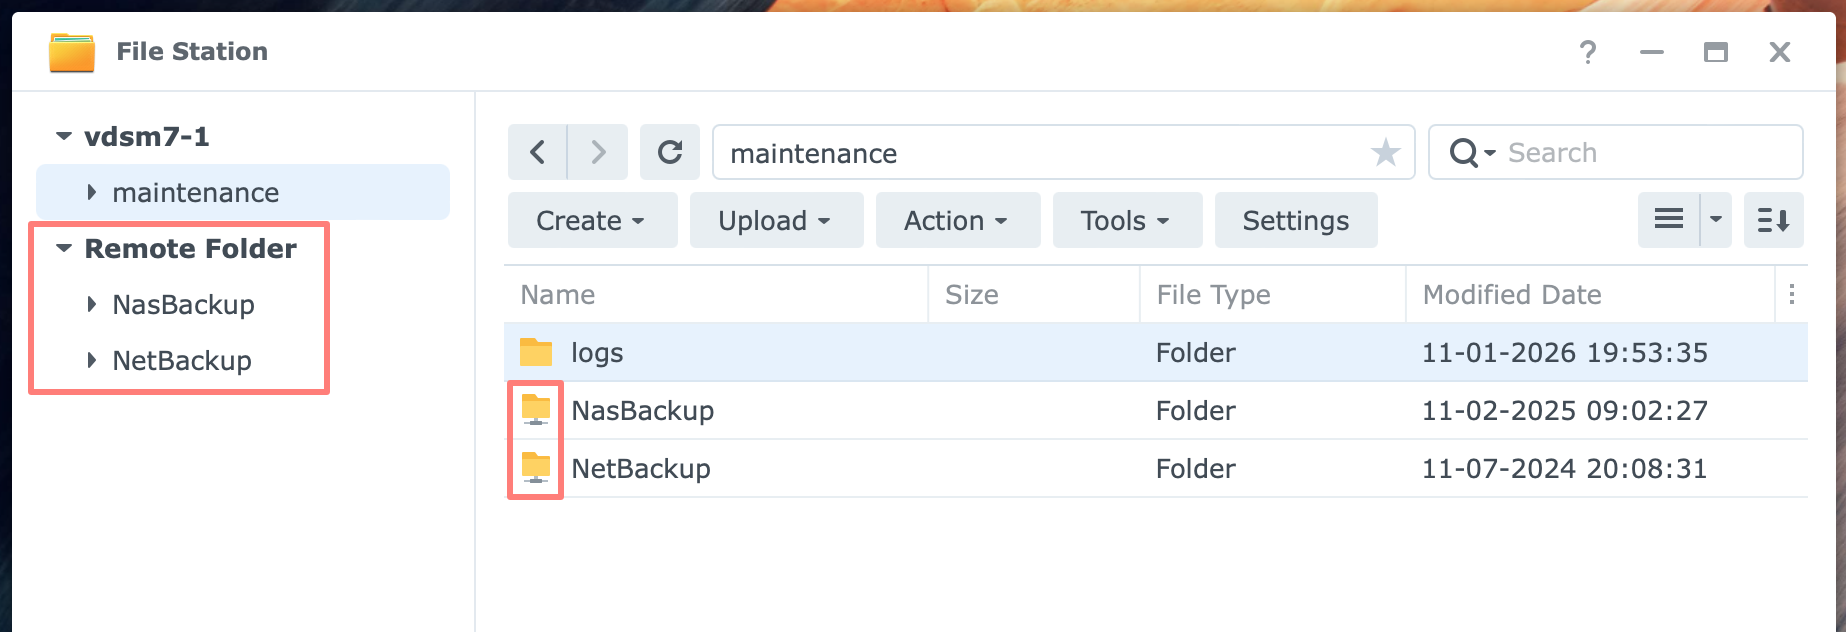
On every NAS I manage, I create a shared folder called maintenance to store logs, among other things. As the name implies, this is for maintenance purposes only. This includes mounting remote folders.

I mount any remote folder inside this maintenance shared folder.
SMB or NFS connection
With the Mount Remote Folder tool, you can select which file service to use: SMB or NFS. Don’t be confused by the legacy name CIFS in the user interface. It refers to SMB.
If you are not using NFS at the moment or are not familiar with it, stick to CIFS/SMB. I might add the use of NFS later in this post. For now, I will discuss the CIFS/SMB option.
Source and target NAS
When you copy data from A to B, I treat A as the source and B as the target NAS. It is arbitrary which side you mount the remote folder on, and I suggest mounting it on whichever side you prefer.
Throughout this post, I will mount a remote folder from the source (A) at the target (B) NAS. In other words, I always use the tool on the target NAS.
Remote connection details
When you create the connection, you need to fill out a small form with the necessary details about the remote folder you want to connect to, like:
- servername or IP address and share name
- like in \\ip_address\share
- use backslashes in the name, which is unusual for Mac and Unix/Linux users who are familiar with forward slashes
- account and password to make the connection
- use an account that has at least read access to the shared folder on the remote NAS
- mount to
- the folder on the target (local) NAS, the one you are currently logged into
- you may notice that the preselected folder is already selected
Mount on startup
When you create the remote connection, you can configure it to mount automatically after the NAS restarts.
We are now ready to use the Mount Remote Folder tool.
Using The Mount Remote Folder Tool
If you have not already done so, log in to the DSM desktop on the target NAS and open File Station.
Select a folder on the NAS where you plan to mount the remote folder. This step is optional, but it makes the next step easier.

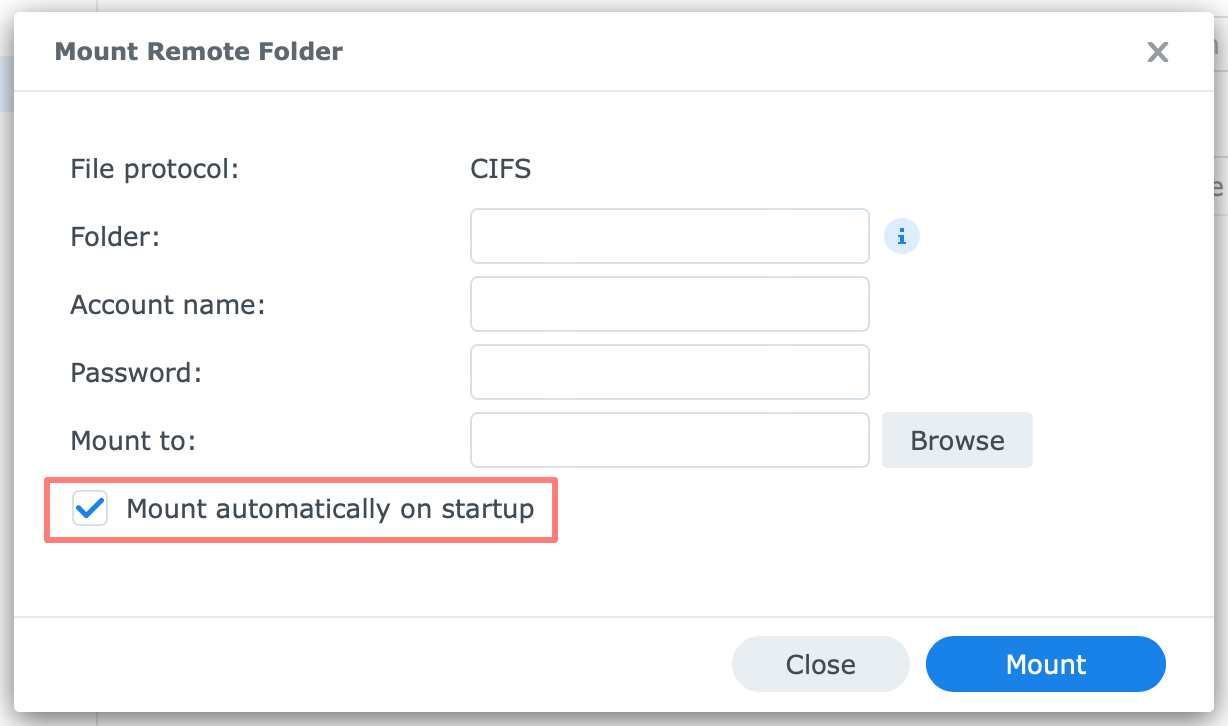
Go to Tools > Mount Remote Folder > CIFS Shared Folder. The Mount Remote Folder dialog opens.
- Folder: \\server_name\share or \\ip_address\share
- Account & password
- Mount to: /Administratie/subfolder
- Mount automatically on startup: enable if required
Note that in the folder name, you can use a subfolder name, like \\server_name\shared_folder\subfolder. The path name you type affects the folder it mounts to. File Station uses the selected folder plus the last subfolder name as the destination. File Station always mounts the remote folder as a 1st level subfolder of your folder.
Finding mounted folders
As soon as you create a remote folder connection in File Station, you see a new column on the left labeled Remote Folder, with the remote folder name(s) beneath it.
You do not have to remember the folder that includes the remote folder. File Station lists all remote folders in one place for your convenience.
When you browse File Station to a remote folder in the right-hand screen, you notice that it has a different icon to distinguish it from local folders.
On a client computer that mounts a shared folder on your NAS, any remote folder within that shared folder appears as a regular folder.
Using The Remote Connection
Now that you have mounted a remote folder, you can start copying files from the source to the target. In File Station, open the remote folder, select the files and folders you want to copy, and issue the copy command.
As you may know, File Station has different copy commands that work similarly. You reach them via the Action button or by right-clicking on the selected files.
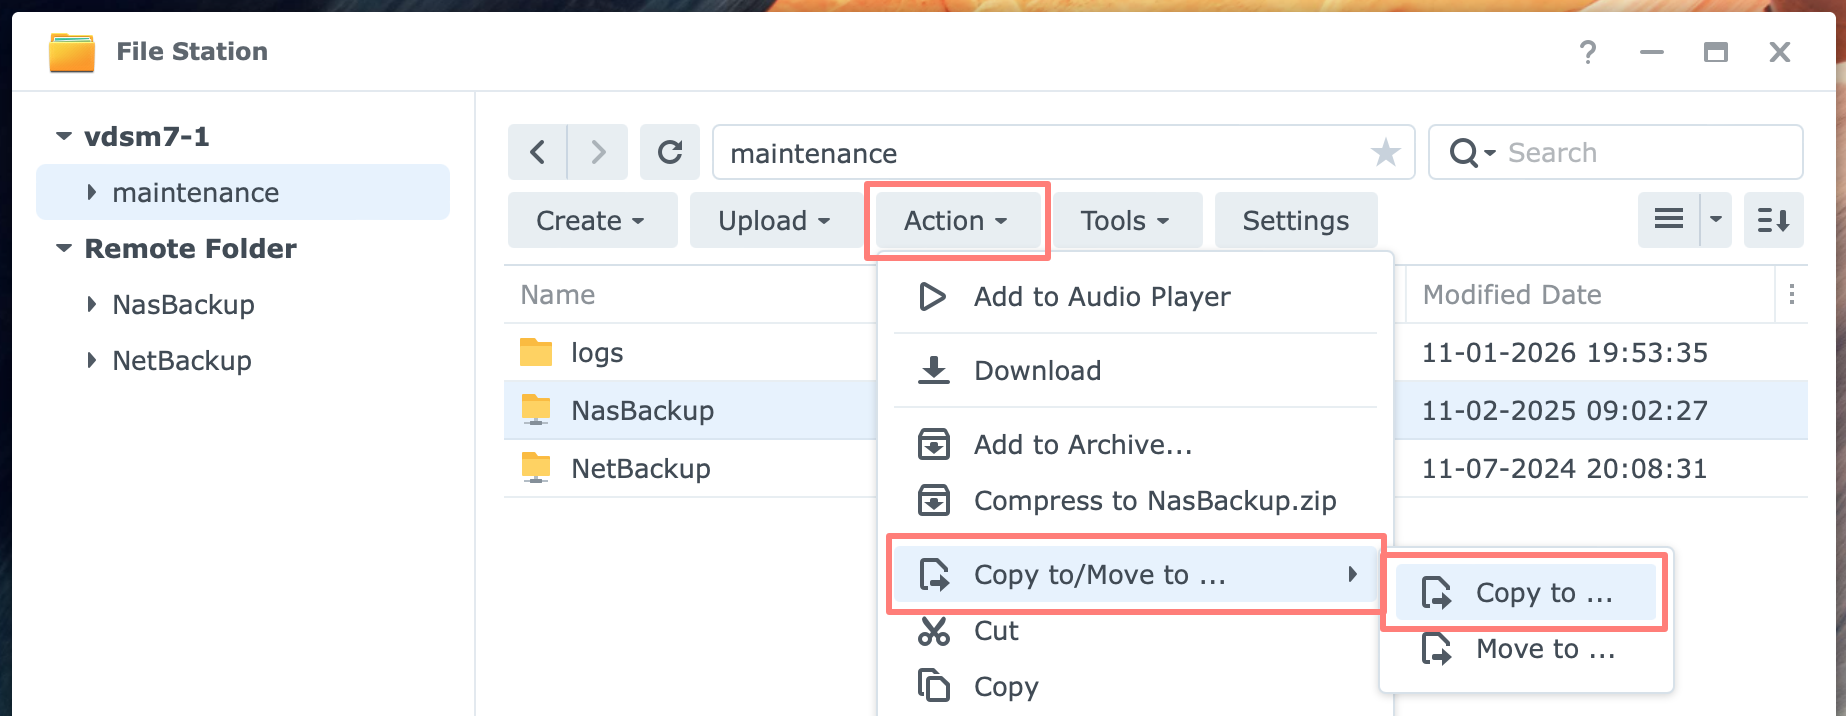
One command I found very useful is Copy to… Another command is Copy, later followed by Paste – Overwrite or Paste – Skip.
Unattended process
Once the copying starts, which sometimes takes hours or even days, you get a progress bar that you can leave as is or hide.
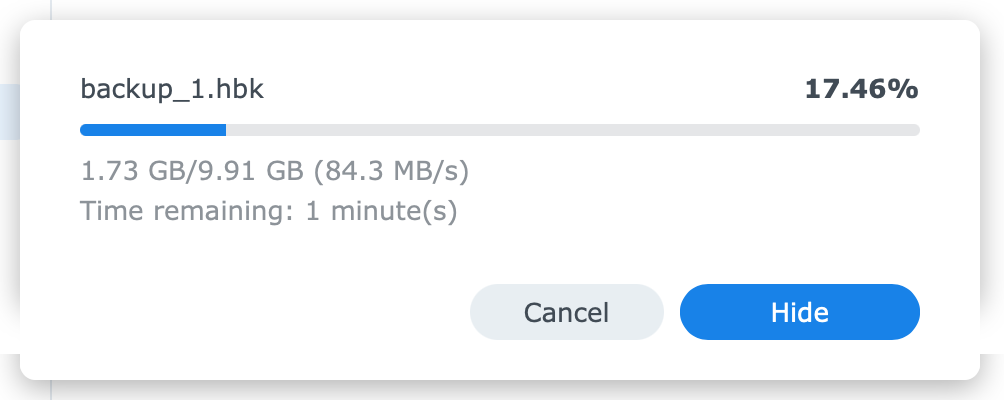
You can close File Station and log off from the DSM desktop if it takes too long. The process continues unattended.
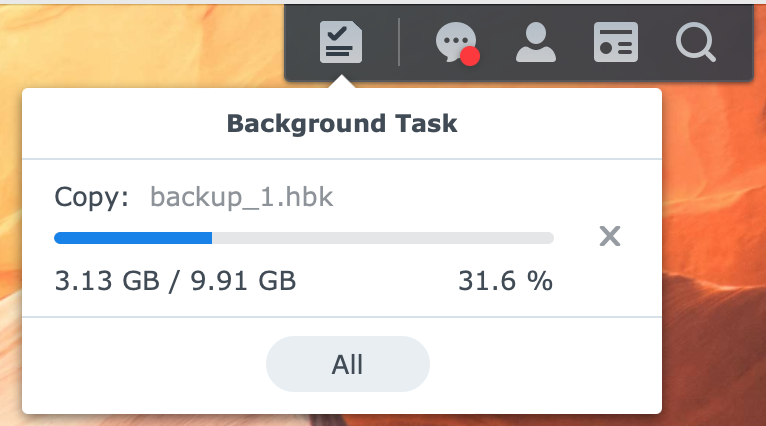
To monitor its progress later, log in to DSM again and locate the File Task Monitor icon in the menu bar at the top to show running background tasks.
Managing Mounted Folders
You may want to unmount or reconnect a remote folder on the target NAS. There are two locations where you can manage mounted folders.
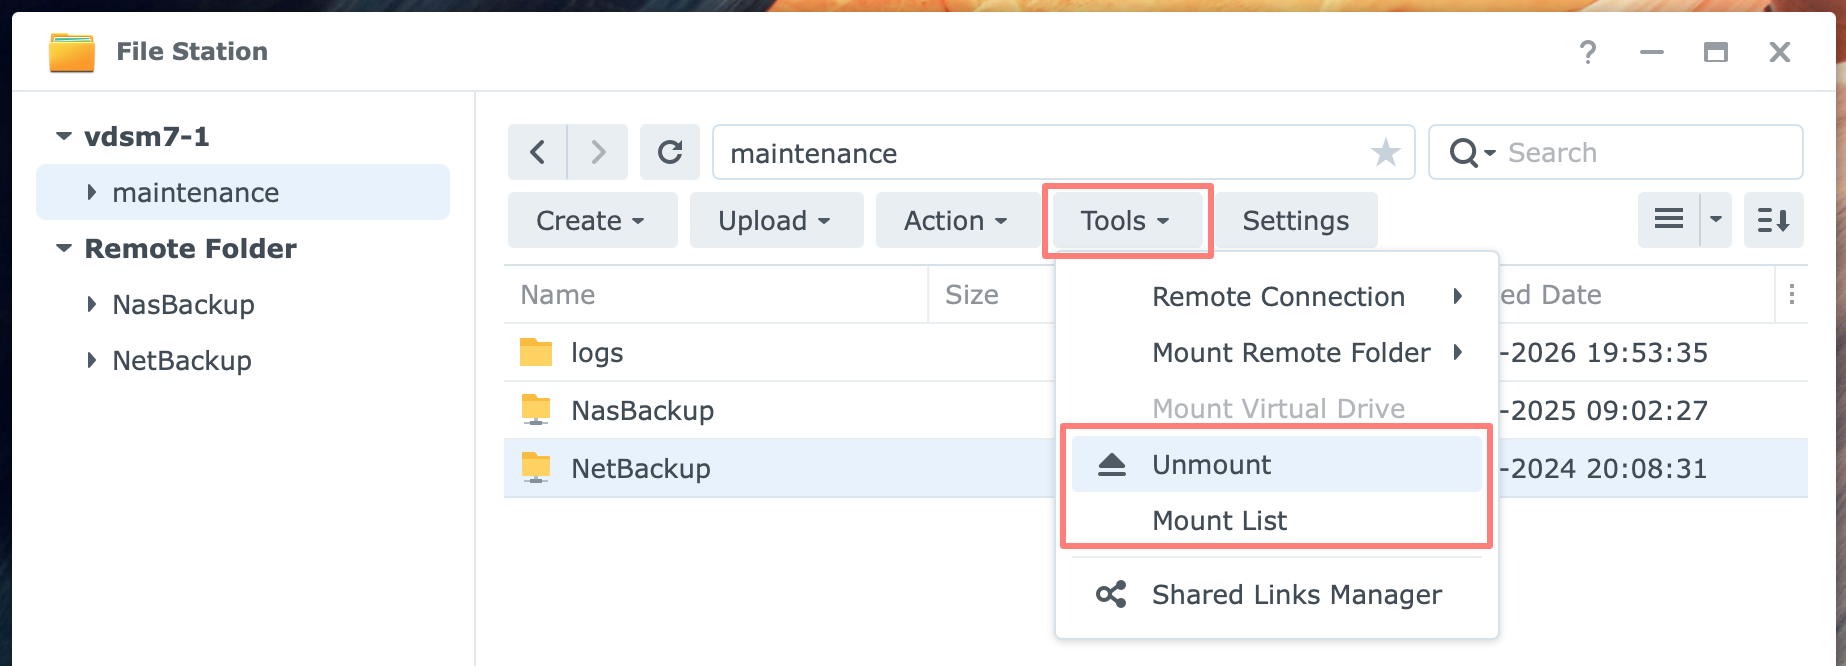
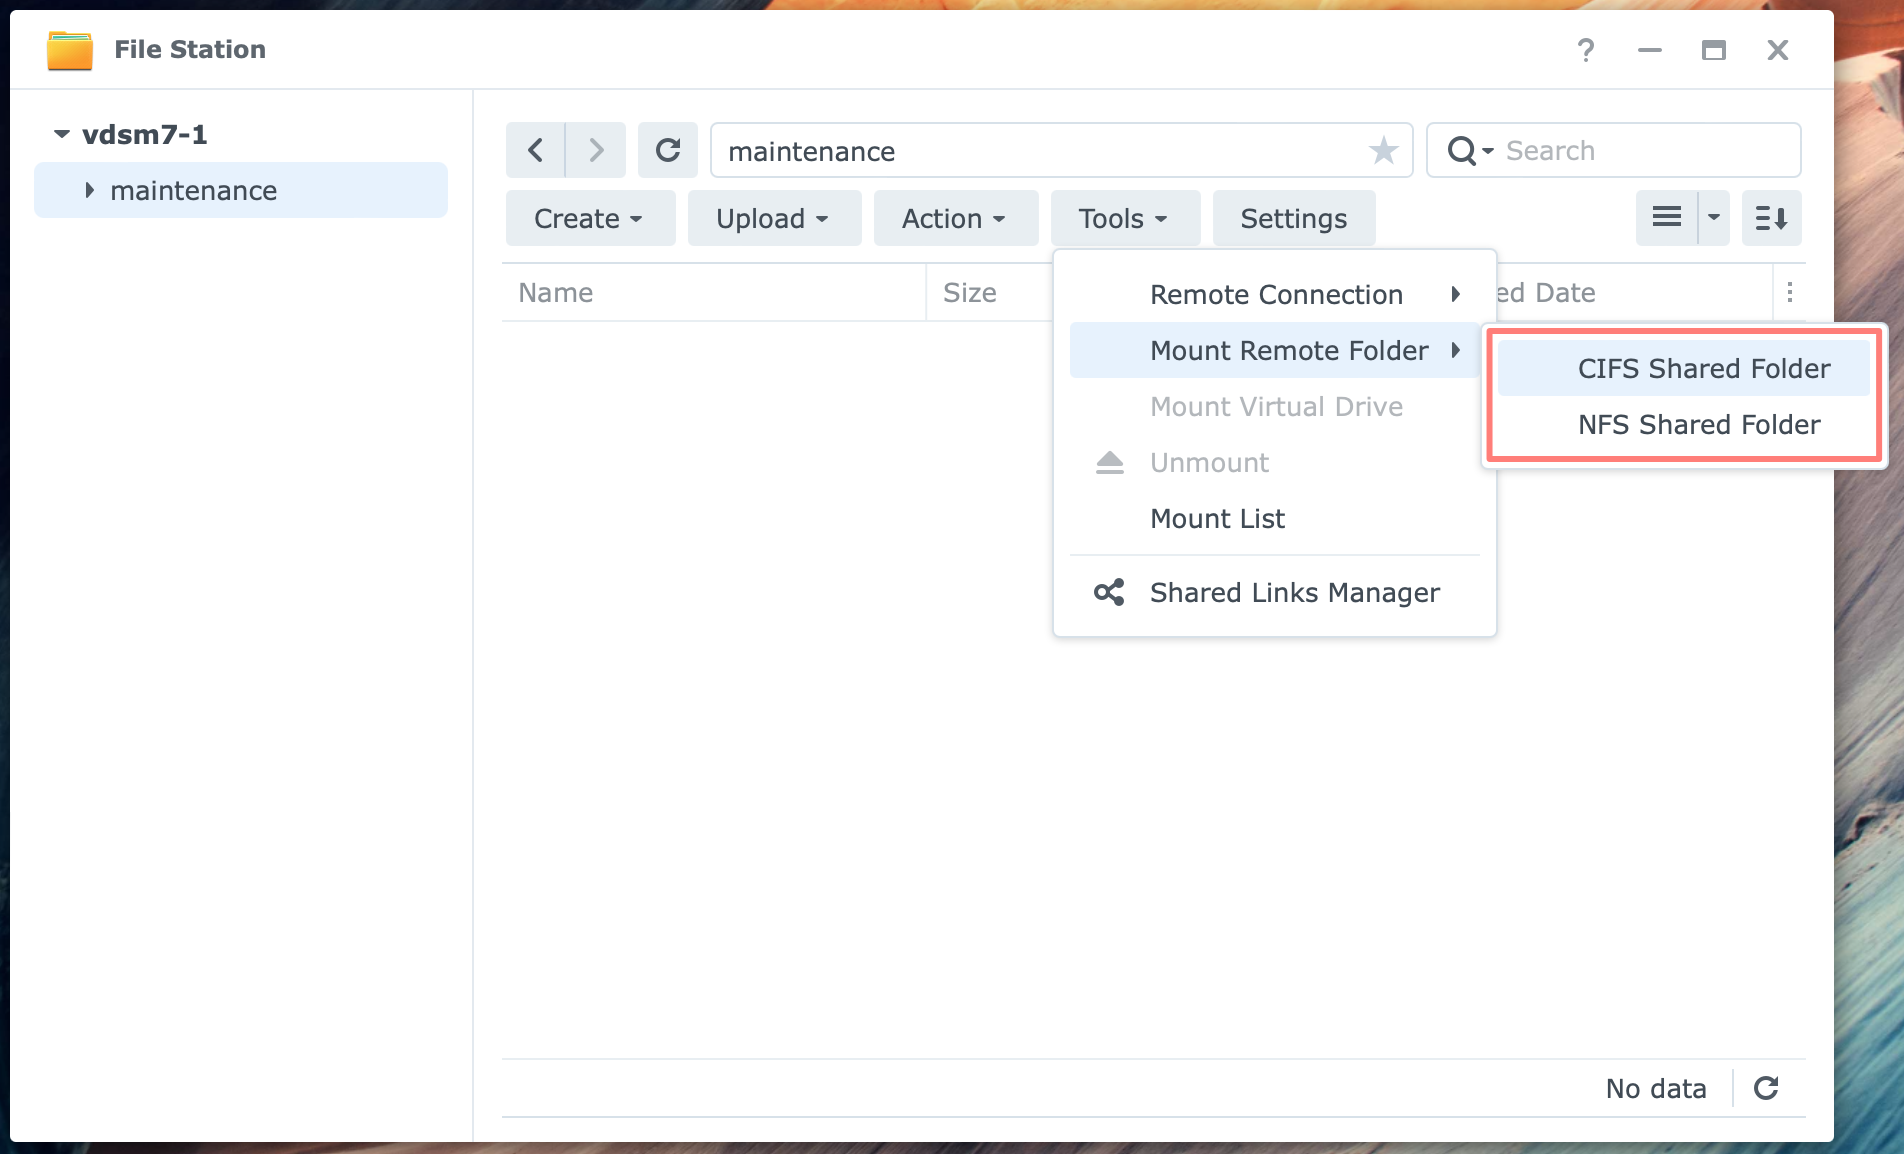
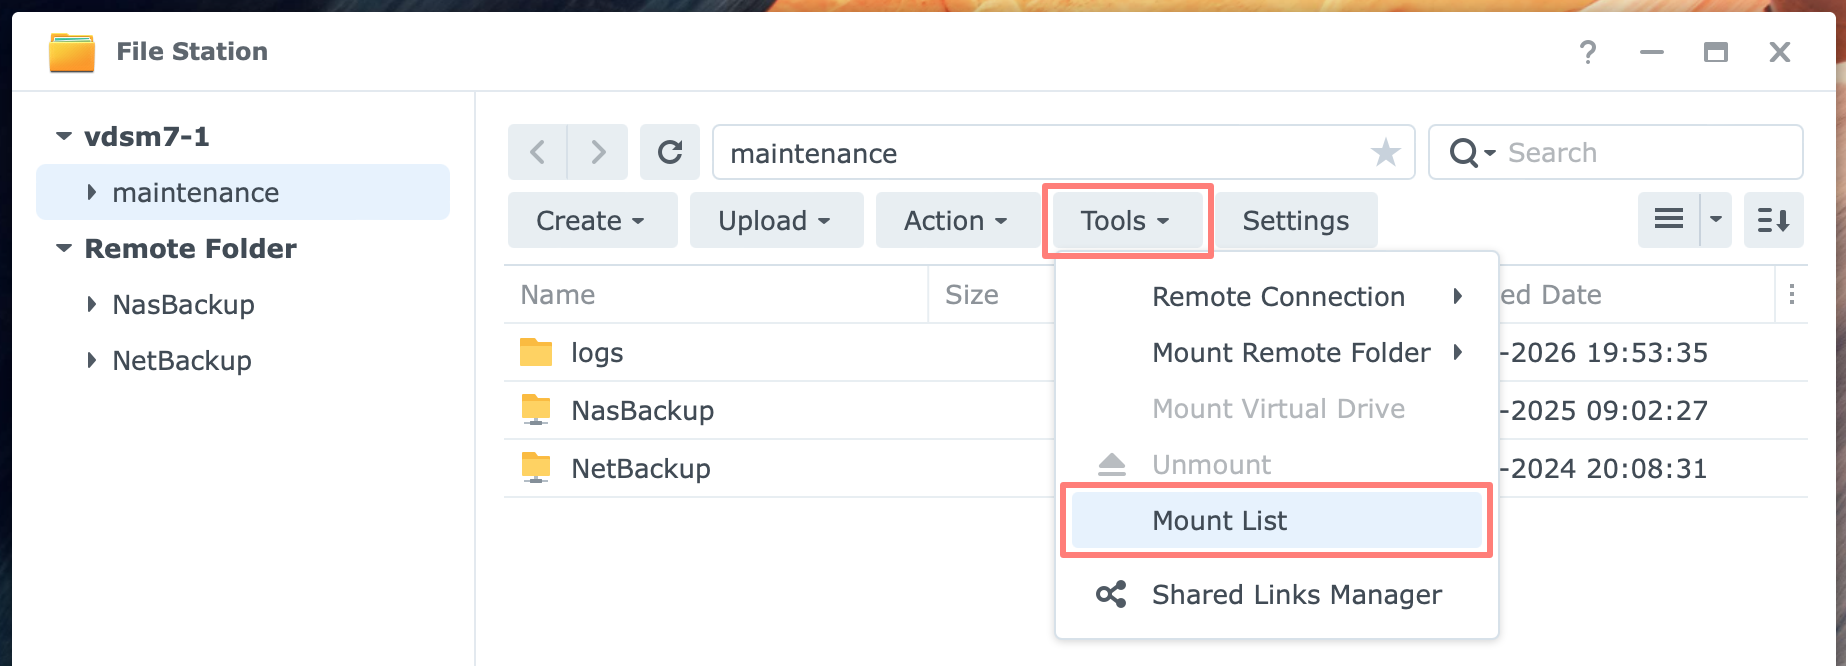
In File Station, click Tools, then select either Unmount or Mount List.
The Unmount command
Select the mounted folder you want to unmount. In File Station, click Tools and select Unmount. See the screenshot above. Note that the Unmount command executes instantly without asking for confirmation.
If you did not choose the mounted folder beforehand, the Unmount command is unavailable.
The Mount List
The Mount List lets you both unmount a remote folder or reconnect to it. In File Station, click Tools, then select Mount List. See screenshot above. Go to the second tab, Remote Folder.
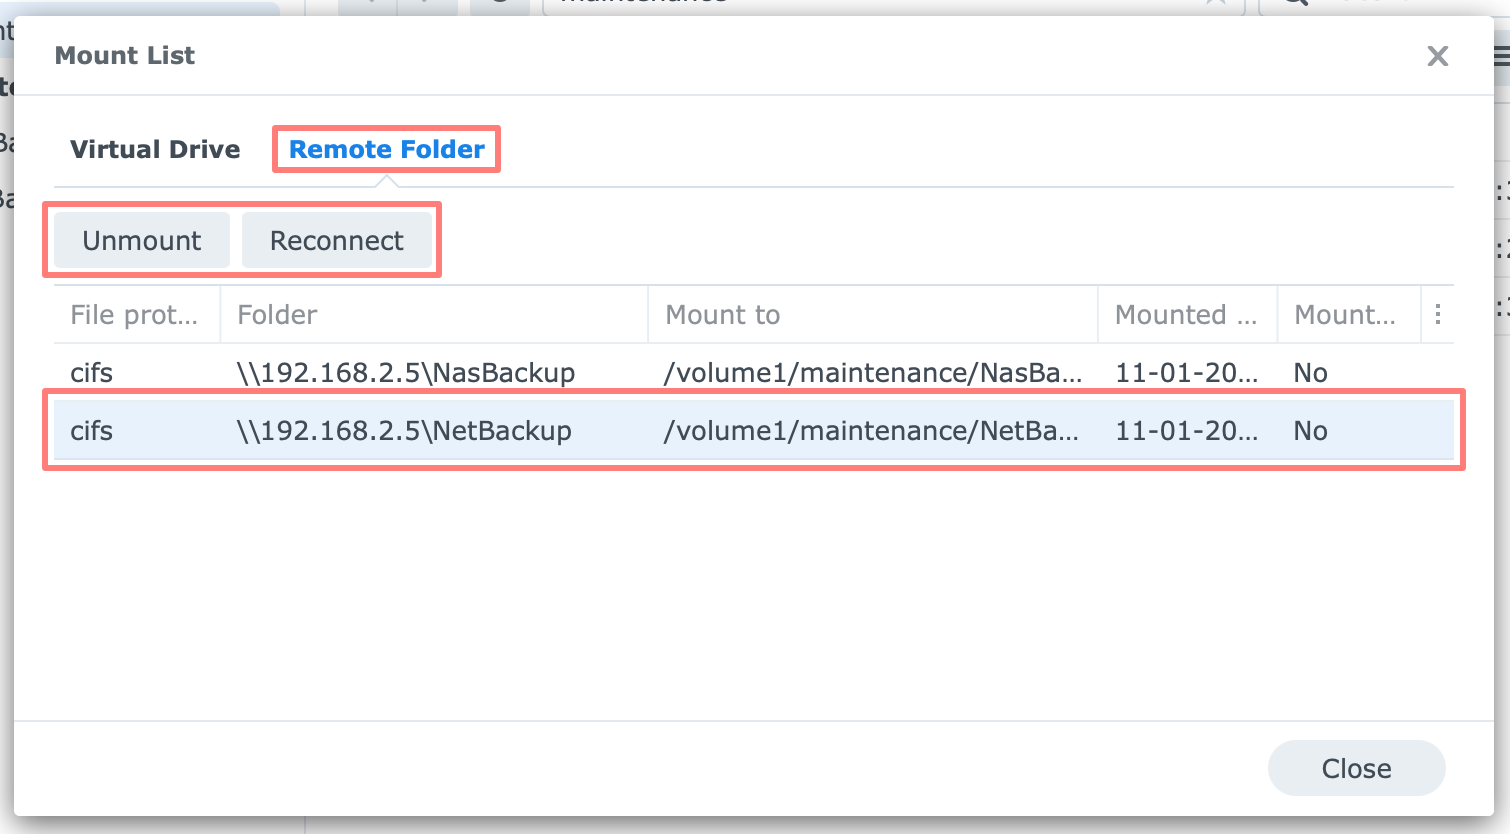
Select the remote folder and the preferred action: Unmount or Reconnect.
Thanks for reading
This post is donationware, and I made it to help you. Please consider leaving a comment or buying me a coffee if you found it helpful. I will be eternally grateful.
Paul Steunebrink / Storage Alchemist