This post is donation-ware. If it did help you, please consider leaving a comment or even buying me a coffee. I will be eternally grateful.
Primary objective
Create a more robust form of authentication to prevent unauthorized access.
Secondary objective(s)
Increase security.
Background
In DSM 7, Synology uses 2-factor authentication but refers to it as 2-step verification in DSM 6. However, the technology is the same.
The process of how to enable 2-factor authentication is also different between DSM 6 and DSM 7. Note that you can abbreviate 2-factor authentication as 2FA.
The idea is that you can authenticate yourself (proof of who you are) using something you know, something you have, or something you are, or through any combination. With 2FA, we use two factors, typically knowledge, and possession. These are the three different factors that we can use for authentication.
User name and password are both pieces of knowledge, hence a one-factor authentication. Unfortunately, knowledge is relatively easy to steal, like a leaked or guessed password. When you combine this with a Time-based One-Time Password (TOTP) from a device in your possession, you perform a two-factor authentication: knowledge and possession.
This type of authentication is harder to hack as the perpetrator needs your user name and password and access to your hardware device for a code that changes every minute.
An app like Google Authenticator is a time-based one-time password generator that you can link to your NAS user account. When you enable the Authenticator, you first log in with your user name and password. Next, you get a second login screen for the one-time password. You type or copy the password from your smartphone into that second login screen.
By combining both knowledge and possession in authentication, you create a 2-factor authentication. Since this takes place in two consecutive authentication steps, it is also called 2-step authentication.
If you forgot or lost your mobile device, you could still log in to your NAS, but you need access to your email. On the second login screen, there is a Lost your phone? (DSM 6) or Lost your mobile device? (DSM7) option. Clicking on this question will send a code to your email address that you configured during the 2-step verification setup. Note that the amount of emails is limited.
When 2FA is a must have
In my opinion, 2-factor authentication (2FA) is a must-have for all administrator accounts of your NAS. However, if you enable any form of remote access like QuickConnect, I highly recommend 2FA for all users. Likewise, if you run a website on your NAS, like WordPress, enable 2FA for all users.
The reason is that both remote access and a website connect your website directly to the internet. Any external connection makes your NAS more vulnerable to attacks. You can mitigate this risk by enabling 2FA, among others.
Preparations
To make setting up 2FA a great experience, you can make the following preparations before you start. Note that this is optional. The wizard will guide you to make these preparations during the 2FA setup, but I find it distracting, particularly for the untrained user.
- Install an app on your smartphone or tablet the supports TOTP, like Google Authenticator. You find this in the AppStore (Apple) or PlayStore (Android).
- Enable email notification for your user account. This is in particular recommended if you set up 2FA for yourself. You will find instructions in the text below.
Actions
There are two methods for enabling 2-factor authentication: you can enable 2-factor authentication (2FA) for a single user account (yourself) or all user accounts in DSM. I discuss them both for DSM 6 and DSM 7.
Enable 2FA for yourself in DSM 6
Log in to the DSM desktop. In the top-right corner, open the user menu, and select Personal. Note that every user can do this for him or herself, both standard users and administrators.
On the Personal screen, go to the Email Account tab. If no email account is configured, click on the Add button. The Email Account Setup Wizard opens.
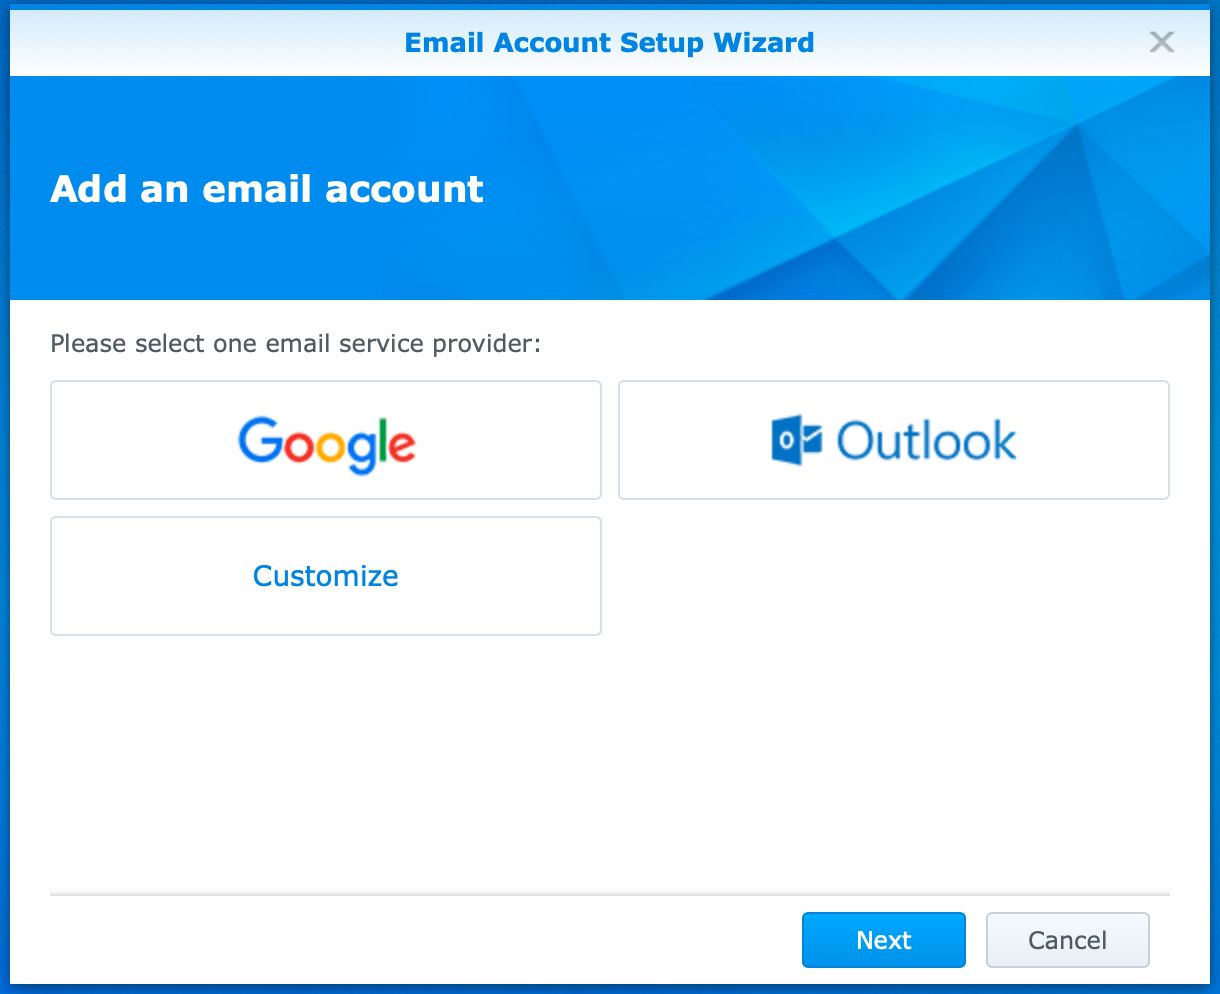
If Google or Microsoft is your service provider, the process is relatively simple. If not, choose Customize and click Next. You get a screen like the one below.
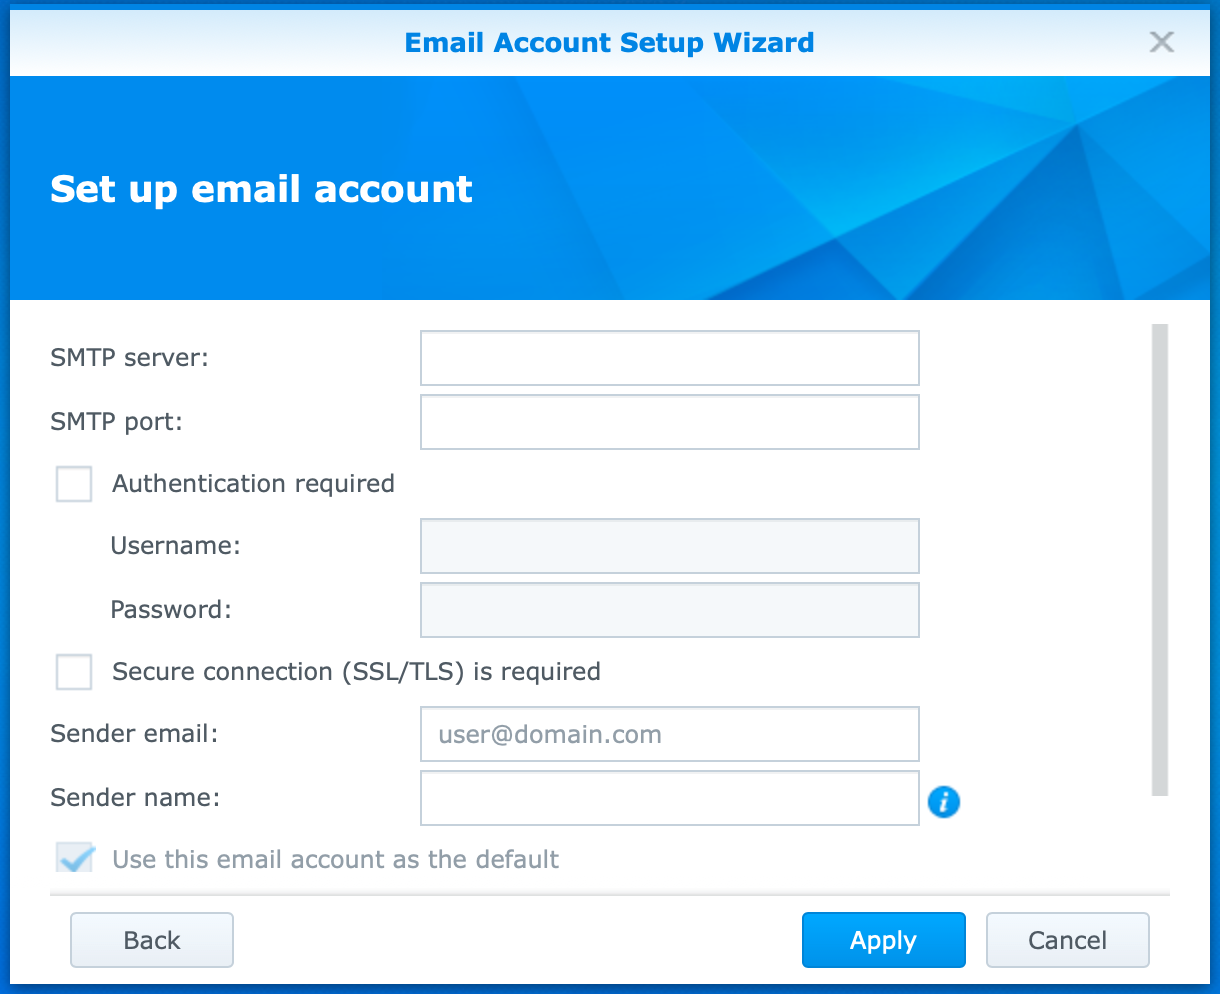
You perhaps need some help to fill in all necessary information. At the bottom of the screen (not visible in the screenshot) is a Test Connection button. I encourage you to use it.
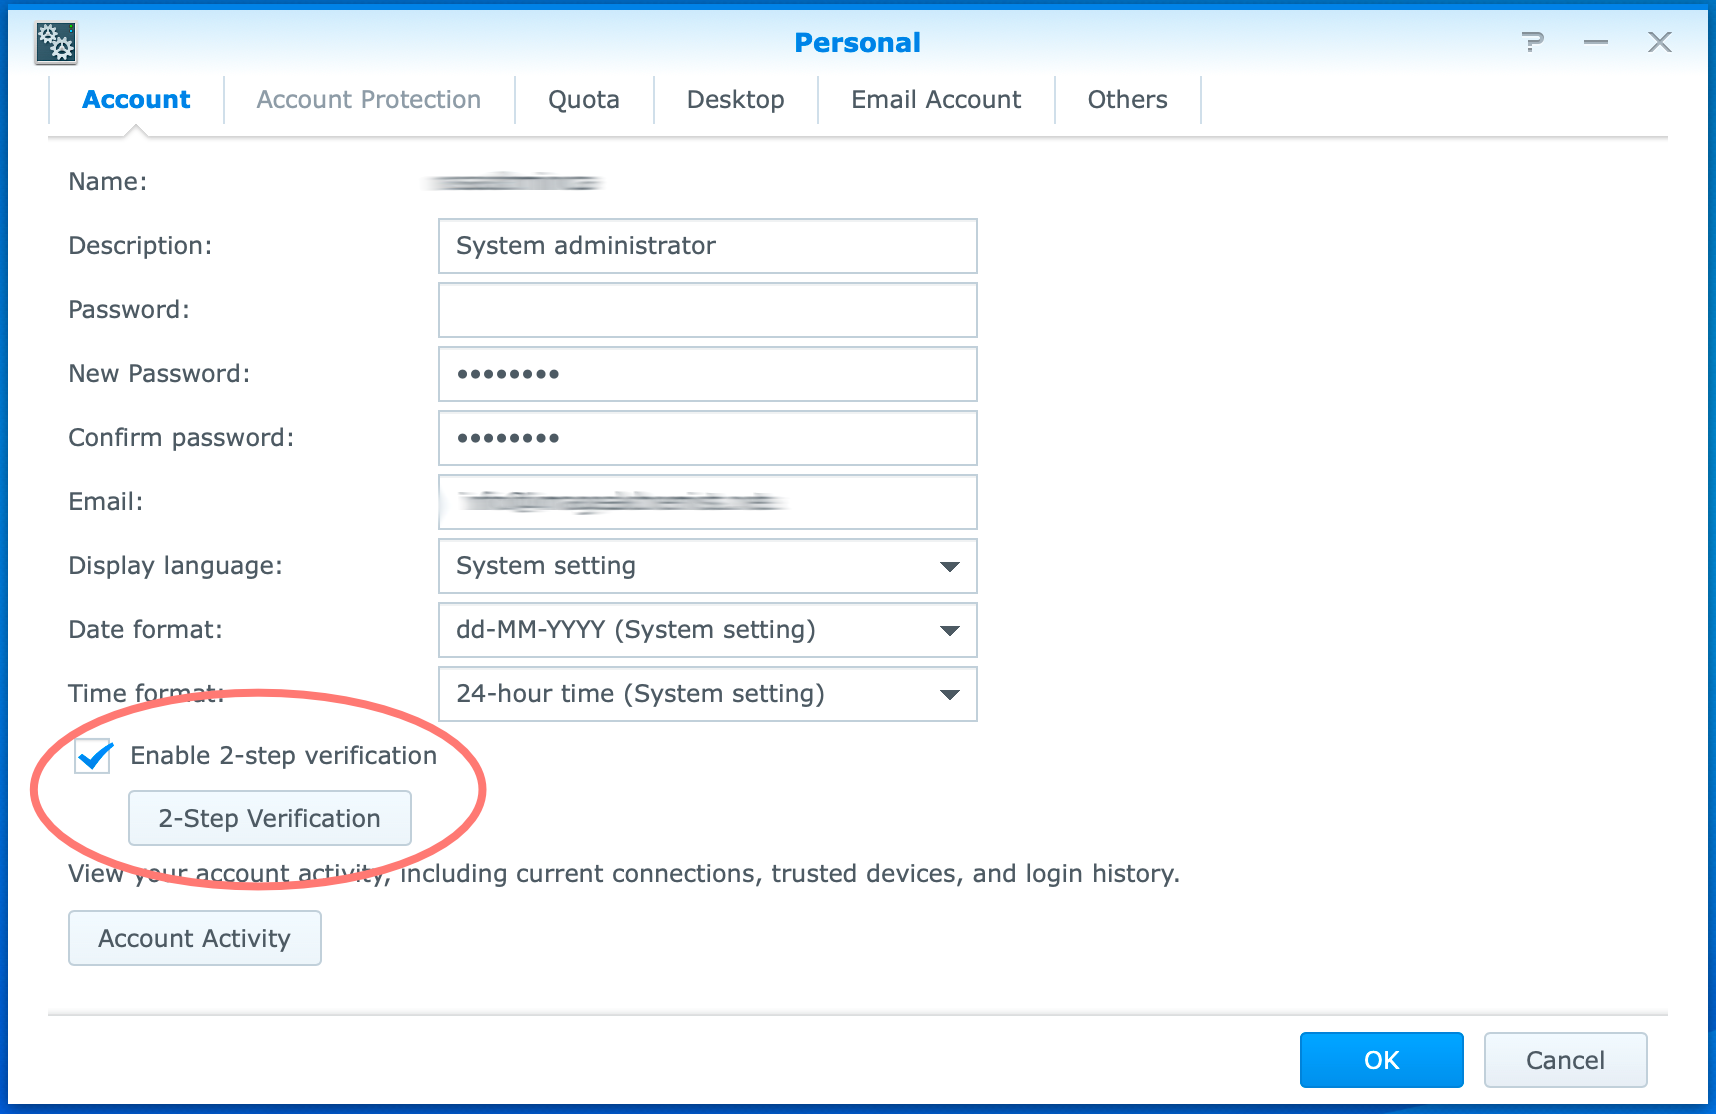
Continue on the Account tab of the Personal screen, check the box for Enable 2-step verification. The 2-Step Verification Wizard opens. If it does not open, click on the 2-Step Verification button.
In the Welcome screen, click Next. In the Confirm your email address screen, enter the email address you enabled for notification in the previous step and click Next. In the Install and configure authenticator app screen, scan de QR code with your smartphone.
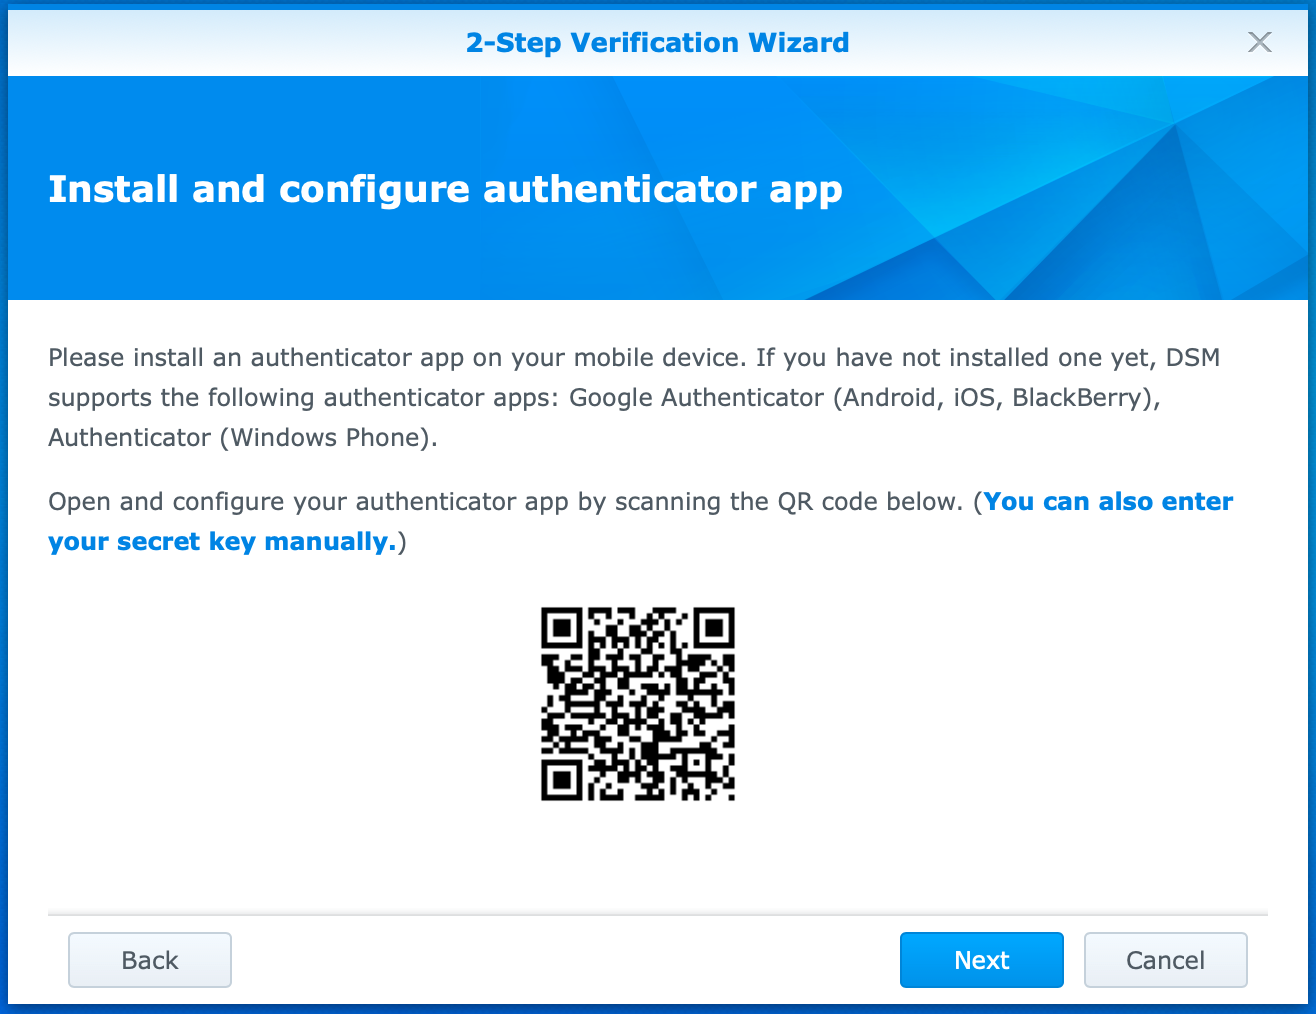
Open the TOTP app on your mobile device, click on the ‘+’ sign, and scan the QR code. Notice that this step adds a code with user_name@nas_name to the TOTP app.
Click Next in the wizard on the NAS. In the Confirm your 2-step verification settings screen, enter the 6-digit code from the TOTP app, click Next.
The last screen confirms that you enabled 2-step verification for your account. Click Close.
Congrats, you achieved the primary and secondary objectives.
Enable 2FA for all users in DSM 6
I will now show you the second method of enabling 2-factor authentication on your NAS with DSM 6.
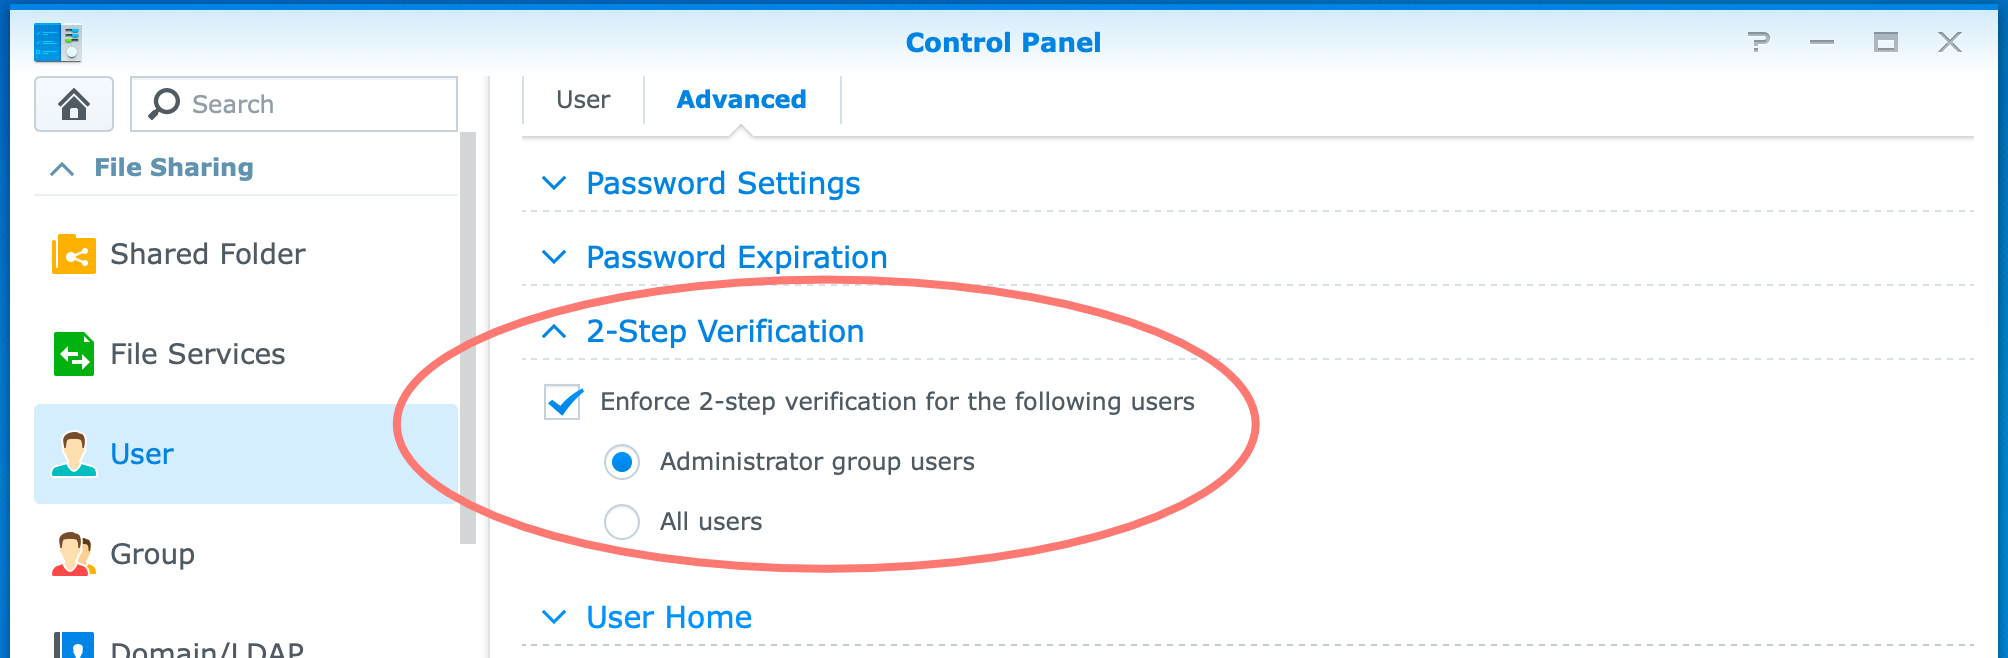
Log in to the DSM desktop with administrative privileges. Open Control Panel > User > Advanced tab > 2-Step Verification. Check the box for Enforce 2-step verification for the following users. Either choose Administrator group users or All users. Click the Apply button.
I suggest always enabling this for the administrator group users. In case you open up your NAS to the internet via QuickConnect or other forms of external access, as well as hosting a website, I suggest enabling 2-step verification for all users.
The next time a user logs on to DSM, it will receive a message to set up an email notification and connect with the TOTP app on his or her mobile device.
Congrats, you achieved the primary and secondary objectives.
Enable 2FA for yourself in DSM 7
Log in to the DSM desktop. In the top-right corner, open the user menu, and select Personal. Note that every user can do this for him or herself, both standard users and administrators.
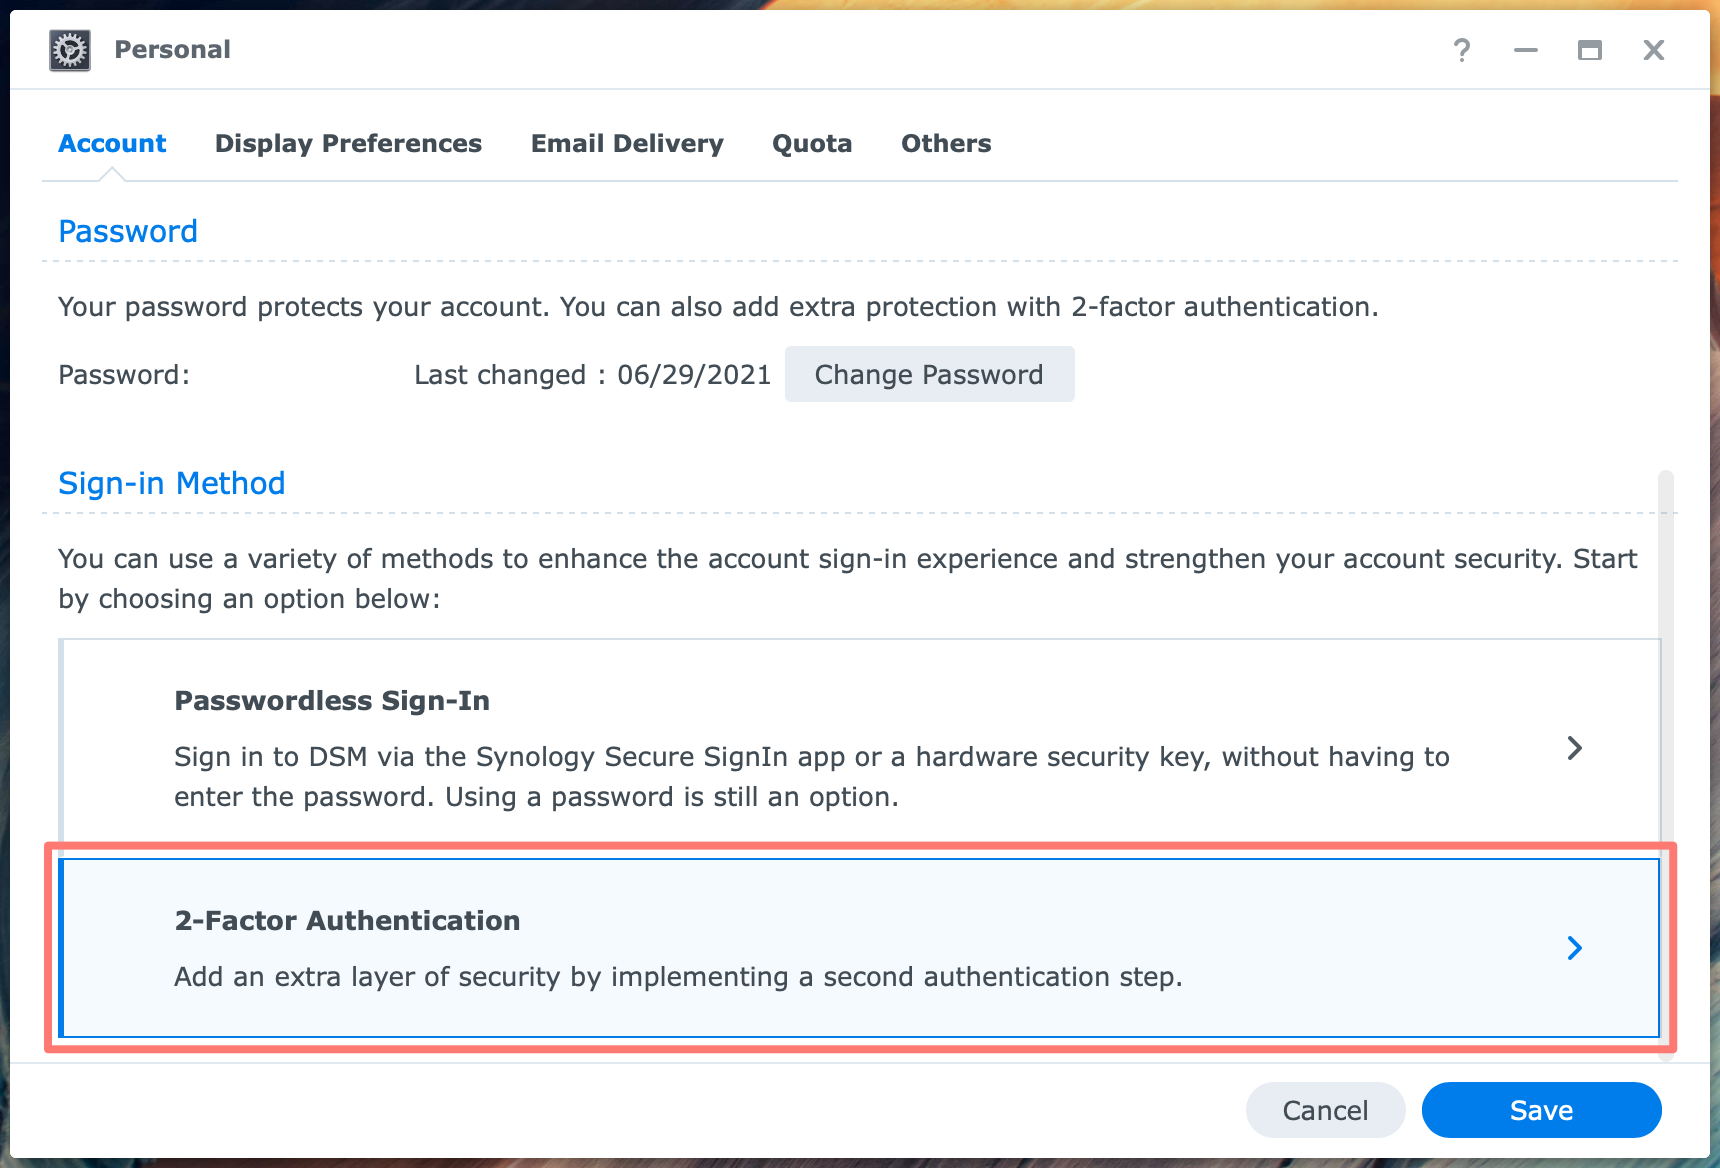
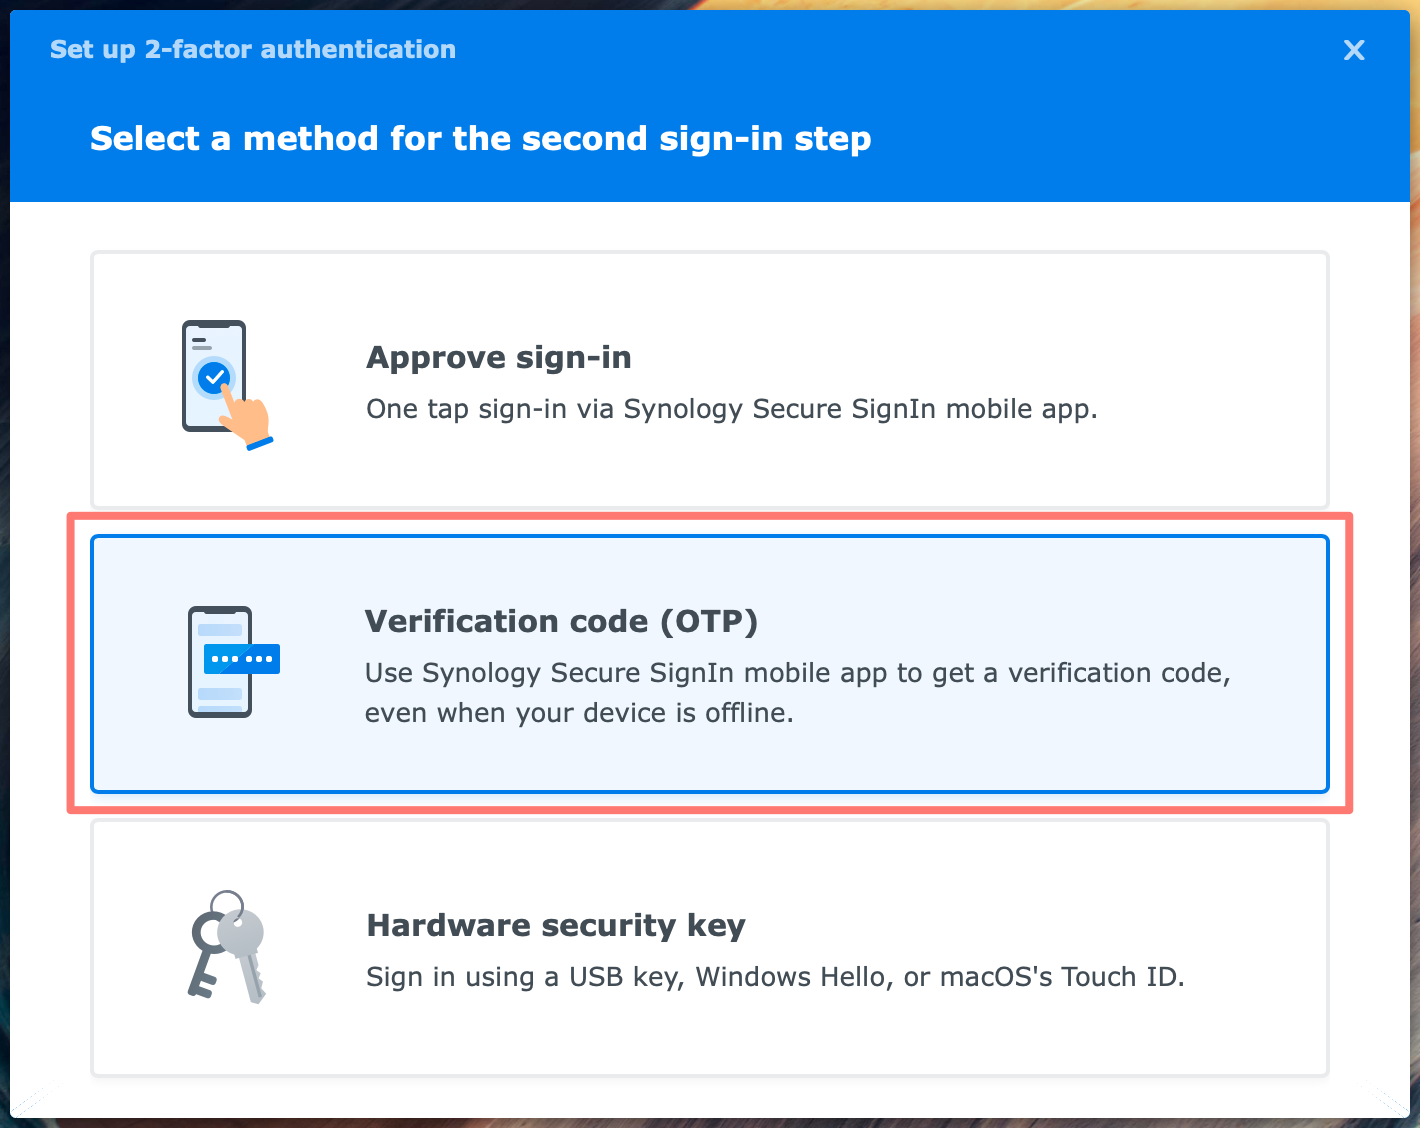
On the Account tab of the Personal screen, go to Sign-In Method section. Select 2-Factor Authentication. The Set up 2-factor authentication wizard starts.
On the Select a method for the second sign-in step screen, choose Verification code (OTP). As the text states, the advantage of this method is that it works when the NAS is offline. Verify your identity in the pop-up screen, and click OK.
In the Install Synology Secure SignIn you are encouraged to install that app or Google Authenticator or any other TOTP app. Read the instructions on the next screen, Protect your DSM account with 2-factor authentication, and click Next. Click Next.
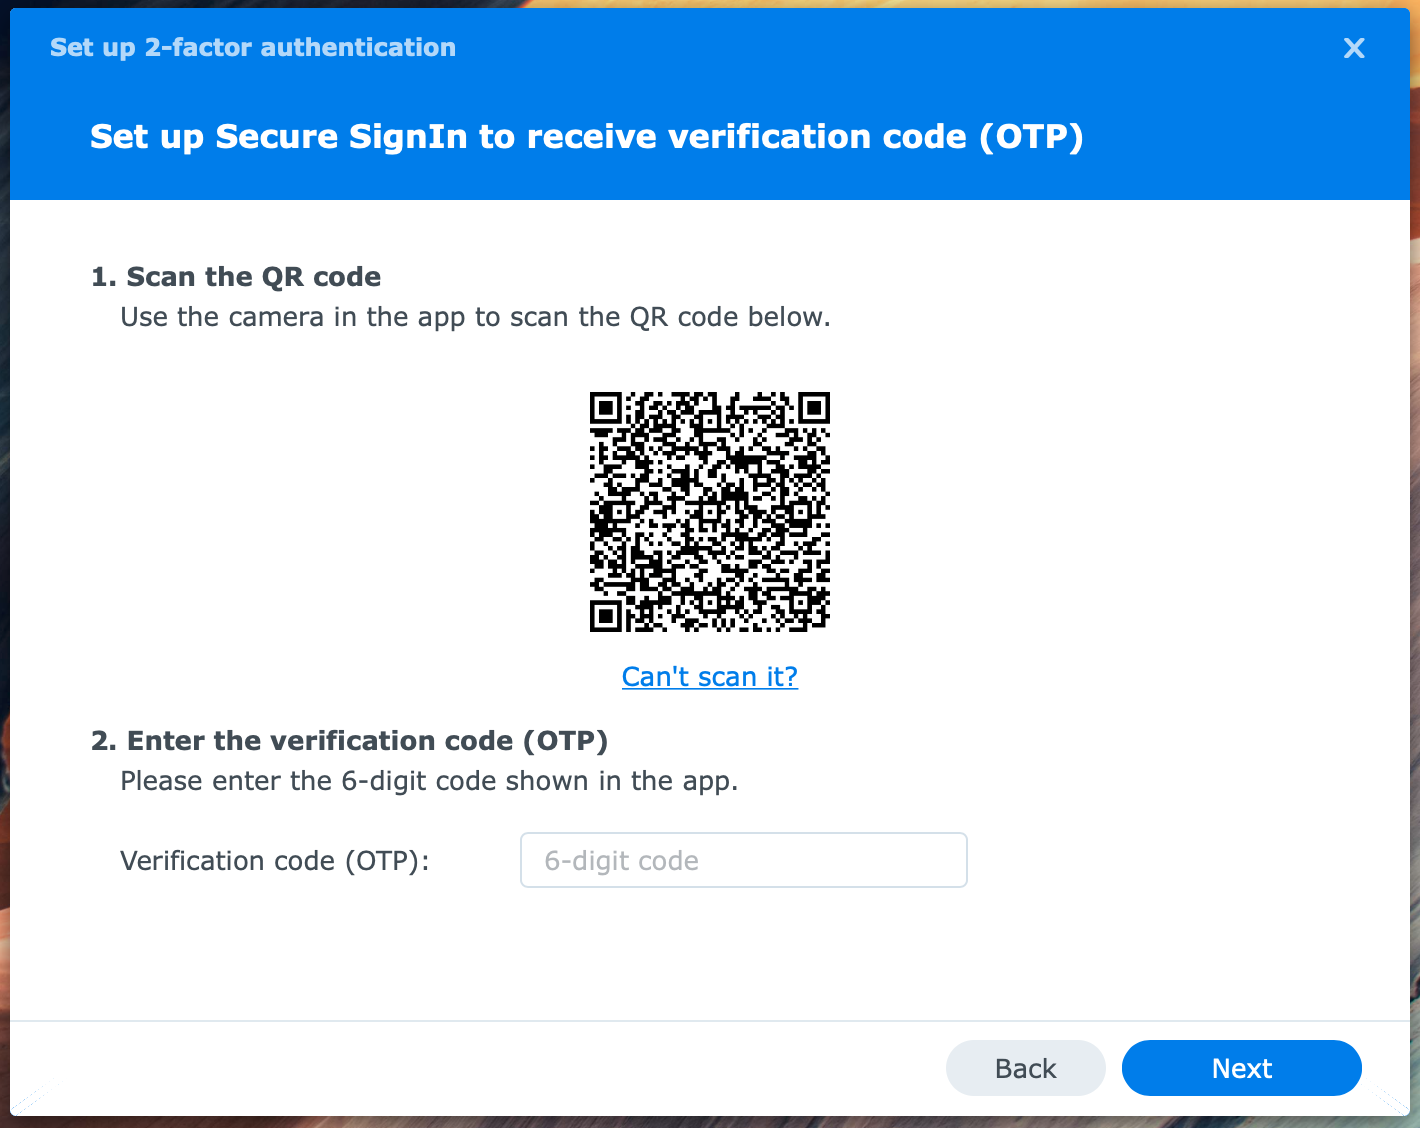
In the Set up Secure SignIn to receive verification code (OTP) screen, you scan the QR code with your TOTP app. The app gives a 6-digit code for this account. Enter the verification code into this screen, and click Next.
In the Backup email settings screen, you can set up your email address in case of an emergency, like a lost phone. Click on the Set Up button to select a service provider or do a custom setup. Also, enter a backup email address to send the email. Click Next.
In the last screen, review your settings and click Done.
Congrats, you achieved the primary and secondary objectives.
Enable 2FA for all users in DSM 7
I will now show you the second method of enabling 2-factor authentication on your NAS with DSM 7.
Log in to the DSM desktop with administrative privileges. Open Control Panel > Security > Account tab > 2-Factor Authentication. Enable Enforce 2-factor authentication for the following users.
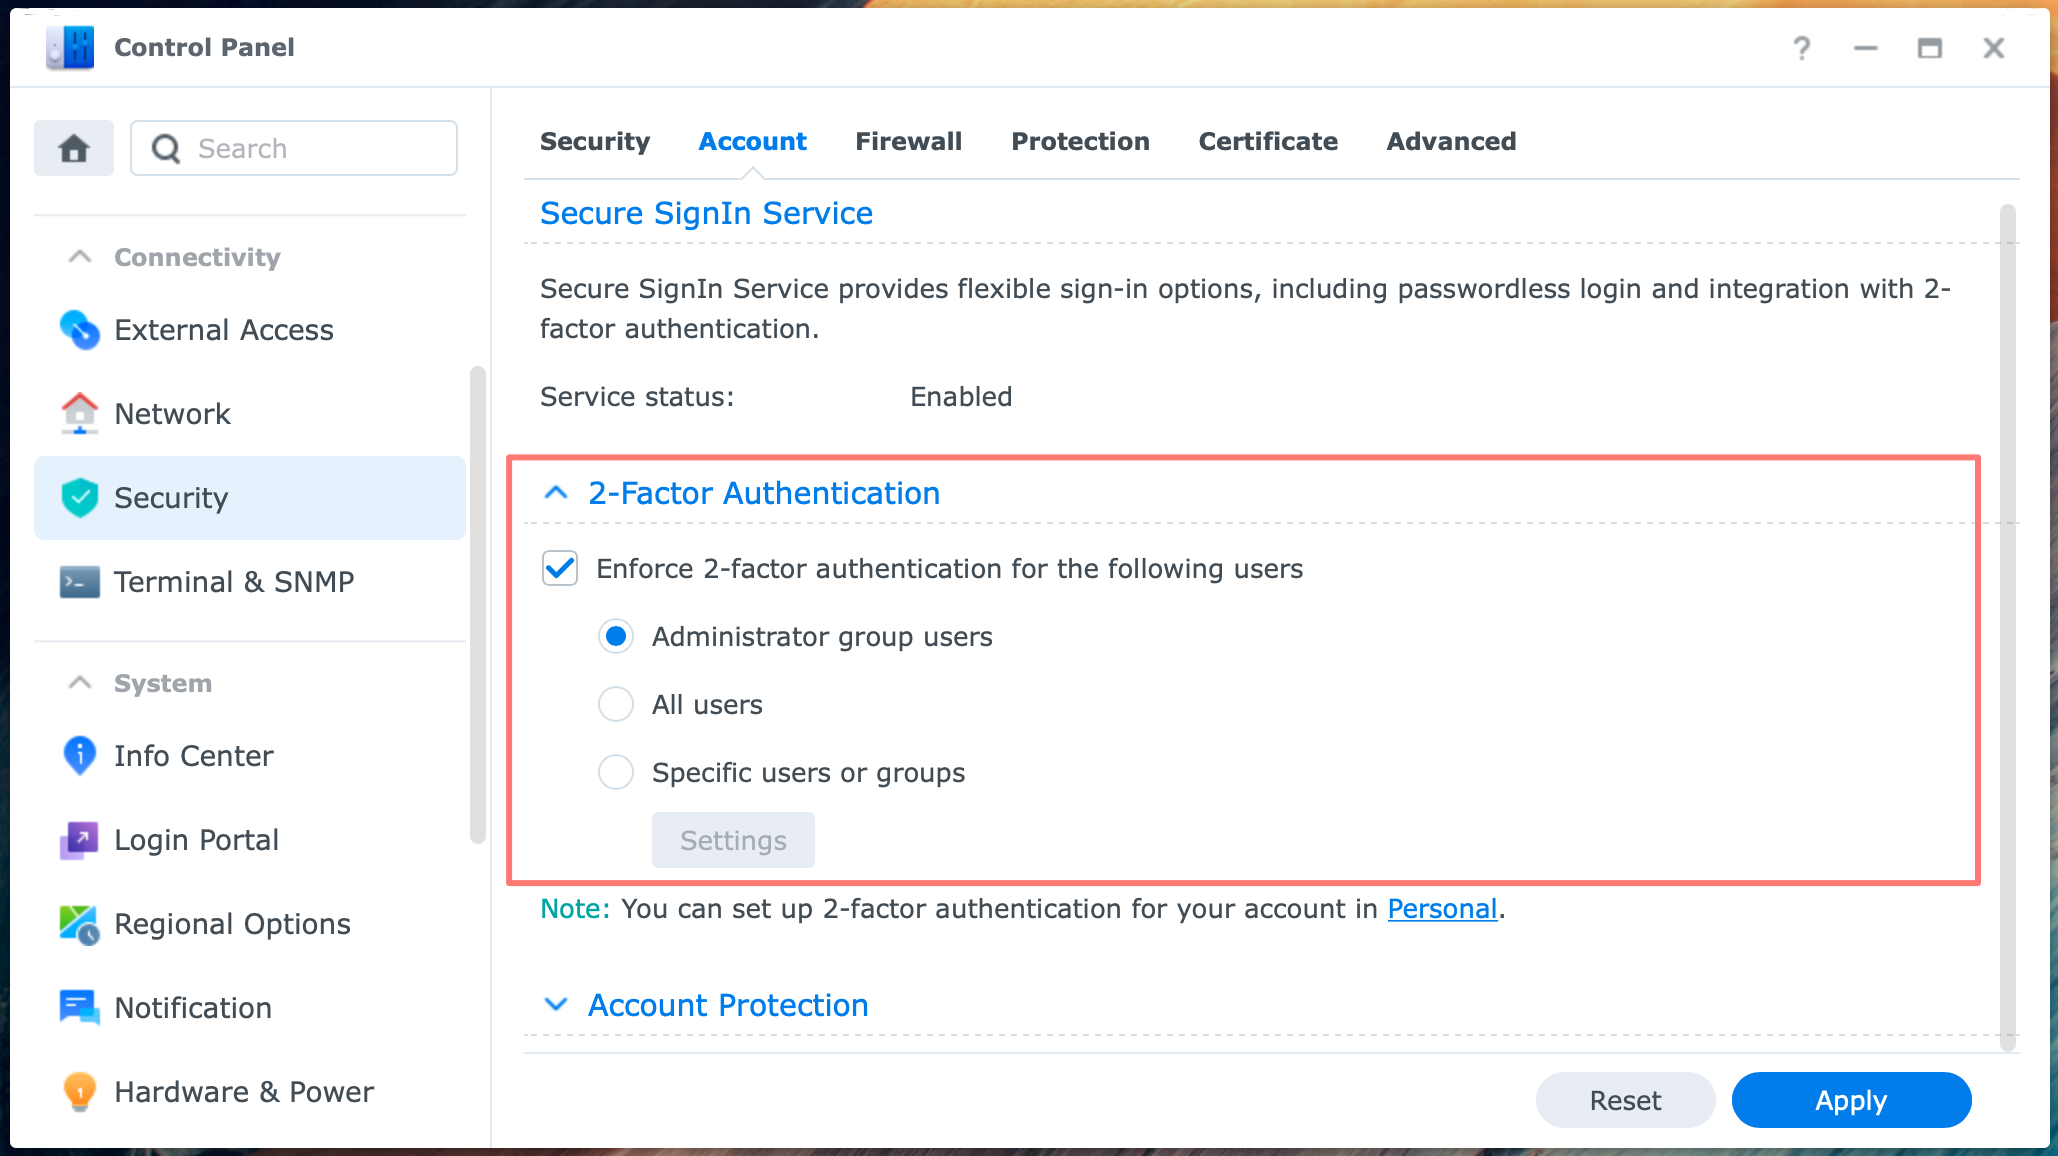
Select one of three options:
- Administrator group users
- All Users
- Specific users or groups
Note that if you choose the option Specific users or groups you should open the Settings button below it and configure the users or groups you like to enable 2FA.
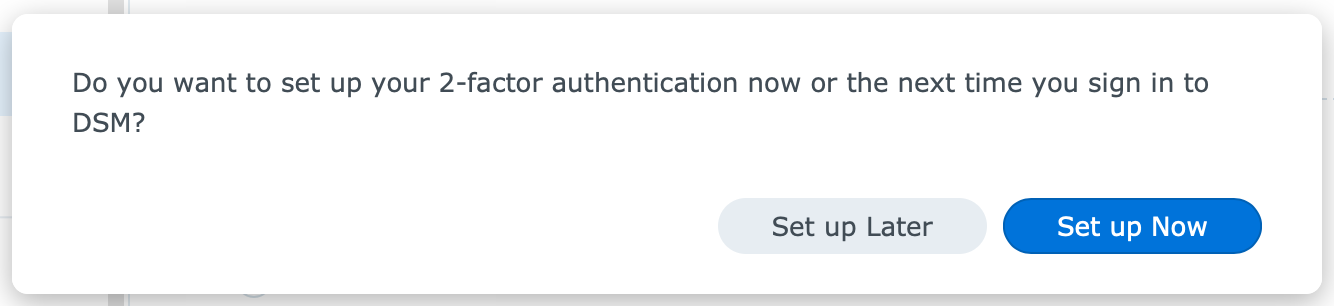
Next, click Apply. A message may appear to allow you to configure your email for notifications. You can postpone this step to the next time you sign in to DSM.
Congrats, you achieved the primary and secondary objectives.
Thanks for reading
This post is donation-ware. If it did help you, please consider leaving a comment or even buying me a coffee. I will be eternally grateful.
Paul Steunebrink / Storage Alchemist